My Lovely Followers

Showing posts with label Woodware. Show all posts

Saturday, 20 June 2026

Patterned Paper IG Hop - June 26

Hello friends, welcome back to my little blog. I'm here today to share my card for this month's Patterned Paper Party Instagram Hop. Do you love patterned paper? Do you have a huge stash that needs using? Well so do we and it's time to get it used! We will be hopping on the 20th of each month to share our ideas. We will definitely be creating cards, but maybe sometimes tags, ATCs, gift bags/boxes, mini albums and scrapbook pages too. We want our patterned paper to be used.
The theme is always 'anything goes' but each month we will have an optional twist that can be used if you like; this month the twist is 'chevrons' which are so fun, especially for masculine cards. I made a Father's Day card for my FIL and it's 5" x 7" in size.  Surprisingly I didn't use chevron patterned paper but instead die cut some chevrons from patterned paper for my background.  I hope you like it.
Here is my card:
A closer look at the image:
Plus I decorated the inside:
I began by stamping the image onto alcohol marker card, coloured it with Promarkers and fussy cut it out.  I did add some white highlights with a gelly roll pen too.  I found this fun paper pad from DCWV and although it's hard to tell in the photo but the orange/bronze stripe has some foiling detail.  All the papers are from the pad including the brown mat layers and the chevrons were cut from it too.  I cut the main panel 4 1/4" x 6 1/4" and matted it onto the brown layer with double sided tape.  I cut a white panel 3 1/2" x 2 7/8" and again matted it onto a brown layer; I also added some thin cream strips of paper to the top and bottom of the white panel with liquid glue.  I added the image onto the white panel with foam squares.  I stamped the sentiment onto the cream paper with brown ink and die cut the DAD letters from the brown paper and stacked them x3 with liquid glue; the letters were then adhered to a cream piece with liquid glue.  I cut 4 x chevrons for my background and adhered them with liquid glue.  The image panel was added to the centre of the panel with double sided tape and the sentiments were added to the top right and bottom left with double sided tape.  For the inside I cut a white panel 4 3/8" x 6 3/8" and stamped the sentiment in the centre with brown ink.  I cut some of the papers and layered them together with double sided tape and also cut another chevron and placed that across the centre with liquid glue.  the panel was then adhered to the card base with double sided tape (oops I forgot my brown layer but it still looks ok I think). 

I would like to enter my card into the following challenges:

* to be updated *

We hope you will be inspired by our Patterned Paper Party IG Hop and will pop over and check out all the gorgeous creations along the way. If you would like to join us please visit my Instagram page or use the hashtag #patternedpaperpartyhopjune2026 and we will find you.

Thanks for stopping by and take care.

Lots of love

card supplies:
LOTV - vintage boys - mr fixit A5 polymer stamps (available in digi only now)
MFT - stepped up chevon die
MFT - little letters die set
Woodware - one for the boys stamp (for inside sentiment although I did some stamp surgery to remove the happy birthday)
DCWV - the natural stack 8" x 8" pad
Promarkers
Heffy Doodle - alcohol marker friendly card (store now closed)
Limetree Craft - 280gsm silky smooth white card (not available but other options are here and here)
*Gina K Designs - dark chocolate ink pad

*I now have an Affiliate Link for the Gina K Designs store. If you are considering making a purchase I would appreciate you using my link as it will earn me a small commission at no extra cost to you. Thank you x

Sunday, 1 February 2026

AAA Birthday challenge - DT card

Good morning lovely friends and welcome to February! As it's the first of the month it means we have a brand new challenge over at AAA Birthday challenge. This month's theme is 'slimline' and our guest designer again this month is Cathy R. so please pop over to her blog and leave her some love.
I don't make slimline cards very often, not really sure why, although they can be a bit tricky to photograph.   I had a fun image in mind when making my card so went with the larger sized slimline (4" x 9") so that it would fit.  You could of course make a mini slimline which is about 3 1/4" x 6 1/4", although they can be anything from 3" x 6" to 3 1/2" x 6 1/2" depending on which brand of dies you use.   I hope you like it.
Here is my card:
A closer look at the fun image:
Plus I decorated the inside:
I began by creating my card base from white card; I cut my piece to 8" x 9" and scored it at 4" on the 8" side.  I used master layouts 10 and die cut a white stitched panel and mat layer panel from dark brown card (although it looks black in my photos).  I used a fun tiger print stencil to create my background but of course I had to move the stencil down to fill the whole panel but as this is quite an open pattern it did leave a noticeable line in the middle which I didn't like.  I tried adding strips of the brown card and twine to try and mask the line but it didn't work for me so I finally decided to die cut the smaller panel from the die set and stencil that with the tiger print.  I also die cut the mat layer for this smaller panel and adhered them together with liquid glue.  I adhered the larger panels with liquid glue and then placed the smaller panel in the middle with liquid glue.  I think it looks more intentional now and not like a mistake.  I stamped the adorable giraffe image, coloured him with Promarkers and fussy cut him out.  I stamped the personalised message onto his 'board' with black ink. I added some scrap white card behind the panel and then adhered this onto the card base with double sided tape.  I added the giraffe with foam squares, added some die cut stars and some gold pearls for a finishing touch.  For the inside I cut another white stitched panel and brown mat layer.  I stencilled the bottom of the white panel with the tiger print stencil, added a strip of the brown card above and a few die cut stars with liquid glue.  I stamped the sentiment in the centre with black ink and then adhered the panel to the card base with double sided tape. 

I would like to enter my card into the following challenges:

613 Avenue Create challenge - ATG optional twist animal magic
Allsorts challenge - create your own background
Crafter's Cafe challenge - one for the boys
Crafty Animals challenge - ATG must include an animal
Critter Crazy challenge - ATG with a featured critter

The Design Team have created amazing cards as always so please pop over to the blog and check them out and perhaps leave them some love on their personal blogs.

I hope you will be able to join in with the challenge this month but don't forget it has to be birthday themed. I can't wait to see your creations in the linky.

Love and hugs,

card supplies:
Promarkers
Uniko - tiger print stencil
*Gina K Designs - master layouts 10 die set
Gina K Designs - honey mustard ink pad
Gina K Designs - grand gentleman stamp
Gina K Designs - gold, black and silver metallic pearl mix 
Gina K Designs - on the inside - birthday stamp
Clearly Besotted Stamps - happy birthday all 
MFT - blueprints 13 (for stars)
Limetree Crafts - 280gsm silky smooth card - not currently available but there are alternatives here and here
Limetree Crafts - dark chocolate 300gsm card
Versafine Clair - nocturne ink pad

*I now have an Affiliate Link for the Gina K Designs store. If you are considering making a purchase I would appreciate you using my link as it will earn me a small commission at no extra cost to you. 
Thank you x

Thursday, 6 June 2024

Krafty Chicks challenge #719 - Stamps

Good morning friends; it's Thursday so that means it's time for a new challenge over at Krafty Chicks challenge.  As it's the start of the month we are back to Week 1 which means our theme this week is 'Stamps', so we would like to see a stamp/digi on your project. 
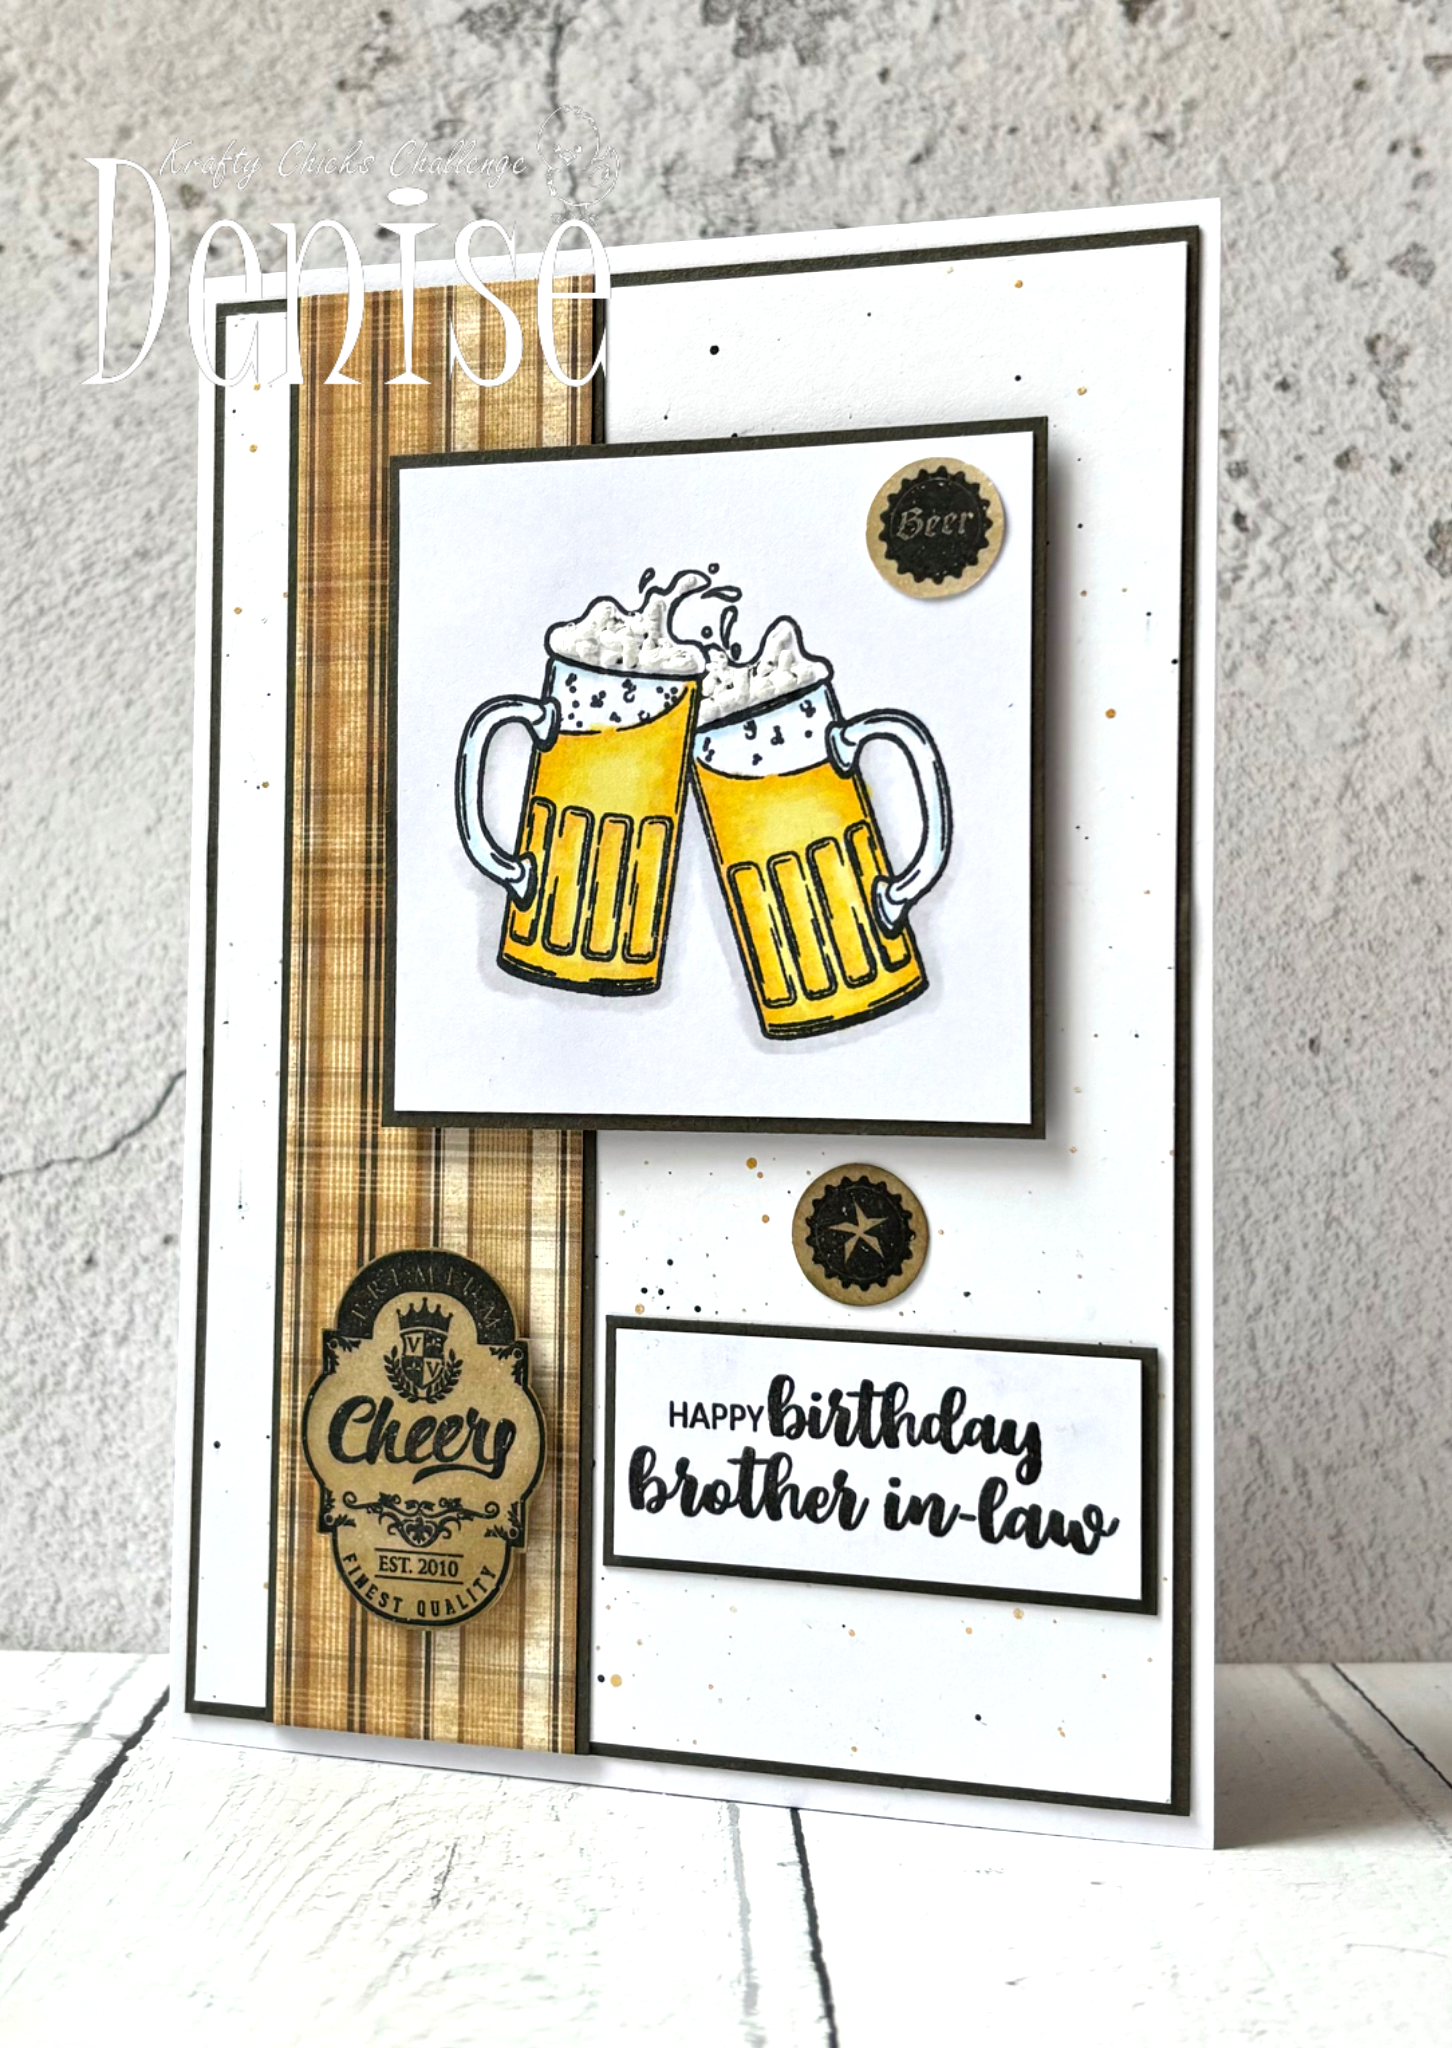
It was my brother-in-law's birthday recently and today I'm sharing the card I made for him.  He took his cards away on holiday with him so didn't fuss too much, although most men prefer this anyway I find.  
Here is my card:
A close up of the image:
I decorated the inside:
I began by stamping the image onto alcohol marker friendly card and coloured it with my Promarkers.  I also added some puffy stuff to make the foam look dimensional.  I cut it into a square and added a brown mat behind.  I had already created the background for a different project but hadn't used it.  It was simply a white panel with some black and gold splatter over it.  I again matted it onto a brown panel and adhered it to my card base with double sided tape.  I wanted to add some interest so took a strip of patterned paper, added a brown mat panel and adhered it to my background along the left side of the card.  I attached the image panel over top with foam squares.  I stamped the sentiment in black ink and cut it into a rectangle before adding a brown mat behind.  The was added to the card with double sided tape.  In the same stamp set as the beer glasses were some label type images and smaller bottle top style stamps.  I stamped them onto white card, inked them with a brown ink pad.  I fussy cut the label and used a small circle punch to cut out the smaller ones.  I added the label with foam squares and the circles with liquid glue.  For the inside I cut a white panel, simply added a strip of the patterned paper to the very bottom and added a strip of brown card above.  I adhered this onto a brown mat panel and stamped the sentiment in the centre with black ink.  I added one of the small punched circles to the bottom right corner.  The whole panel was then adhered to my card base with double sided tape.  The finished card is 5" x 7".  

I would like to enter my card into the following challenges:

Allsorts challenge - lots of layers
Classic Design challenge - ATG optional twist masculine
CRAFT challenge - masculine
Make My Monday challenge - B is for ...... birthday, beer, brother-in-law, brown

I hope you will be able to join us for our 'stamps' challenge and I cannot wait to see your creations in our linky.  Please leave some love for my fellow chicks - Leanne, Diane and Lori and also our guest designer Rachelle, who is with us for another month.  

Thanks for stopping by. 

Love and hugs, 
Card ingredients:
Apple Blossom - time for a beer stamp set - no longer available 
Clearly Besotted - happy birthday all - retired
Clearly Besotted Stamps - mini calligraphy - retired 
Woodware - tiny circle punch
DCWV - the natural stack 8"x8" cardstock pad - no longer available
Gina K Designs - charcoal brown card
Gina K Designs - warm cocoa ink pad
Versafine - onyx black ink pad
Promarkers
Inkylicious - fluffy puffy stuff

Sunday, 5 May 2024

We Love Stamping challenge - guest designer

Good morning lovely friends; I hope you've had a great start to your weekend and of course the added bonus if you live in the UK is an extra day off tomorrow for the Bank Holiday (apologies if you have to work).  The sun was actually warm and shiny here yesterday so fingers crossed it appears today; although we can rarely string two days together at the moment. 

I am delighted and honoured to be a guest designer over at the We Love Stamping challenge this month so I'll be sharing a card today and also another card in two weeks time.  The theme for this month has been chosen by Lynn and is 'Vintage'.   There are some fantastic prizes up for grabs courtesy of Lisa Horton Crafts.  

Now I have to admit that my heart sank when I read the theme as vintage is not really my thing but hey that is what a challenge is all about isn't it.  I used the opportunity to make a birthday card for my Father in Law for this first card and I was really happy with the finished result.  
Here is my card:
A close up of the image:
Of course I decorated the inside:

I began by stamping the car image onto cream card with a brown ink; I cut it out, inked around the edges and also distressed the edges with a edge distressed (which I did to most of my edges).  I stamped the map background in the same way and again inked and distressed the edges.  I used a newspaper style patterned paper for my background and added that to my card base with double sided tape.  The postcards were cut from a piece of patterned paper, inked and distressed along with the circular piece.  The tickets were cut with two different types of dies and again inked with various colours of ink.  I stamped one with a coordinating sentiment.  The letters were die cut from brown card and stacked 3 high for some dimension.  I stamped the happy birthday sentiment with brown ink onto cream card, inked and distressed and cut out with a sentiment strip.  The hardest bit was figuring out placement on the card and I have to say it took me a good while of moving and changing my mind before I came to the final result.  Most things were added with double sided tape except the car image, sentiment and circle embellishment which were added with foam tape and the DAD letters with liquid glue.  For the inside I used the same newspaper patterned paper for my background, I stamped a postcard onto cream card and again inked and distressed it.  I die cut a few more tickets and stamped my sentiment into the centre of a cream rectangle which was inked and distressed.  Everything on the inside was adhered with double sided tape.  I think it is the perfect card for an older gentleman and although I went a bit mad with the inking and distressing I think it turned out ok. 

I would like to enter my card into the following challenges:

Alphabet challenge - C is for cars
Classic Design challenge - ATG optional twist happy birthday
Cut It Up challenge - add a sentiment
The Male Room challenge - trains, planes and automobiles
As I said I will be back with my second card on the 18th May.  I hope you can play along with the challenge and I cannot wait to see all your vintage projects in the linky.  Enjoy the rest of your weekend and thank you so much for stopping by. 

Love and hugs, 

Card ingredients:
Car Stamp - from Amazon (was a set of 4 stamps)
MFT - little letters die (retired)
MFT - mini ticket strip border (retired)
Whimsy Stamps - ticket sentiments & friendship ticket sentiments stamps (retired)
Gina K Designs - flowing florals (for happy birthday)
Woodware Stamps - one for the boys (for inside sentiment)
Versafine Clair - acorn ink pad
Lidl - Crelando 270gsm coloured card (available in store)
Postcard stamp - unknown brand
Heidi Swapp - edge distresser (discontinued)

Wednesday, 24 April 2024

Spring into Card Making IG Hop - Week 7

Hello crafty friends and happy Wednesday.  I hope your week has been good so far; we've had a great start to the week here in South Wales as the weather is decidedly spring like at the moment, which is a nice change.  Let's hope it lasts for a little while.  

I'm here today to share my card for the final week of the Spring Into Card Making IG Hop, which has been organised by my lovely friend Kelly.  Each week we will be sharing a themed card focusing on the joys of spring.  If our hop inspires you please use the hashtag #2024springintocardmakinghop to join in the fun.   
For Week 7 we are celebrating the Earth.  We know not everyone has earth/world stamps so grab something recycled or reuse something not intended for crafting and get creative.  I didn't have any earth stamps so decided to recycle a cereal box and made a decorative hanger for a friend.  I hope you like it.
Here is my hanger on the wall:
A closer look:
The sweet image in more detail:
I haven't decorated the back yet as I wanted to show the cereal box:
plus I made my own 'flowers' from different circles:
I began by stamping the image with memento ink onto alcohol marker friendly card, coloured it with Promarkers and added a few highlights with a white gel pen.  I took the cereal box and cut it out using a square die.  They were nesting dies but the increments between dies was quite large so for the smaller squares, which I cut from lemon lustre pearlescent card, pink card and patterned paper, I used my paper trimmer.  I adhered all of them together with double sided tape.  I punched two holes at the top with my Crop-a-dile (after dusting it off lol!) and used white brads that came with it.  I die cut a polaroid frame from white card and adhered the image behind with liquid glue (I sadly had to cut off their gorgeous long legs).  I stamped the beautiful sentiment in black ink at the bottom of the frame.  I made my 'flowers' by cutting 3 different circle shapes and before glueing them together I distressed them by scrunching them in my hand.  I used a dot of liquid glue to adhere them together.  I used the pearlescent card to cut out the hello word, the wings of the butterfly and used some of the cereal box to cut the body.  I attached the body to the wings with liquid glue.  The friend word was a pre-printed sentiment strip which I coloured with pink ink and cut with a sentiment strip die (although I did have to trim the sides a little smaller with my trimmer).  The polaroid frame was added with double sided tape, the hello and butterfly with liquid glue and the flowers and friend sentiment with foam squares.  I found some velvet type ribbon in my long forgotten ribbon jar which was the perfect pink colour so added that through the holes so that my hanger would um you know ...... hang!  I'm really happy with the finished result and it was just like making a card so not a big deal.  

I would like to enter my hanger into the following challenges:

As You Like It challenge - clean or fussy (I like both but today I was drawn to layers)
Classic Design challenge - ATG optional twist happy birthday
Cut It Up challenge - starts with B (besties, butterfly)
Dream Valley challenge - make it female
I Love Promarkers challenge - ATG option shapes
Inkspirational challenge - mood board (love the colours)
Inspired By challenge - rainbow pops (again love the colours)
My Time To Craft challenge - everything dies (die cuts)
Sweet Stampin' challenge - earth day or use something recycled (I used a cereal box)
Triple B challenge - use at least one bird, butterfly or bloom
Try It On Tuesday challenge - inspired by a song ('you got a friend in me' by Randy Newman)

I would love it if you would pop over to Instagram and see the amazing work by all the other crafters taking part in the hop.  Please use the hashtag #2024springintocardmakinghop to find us and also so that we can find your creation if you are inspired to take part.  

I'll be back again with you tomorrow with my card for the Krafty Chicks challenge so please pop by and check it out.  I wanted to say a quick hello to my new followers; it's lovely to have you join me and I hope you visit me often.  As always I appreciate the comments you leave and thank you so much for stopping by. 

Love and hugs, 

Card ingredients:
Stamping Bella - curvy girl - besties stamp
Tonic Studios - square layering die set
MFT - LLD insert it instaframe die (retired)
Memory Box - Pippi butterfly die (? retired)
Gina K Designs - modern floral bundle (for the tiny sentiment die)
Gina K Designs - dusty rose ink pad (to colour the friend sentiment strip)
Tonic Studios - autumn maple 6 x 6 pearlescent card pack (discontinued)
Crafty Things - 6 x 6 creative paper pack (from Home Bargains)
Promarkers
Versafine - onyx black ink
Memento - tuxedo black ink 
Woodware - small circle punch
MFT - gerbera daisy die set (for the tiny circle) (retired)
Recycled bran flakes cereal box (other cereals are avaiable!)

Wednesday, 12 July 2023

Shark week IG hop

Happy Wednesday friends.  I've got 2 posts planned for your today - the first one is for a card hop I'm participating in on Instagram to celebrate Shark Week.  The card hop is hosted by my good friend Kelly and today's hop will showcase some fintastic cards featuring all things shark to celebrate Shark Week. Thank you to Whimsy Stamps and Hero Arts for supporting our hop and for your fabulous prize giveaways for 2 lucky winners.  Check out all the details over on my IG account. 

Here is my card:


and a close up of my shark:


I began by stamping the shark and colouring him with Promarkers.  I fussy cut him out and added glaze to his eyes.  The background is a sheet of patterned paper but I added extra details from the stamp set.  The sea bed was stamped along with the sea grass and I coloured the lower part of the paper with a light brown Promarker to mimic the sand.  I also stamped some fish in the background for some added interest.  The sentiment was stamped onto navy card, white heat embossed and die cut with a banner die.  The paper was added onto a navy card panel and this was adhered to my card blank with double sided tape.  The shark and sentiment were added with foam tape.  For a final finishing touch I added a couple of clear rain drop embellishments to resemble bubbles.  

I would like to enter my card into the following challenges:

Crafty Catz challenge - ATG option sparkle/shine
Critter Crazy challenge - ATG feature a critter (again delete if sharks not allowed)

Before I go I thought I would share one interesting fact about sharks.  Long before dinosaurs roamed the Earth, sharks were swimming in our oceans. In fact, they’ve been around for over 400 million years. They don’t have bones (their skeletons are made of cartilage), though, so there are no fossils to be found.

Please swim on over to IG and give our sponsors some love then swim on back to see the amazing shark creations in the hop.  Don't forget there are 2 prizes up for grabs so comment on the hop for a chance to win.  

Thanks for stopping by.  I'll be back later with my card for Week 5 of the Summer Crush Wednesdays IG hop.  

Love and hugs, 


Card ingredients:

Woodware Stamps - Jaws stamp set
12 x 12 paper pad - fresh feelings from The Works
Promarkers
Little Things from Lucy's Cards - clear raindrops
MFT - blueprints 27 (for the sentiment banner die)

Tuesday, 7 June 2011

Passion for promarkers #103–DT card

** THIS IS MY 3RD POST FOR TODAY **

Please scroll down to see my earlier posts!

Good morning dear friends.  It’s Tuesday morning so that means a brand new challenge over at passion for promarkers challenge.  This week the lovely Anja has set the theme and she has chosen a colour challenge with a difference.  She wants us to use either ‘pink/brown’ or ‘blue/brown’.  I think I know what the majority of our entrants will go for and I am also a girlie girl and went for the pink option.  Don’t forget you must use your promarkers or aqua markers to be eligible for the prize draw.  Here is my card:

PFP challenge 103 - pink & brown or blue & brown

PFP challenge 103 - pink & brown or blue & brown (close up)

I have used a super cute digi by Heather Ellis from the pure innocence range – I have quite a few of these images but always seem to forget to use them!!  The papers, cardstock and rhinestones are all stampin’ up! available from Julie Kettlewell aka Julie’s Japes. 

Our sponsor this week is Joanna Sheen and the lucky winner will receive a £10.00 voucher to spend in her online store.

joanna sheen

The rest of the design team have created gorgeous samples as usual, so please pop over to the challenge blog and check them out.  We really appreciate all the lovely comments you leave for us. 

I would like to enter my card into the following challenges:

The crafty pad challenge – stripes

Stampin’ sisters in Christ challenge – use something new (my image and pink cardstock)

Craft your passion challenge – anything goes

Ooh la la creations challenge – happy birthday

Creative belli challenge – tool shed (I used an old woodware window punch)

Shelly’s images challenge – seeing spots

Stamp something challenge – June digi day & GDT call

Catch the bug challenge – anything goes

By the cute and girly challenge – in the garden

The beary sweet challenge – sketch

I hope you will be able to join in with our challenge this week and I look forward to seeing all your wonderful cards.  Have a fantastic day and thanks for stopping by today.

My signature

PFP challenge 103 - pink & brown or blue & brown

Card ingredients:

Image: Heather Ellis from pure innocence range

Papers: SU paper patterns pack – in colour, pink pirouette cardstock, soft suede cardstock

Tools: promarkers, ek success medium and small retro flower punches, woodware window punch, SU basic rhinestones, personal impressions sentiment

Monday, 14 March 2011

Stamp with fun #102–DT card

Good morning everyone – I hope everyone had a good weekend.  Thank you for all the lovely get well wishes you left for me yesterday, they were really appreciated! 

I’m back this morning with my DT card for this week’s stamp with fun challenge and we have a wonderful sketch by Andrea-Emmi41 to use.  Here is the sketch:

swf #102 sketch

and here is my card:

SWF #102 - sketch

SWF #102 - sketch (close up)

I made this card for my boss who is retiring at the end of the week but we’re all going out for a meal tonight and we will be giving her card and present to her then.  The card is 8x8 in size as the whole team in work will be signing the inside and we needed lots of room!  As soon as I saw this image, which is from Karen’s Doodles, I knew it would be perfect as I know that is how happy I’m going to be when I retire lol! 

This week we are sponsored by Bunny Zoe’s Crafts and the lucky winner will receive this adorable stamp.

image  

image

The rest of the DT have created amazing samples once again this week, so please pop over to the challenge blog and check them out.  We really appreciate all the lovely comments you leave for us. 

I would also like to enter my card into the following challenges:

Aly’s Sunday challenge – anything goes

Anything goes challenge – die cuts (I used my new go-kreate die to cut the image)

Bee crafty’s challenge – spots and dots

Freshly brewed challenge – 3 or more patterned papers

Do you stack up? challenge – layers (2nd entry)

Simon says stamp challenge – anything goes

Southern girls challenge – use flowers

Alphabet challenge – s is for stripes

Little Claire’s challenge – flowers

Crafty calendar challenge – spring

Paperminutes challenge – women’s day

Fab ‘n’ funky challenge – make it girly

Crafty Ann’s challenge – sketch and/or spring (I think my papers/colours are very spring like)

Bee crafty challenge – spring florals (my papers)

By the cute and girly challenge – springtime

So that’s all from me for now but I’ll be back later with my DT card for the cupcake craft challenge.  Thanks for stopping by.

My signature

SWF #102 - sketch

Card Ingredients:

Image: Karen’s Doodles – ‘happy feet woman’

Papers: making memories – ‘Emma’ paper pack, plain card from the papermill shop

Tools: promarkers, ek success retro flower punch, woodware circle punch, go-kreate XXL square frames – frilly #2