My Lovely Followers

Thursday, 29 May 2025

Krafty Chicks Challenge #770 - Anything Goes

Good morning lovely friends. I hope you're all doing ok and having a great week so far. It's time for a new challenge over at Krafty Chicks challenge and this week as it's a 5 week month our theme is 'anything goes' and I am your hostess.   Feel free to create anything you like, the world is your oyster lol! We hope you will come over and join in the fun with us.
I needed a sympathy card unfortunately so this week's challenge was just the ticket for me.  I found a lovely smooshed background that I made a little while ago so decided to use this for my card.  I hope you like it.
Here is my card:
A closer look at the florals:
Plus I decorated the inside:
The ink smooshed panel may look familiar as I made a card in February and decided to make two panels at the same time (you can see my original card here if you like).  I thought I would use the panel differently this time and stamped my floral image directly onto it and die cut it out so that all the colour was the focus and then I kept the card background simple.  I cut a white panel 4" x 5 1/4" and used a lattice embossing folder to create a subtle background.  I added the panel with foam tape and also adhered the floral die cut with foam squares.  I stamped my sentiment in black ink and die cut it with the matching die; this was adhered with liquid glue.  I finished off with a few black pearls.  For the inside I had tiny pieces of the smooshed panel left so cut them into triangles and added them into the corners of a white panel cut to 4" x 5 1/4".  I stamped a sentiment in the centre with black ink and then adhered the panel to my card base with double sided tape.  I'm really happy with how this turned out and I think the pop of colour against the white background really works.  

I would like to enter my card into the following challenges:

Allsorts challenge - ATG (happy 16th birthday Allsorts)
As You Like It challenge - embossing wet or dry (I love the look of heat embossing but never seem to get it perfect so I prefer using embossing folders; you can get so many awesome designs these days too)
Beautiful Blossoms challenge - anything floral goes optional mood board
Can You Handle The Pressure challenge - anything embossing goes optional zoo/jungle animals
Cardz 4 Galz challenge - floral frenzy
Fab 'n' Funky challenge - add a sentiment
Simply Create Too challenge - anything for a woman

I hope you will be able to join us for our 'anything goes' challenge and I cannot wait to see your creations in our linky. Please leave some love for my fellow chicks - Leanne, Diane and Lori.

Thank you so much for stopping by; I appreciate your lovely comments.

Love and hugs,

card supplies:
Gina K Designs - delicate dahlias stamp & die bundle (for sentiments)
Gina K Designs - lattice embossing folder
Gina K Designs - pearl mix - black, gold & silver metallic
Limetree Crafts - 250gsm silky smooth white card - not currently available - they do have 300gsm bright white card available here
Versafine - onyx black ink pad
ink smooshed background created previously using GKD ink pads - passionate pink & dark lilac

Wednesday, 28 May 2025

Cards for all seasons IG Hop - Week 11

Hello friends; I hope you're having a great week so far. I'm back today to share my card for this week's Cards for All Seasons IG hop organised by my lovely friend Kelly. We are now on Week 11 and our theme is 'garden party'.  So think anything in the garden i.e. flowers, bees, watering can etc.  A really fun theme for you this week and I can't wait to see what sparks your imagination.
I had so many ideas running through my head for this challenge but finally settled on creating my own flower arch .  It was a lot of die cutting but I think it turned out really sweet.  I hope you like it too. 
Here is my card:
A closer look at the flower arch:
Plus I decorated the inside:
I began by cutting my white panel 4" x 5 1/4" and firstly masked a strip at the bottom and ink blended over some green ink.  At the top I used a cloud stencil to create a soft sky which fades into white at the top.  I die cut the picket fence from white card and added that over the join of the grass and sky with liquid glue.  At this point I decided to cut down my panel ever so slightly and it ended up being 3 3/4" x 5".  I used 2 arch dies from a nesting set to cut out a thin arch from white card and also die cut lots of flowers and leaves using coloured card from my scraps bin.  I added the flowers and leaves onto the arch with liquid glue.  I then adhered the arch on top of the picket fence with foam squares, which I cut into tiny strips.  I decided to add a few more flowers and leaves on each side of the arch and added most with liquid glue but raised the top one on foam squares.  I die cut a butterfly twice from vellum and adhered them together just down the body with liquid glue.  This was then adhered to the top right corner with liquid glue.  I stamped a sentiment at the bottom of the panel with black ink and as a finishing touch adding some sparkling gems to the flower centres and the body of the butterfly.  I used some scrap white card behind my panel for stability and dimension and added it onto my card base with double sided tape.  It is so sparkly in real life but hard to capture on my photos.  For the inside I cut another panel 3 3/4" x 5" and again ink blended the green ink and add a sky with the cloud stencil using blue ink.  I had a small part of the picket fence left over so adhered that to the left side of the join with liquid glue and also die cut some extra leaves and flowers and added them on top with liquid glue.  I stamped a sentiment at the bottom of the panel for a change in black ink.  The panel was adhered to the card base with double sided tape.  

I would like to enter my card into the following challenges:

Allsorts challenge - ATG (it's their 16th birthday celebration challenge)
Beautiful Blossoms challenge - anything floral goes optional mood board
Crafty Gals Corner challenge - fancy..... flower arch
Make My Monday challenge - garden/gardening
Simply Create Too challenge - anything for a woman
Stencil Fun challenge - must use a stencil optional bouquets

I hope you will pop over to Instagram and check out the hop; please use the hashtag #cfascardhop2025 to see all the gorgeous creations and also if you want to participate we will be able to find you.

I'll be back in the morning with my card for the Krafty Chicks challenge so I hope you will pop back and check it out. Until then thank you so much for stopping by.

Love and hugs,

card supplies:
Gina K Designs - picket fence die
Gina K Designs - ink pads - ocean mist & jelly bean green
MFT - mini cloud edges stencil - retired
Mama Elephant - B2B arches die set
Clearly Besotted - happy everything stamp (for butterfly) - retired
Clearly Besotted - flower friends sentiments (for outside sentiment) - retired
Clearly Besotted - feeling sentimental stamp (for inside sentiment) - retired
Stampin' Up - cardstock vellum - retired
Limetree Crafts - 250gsm silky smooth white card - not currently available - they do have 300gsm bright white card available here
Versafine - onyx black ink pad
Crystal gems from Little Things From Lucy's Cards - sadly now closed
coloured card from scraps bin

Friday, 23 May 2025

Gina K Appreciation IG Hop

Hello friends; I hope you've had a great week and are now looking forward to a long Bank Holiday weekend (here in the UK at least), although the weather is supposed to be awful which is a shame after all the glorious sunshine we've had for the last few weeks.  

I'm delighted to be here to share a card I made as part of a Gina K Appreciation Hop over on Instagram.  As you know I love Gina K Designs products and use them (especially her ink pads) on practically every card I make so it was a no-brainer to join the hop once again this year (I can't find a blog post for last year's card so I must not have had time to do it but if you want you can check out my card over on Instagram).  


Gina is one of the OG creators and YouTubers.  She has thousands of hours of video tutorials and is endlessly creative.  We wanted to take a day to highlight @ginakdesigns and her amazing products and send her lots of crafty love.  On the odd chance that you haven’t heard of her yet, we hope you will be inspired to check her and her fabulous team out on all the social media spots!


I have been so inspired by Gina’s Master Layouts Series on YouTube and for my card today I went right back to the beginning and used one of her layouts from the ML 1 video.  I hope you like it.

Here is my card:

A closer look at the florals:
Plus I decorated the inside:
I began by stamping my floral arrangements in a light brown ink and using the coordinating colouring stencils and Gina's ink pads to colour them in.  I had left the stamp in the Misti so replaced my paper and re-stamped them in black ink to make the colours pop (this is always the scary part in case you mess up the stamping lol!).  I used the matching dies to cut out the flowers and also cut an extra layer each from white card.  I stamped my sentiments in black ink and again used the matching dies to cut them out, along with 3 extra layers from white card.  I used a stitched rectangle die from ML 14 to cut out my white panels and the plain rectangle from ML 1 for the black layer.  Before adhering them together I lightly stencilled the white panel with a butterfly stencil and a light grey ink. I then adhered the layers with double sided tape.  I also used the other dies from ML 1 for my other panels, again adhering them together with double sided tape.  I used liquid glue to add all the white die cuts behind the flowers and also the sentiments.  Now that all my elements were ready I began to assemble my card.  I adhered the border panel across the centre of the main panel with double sided tape and added the fancy oval over top with foam squares.  I added the flowers with a mix of liquid glue and foam squares and the stacked sentiments were added with liquid glue.  As I had so much dimension on the card front I decided to add my panel to the card base with double sided tape.  Finally I finished off with a few black pearls.  For the inside I cut another two panels the same as the front.  Before adhering them together I stamped the flower arrangement in the bottom right corner with the light brown ink, coloured them with the coordinating stencils and then re-stamped them with black ink.  I then adhered the layers with double sided tape.  I stamped a small sentiment in the centre of the panel with black ink and added the panel to the card base with double sided tape.  

I would like to enter my card into the following challenges:

Allsorts challenge - paper piecing or ATG
Beautiful Blossoms challenge - anything floral goes optional mood board
Cut It Up challenge - send me flowers
Do-All Creative challenge - ATG optional flowers
Fab 'n' Funky challenge - add a sentiment 
If You Give A Crafter A Cookie challenge - pretty flowers optional inspiration photo
Just Us Girls challenge - stencil week (background stencil and colouring stencils)
Make My Monday challenge - garden/gardening 
Simply Create Too challenge - anything for a woman
Stencil Fun challenge - must use a stencil optional bouquets
Triple B challenge - birds, blooms or butterflies optional mood board

I hope you will pop over to Instagram and check out the hop; please use the hashtag #ginakappreciationhop to see all the gorgeous creations and also if you want to participate we will be able to find you.

Enjoy your weekend; I appreciate you stopping by and leaving me such lovely comments.   


Love and hugs


card supplies:
Gina K Designs products:

other products used:
Limetree Crafts - 250gsm silky smooth white card - not currently available - they do have 300gsm bright white card available here
Limetree Crafts - 220gsm black card
Versafine - onyx black ink pad

Thursday, 22 May 2025

Krafty Chicks challenge #769 - Masculine

Good morning lovely friends. I hope you're all doing ok and having a great week so far. It's time for a new challenge over at Krafty Chicks challenge and this week we are on Week 4; as always the theme is 'masculine' and Lori is our hostess. I know masculine makes are our least favourite things to make but it's always handy to have some ready in your stash. We hope you will come over and join in the fun with us.
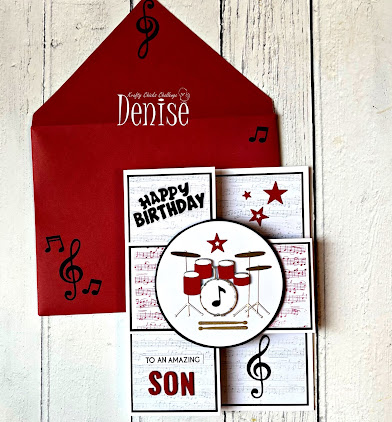
I've had so many masculine cards to make recently that these challenges have been a godsend to me.  It was my son's birthday last week and I made a double Z fold card as he likes the fun fold shaped cards that I make.  He is a drummer and has been since he was in school (he was even in a band with his school friend at one time) so I always try to find a new drumming image or die cut to use on his cards.  I hope you like it.  There are a few extra photos this time as it was hard to show off all the card.
Here is my card:
A closer look at the drum kit:
There is no inside as such so the message panel is on the back:
A side view of the card:
And this is the card open flat:
I also made and decorated my own envelope:
As it was a special card for my son I made a 6" x 8" size card.  I used a 12" x 12" piece of white card and trimmed it to 12" x 11" and scored it at 3" and 6" along the 12" side.  I cut a 3" piece from the 11" size so it ended up being 12" x 8" and I could use the 3" panel for the double Z part of the card.  I folded the score lines and then the card laid flat at 6" x 8".  I cut 2 white panels to 5 3/4" x 7 3/4" and stamped a music background all over in a light grey ink.  I used the one panel as a whole and cut the other panel in half for the front two flaps of the card.  I also cut black mat layers for all the panels and adhered them together with double sided tape.  I added them to the card base with double sided tape.  For the 3" piece I cut two white panels 5 3/4" x 2 3/4" and again stamped using the music stamp this time using red ink for some contrast.  I cut the one panel in half and used the other as it was, again matting them with a black layer.  To make it a double z fold you need to flip the 3" piece so that the folds are on the opposite side i.e. the full piece is in the front and the folded piece is at the back.  Once I had done this I adhered the panels to the 3" strip with double sided tape.  You can place the 3" strip anywhere along your card; it can go at the very top, very bottom or in the middle, as I chose.  It suited my layout better for it to be in the middle but it looks cool is all orientations.  I then began the task of die cutting all my elements.  The drumkit comes as one whole die so I had to cut it multiple times from silver, gold, black, white and red to get all the coloured bits I needed.  I used the silver as my base layer and added all the other colours on top with liquid glue.  I also cut the drumsticks from kraft card.  I die cuts lots of stars and musical notes, a record (which looks more like a bullseye now I'm looking at it lol!), letters for the word son x 4 and a happy birthday word (and vellum shadow).  I adhered all the die cuts with liquid glue.  I also stamped a sub-sentiment onto white card with black ink and some additional sentiments on the inside panels of the card base.  I cut the sub-sentiment with a sentiment strip die and adhered that with liquid glue.  To make my drumkit stand out I die cut a white circle and black circle mat layer and adhered them together with double sided tape.  The drumkit was added with foam squares and the drumsticks with liquid glue.   The circle was adhered to the 3" strip with foam squares.  For the message panel on the back of the card I cut a white panel 5 3/4' x 7 3/4" and added a black mat layer with double sided tape.  I stamped the music background once again onto white card 5 3/4" x 1 1/2" using a light grey ink and adhered this with double sided tape.  To make it look more finished I added a thin strip of black card above the panel with liquid glue.  I stamped my sentiments in the centre of the panel with black ink and added a few more die cuts that were leftover from my epic die cutting fest!  The panel was adhered to the card base with double sided tape.  As my card was a custom size I had to make my own envelope using my envelope punch board and again added some die cuts to match.  Thankfully my son is my greatest cheerleader and always gives me input into my cards so he was really impressed with the work that I put into it and he loved it.  

I would like to enter my card into the following challenges:

Classic Design challenge - ATG optional twist masculine
Creative Creases challenge - ATG with a fun fold
Fab 'n' Funky challenge - add a sentiment 
Heart's Quest for Shaped Cards & Tags challenge - ATG on a shaped card and/or tag (hope my double z fold card is acceptable as a shaped card, if not please delete)
Pearly Sparkles challenge - black, white plus one colour (mine is red)

I hope you will be able to join us for our 'masculine' challenge and I cannot wait to see your creations in our linky. Please leave some love for my fellow chicks - LeanneDiane and Lori

Thank you so much for stopping by; I appreciate your lovely comments. 

Love and hugs,
card supplies:
Made to Surprise - make some noise die set - from Craft Stash but sadly they are closing and it is no longer available
Gina K Designs - grand gentlemen stamp (for sub-sentiment)
Gina K Designs - let's get started die set, free with intri-cut machine (for happy birthday die)
Honey Bee Stamps - inside: birthday sentiments stamp (for inside sentiments)
Little B - circle dies - ? retired
MFT - little letters dies - retired
MFT - keep on rockin' stamp (for other sentiments) - currently oos
Versafine - onyx black ink pad
Hobbycraft - A4 black card
coloured card from my scraps bin

Wednesday, 21 May 2025

3rd Annual Sunshine IG Hop

Hello friends; I hope you're having a great day.  We're at the middle of the week so it's plain sailing to the Bank Holiday weekend now (if you're in the UK at least).  I'm taking part in the 3rd annual Sunshine IG Hop hosted by lovely friend Kelly in honour of Skin Cancer Awareness Month. This hop was inspired by Kelly’s personal journey to raise awareness and remind everyone to prioritise skin checks.  Join us as we celebrate with sunshine-themed projects, helpful tips, and important reminders about skin health.  
As you can see from the graphic we have a giveaway of 3 amazing prizes! - a $40 Gift Certificate from @prettypinkposh, a $25 Gift Certificate from @createwithkas and a $25 Gift Certificate from @touchofmagik.  To enter you must follow @prettypinkposh @createwithkas @touchofmagik and all the hop participants.  Like the post and comment on each stop.  Rules - giveaway is open worldwide (18+), no giveaway or private accounts and ends May 28, 2025.  Winners announced via @createwithkas & @touchofmagik stories; not affiliated with Instagram. Let’s spread sunshine and awareness—don’t forget to schedule your annual skin check!

For my card I created a fun beach scene using scraps of card and some cute dies.  Hopefully it's bright enough for you lol!  
Here is my card:
A closer look at my die cuts:
I also decorated the inside:
I began by die cutting all my elements - I cut 5 white chairs and 2 umbrella bases from white card, the umbrella pole from silver mirri card and the umbrella details from yellow card.  For each chair I used 2 layers adhered with liquid glue and the same for the umbrella base.  For the umbrella details I just adhered the one layer on top of the base, again with liquid glue.  I stamped the sun with yellow ink and used the coordinating die to cut it out.  I stamped my sentiments in black ink and again used the coordinating dies to cut them out.  Once I had all my elements ready I moved onto my background.  After lots of indecision I decided to create a background from torn strips of cardstock, I think it adds texture and dimension without too much bulk.  I cut a white panel larger than what I needed and added the strips of card over top with double sided tape.   I then used a stitched rectangle die to cut it out (I perhaps should have used printer paper because it did take some fiddling to get it to cut all the way through but it did eventually).  I adhered the chairs with liquid glue to the bottom of my panel and the umbrella was added with a mix of foam squares and liquid glue.  The sentiments were adhered with foam squares and the sun was adhered to corner with liquid glue (I completely forgot to run it through with the stitched rectangle so there are no stitches on this but I think it looks ok).  I added some scrap white panels behind to add dimension and stability and then used double sided tape to adhere the panel to my card base.  For the inside I cut another white panel and again added some torn coloured card strips to the bottom with double sided tape.  I then cut this with the stitched rectangle die.  I stamped the sentiment in the upper centre with black ink and adhered one of the chairs in the lower right corner with liquid glue.  The panel was added to my card base with double sided tape.  I thought this card would make a great retirement or bon voyage card.  

I would like to enter my card into the following challenges:

Creative Inspirations challenge - the great outdoors (the beach is outdoors lol!)
Creative Knockouts challenge - real or faux stitching (I used a stitched rectangle die)
Fab 'n' Funky challenge - add a sentiment
Inkspirational challenge - hot (my beach scene looks like a tropical paradise!)

I thought I would add a fact about skin cancer/melanoma, which you may find interesting. I have another fact for you on my Instagram post too.

There is no such thing as a healthy tan; sun beds increase your risk of melanoma by up to 20%. Melanoma skin cancer can develop in areas that have been damaged by UV rays, which is what sun beds emit to give you a tan. They’re often marketed as a safe way of getting a tan, but they’re not – in fact, using sun beds regularly can damage your skin more quickly than the sun, leaving it wrinkled and leathery.  (source Cancer Research UK).

Please pop over to my Instagram post to join the hop or use hashtag #SCASunshineHop2025 to find us.  Don't forget we have amazing prizes up for grabs so get hopping!.  

I hope you have a wonderful day. Thank you for stopping by and leaving me such lovely comments; I really appreciate them all. 

I'll be back tomorrow with my card for the Krafty Chicks challenge so I hope you can pop back and check it out. 

Love and hugs,

card supplies:
Gina K Designs - at the beach die set
Gina K Designs - ocean silhouettes stamp set (for inside greeting)
Gina K Designs - pocket full of sunshine stamp & die bundle (for sun and outside greetings)
Gina K Designs - Master Layouts 2 (for stitched rectangle die)
Gina K Designs - wild dandelion ink pad (for sun)
Limetree Crafts - 250gsm silky smooth white card - not currently available - they do have 300gsm bright white card available here
Versafine - onyx black ink pad
coloured card all from my scraps bin

Monday, 19 May 2025

Rainbow bridge card

Hello again friends.  I hope you've had a great start to the week and the sun is still shining wherever you are.  Today I'm sharing a card I made for my SIL and her family who sadly recently had to say goodbye to their fur baby Charlie.  She had such a wonderful life with them and they are understandably heartbroken.  I hope my card will give them some little comfort.  
Here is my card:
A closer look at the details:
Plus I decorated the inside:
I truly believe in the Rainbow Bridge and wanted to emulate that in my card.  I made an A2 landscape card for a change as that suited my layout better.  I cut strips of coloured card 3/4" wide in rainbow colour and adhered them directly onto the middle of my card base.  I cut a white panel 5" x 3 3/4" and die cut a rainbow from it.  I also die cut some clouds from white card (x 5) and dogs from black card (x 5).  I adhered two clouds together with liquid glue for each side of the rainbow and 4 black dogs for the front of the card, again adhering them with liquid glue.  I stamped the sentiment below the rainbow and the paws across the panel and the rainbow stripes.  I added foam tape behind the panel and adhered it over the rainbow stripes.  The clouds and dog were added with a mix of foam tape and liquid glue.  I didn't feel the front needed anything else.  For the inside I cut a white panel 5" x 3 3/4" and added some very thin strips of the coloured card to the very bottom with liquid glue.  Over the stripes I added a white cloud and black dog, again with liquid glue.  I stamped the simple sentiment in the centre of the panel with black ink.  The panel was added to the card base with double sided tape.  A fairly simple card but I am really happy with it.  

I would like to enter my card into the following challenges:

Colorful Options challenge - rainbow inspired
Crafter's Cafe challenge - ATG optional no squares
Crafty Animals challenge - ATG must include an animal
Critter Crazy challenge - ATG with a featured critter
Just Us Girls challenge - rainbow themed mood board
Little Red Wagon challenge - D is for die cut
The Neglected Stuff challenge - use old, forgotten supplies (everything I used is older, retired stuff)

I hope you have a wonderful week.  I appreciate you stopping by and leaving me such lovely comments.   

Love and hugs

card supplies:
Paper Smooches - rainbow die - retired
MFT - cutest clouds ever dies - retired
MFT - rainbow bridge goodbyes stamp - currently oos
Limetree Crafts - 250gsm silky smooth white card - not currently available - they do have 300gsm bright white card available here
Limetree Crafts - 220gsm black card
Versafine - onyx black ink pad
coloured card from scraps bin