My Lovely Followers

Showing posts with label Craft UK Ltd. Show all posts

Friday, 26 June 2026

Uniko June Release: Day 4 introduction

Good morning friends and welcome back to my blog. It's day four and the final day of introductions for Uniko's June release. Today's introduction is another brilliant stencil called 'Ink & Flip: Chevron Duo'. You know how much I love these fantastic stencils; there are so many ways to use them just by flipping the stencils different ways. I needed to make a Father's Day card for my hubby and this stencil was perfect.  I used 4 shades of blue ink pads to create the pattern and kept it really simple (as my husband doesn't really do fussy). 
Here is my card:
A closer look at the details:
Plus I decorated the inside:
I made a 5" x 7" card so cut a white panel to 4 1/2" x 6 1/2" and using the 4 ink pads created my background.  I decided to cut the panel along the edge of the stencilling (top and bottom) so that it would have a fun zig-zag edge and I added some scrap white card behind for dimension.  I cut another white panel and added the stencilled piece on top using double sided tape.  I stamped the sentiments above and below the panel with black ink (for the Father's Day I had use the Mother's Day stamp and do some masking and replace the mother with father).  I adhered the panel to the card base with double sided tape.  I didn't add any embellishments as I loved it as it was.  For the inside I cut another white panel and stamped the sentiment in the upper centre with black ink.  I stencilled once again and cut out a small piece to go at the bottom of the panel, which was adhered with liquid glue. The panel was then added to the card base with double sided tape. 

I would like to enter my card into the following challenges:

* to be updated *

 Please check out what Bev and the rest of the team have created by clicking the links below:

It's release day tomorrow and all the products we've introduced this week will be available in the Uniko store at 9am.  I will be back at the same time with one extra card so I hope you will come and check it out.  

Love and hugs,

card supplies:
Uniko - Ink & Flip: Chevron duo stencil (available tomorrow)
Uniko - everyday family and everyday spring stamps (for outside sentiments)
Uniko - everyday love stamp (for inside sentiment)
Limetree Craft - 280gsm silky smooth white card (not available but other options are here and here)
Craft UK Limited - 5" x 7" card & envelope pack
Versafine Clair - nocturne ink pad
*Gina K Designs - ink pads - in the navy, blue denim, blue raspberry, powder blue

*I now have an Affiliate Link for the Gina K Designs store. If you are considering making a purchase I would appreciate you using my link as it will earn me a small commission at no extra cost to you. Thank you x

Thursday, 22 May 2025

Krafty Chicks challenge #769 - Masculine

Good morning lovely friends. I hope you're all doing ok and having a great week so far. It's time for a new challenge over at Krafty Chicks challenge and this week we are on Week 4; as always the theme is 'masculine' and Lori is our hostess. I know masculine makes are our least favourite things to make but it's always handy to have some ready in your stash. We hope you will come over and join in the fun with us.
I've had so many masculine cards to make recently that these challenges have been a godsend to me.  It was my son's birthday last week and I made a double Z fold card as he likes the fun fold shaped cards that I make.  He is a drummer and has been since he was in school (he was even in a band with his school friend at one time) so I always try to find a new drumming image or die cut to use on his cards.  I hope you like it.  There are a few extra photos this time as it was hard to show off all the card.
Here is my card:
A closer look at the drum kit:
There is no inside as such so the message panel is on the back:
A side view of the card:
And this is the card open flat:
I also made and decorated my own envelope:
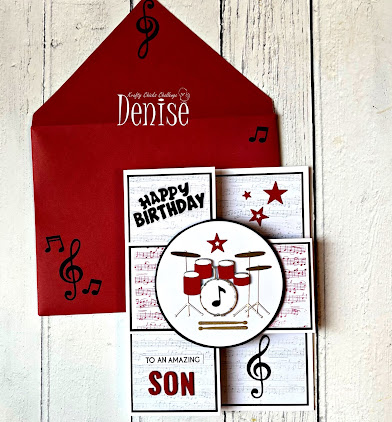
As it was a special card for my son I made a 6" x 8" size card.  I used a 12" x 12" piece of white card and trimmed it to 12" x 11" and scored it at 3" and 6" along the 12" side.  I cut a 3" piece from the 11" size so it ended up being 12" x 8" and I could use the 3" panel for the double Z part of the card.  I folded the score lines and then the card laid flat at 6" x 8".  I cut 2 white panels to 5 3/4" x 7 3/4" and stamped a music background all over in a light grey ink.  I used the one panel as a whole and cut the other panel in half for the front two flaps of the card.  I also cut black mat layers for all the panels and adhered them together with double sided tape.  I added them to the card base with double sided tape.  For the 3" piece I cut two white panels 5 3/4" x 2 3/4" and again stamped using the music stamp this time using red ink for some contrast.  I cut the one panel in half and used the other as it was, again matting them with a black layer.  To make it a double z fold you need to flip the 3" piece so that the folds are on the opposite side i.e. the full piece is in the front and the folded piece is at the back.  Once I had done this I adhered the panels to the 3" strip with double sided tape.  You can place the 3" strip anywhere along your card; it can go at the very top, very bottom or in the middle, as I chose.  It suited my layout better for it to be in the middle but it looks cool is all orientations.  I then began the task of die cutting all my elements.  The drumkit comes as one whole die so I had to cut it multiple times from silver, gold, black, white and red to get all the coloured bits I needed.  I used the silver as my base layer and added all the other colours on top with liquid glue.  I also cut the drumsticks from kraft card.  I die cuts lots of stars and musical notes, a record (which looks more like a bullseye now I'm looking at it lol!), letters for the word son x 4 and a happy birthday word (and vellum shadow).  I adhered all the die cuts with liquid glue.  I also stamped a sub-sentiment onto white card with black ink and some additional sentiments on the inside panels of the card base.  I cut the sub-sentiment with a sentiment strip die and adhered that with liquid glue.  To make my drumkit stand out I die cut a white circle and black circle mat layer and adhered them together with double sided tape.  The drumkit was added with foam squares and the drumsticks with liquid glue.   The circle was adhered to the 3" strip with foam squares.  For the message panel on the back of the card I cut a white panel 5 3/4' x 7 3/4" and added a black mat layer with double sided tape.  I stamped the music background once again onto white card 5 3/4" x 1 1/2" using a light grey ink and adhered this with double sided tape.  To make it look more finished I added a thin strip of black card above the panel with liquid glue.  I stamped my sentiments in the centre of the panel with black ink and added a few more die cuts that were leftover from my epic die cutting fest!  The panel was adhered to the card base with double sided tape.  As my card was a custom size I had to make my own envelope using my envelope punch board and again added some die cuts to match.  Thankfully my son is my greatest cheerleader and always gives me input into my cards so he was really impressed with the work that I put into it and he loved it.  

I would like to enter my card into the following challenges:

Classic Design challenge - ATG optional twist masculine
Creative Creases challenge - ATG with a fun fold
Fab 'n' Funky challenge - add a sentiment 
Heart's Quest for Shaped Cards & Tags challenge - ATG on a shaped card and/or tag (hope my double z fold card is acceptable as a shaped card, if not please delete)
Pearly Sparkles challenge - black, white plus one colour (mine is red)

I hope you will be able to join us for our 'masculine' challenge and I cannot wait to see your creations in our linky. Please leave some love for my fellow chicks - LeanneDiane and Lori

Thank you so much for stopping by; I appreciate your lovely comments. 

Love and hugs,
card supplies:
Made to Surprise - make some noise die set - from Craft Stash but sadly they are closing and it is no longer available
Gina K Designs - grand gentlemen stamp (for sub-sentiment)
Gina K Designs - let's get started die set, free with intri-cut machine (for happy birthday die)
Honey Bee Stamps - inside: birthday sentiments stamp (for inside sentiments)
Little B - circle dies - ? retired
MFT - little letters dies - retired
MFT - keep on rockin' stamp (for other sentiments) - currently oos
Versafine - onyx black ink pad
Hobbycraft - A4 black card
coloured card from my scraps bin

Thursday, 3 April 2025

Krafty Chicks challenge #762 - Birthday

Good morning lovely friends. I hope you're all doing ok and having a great week so far. It's been another glorious week here in South Wales, with lots of sunshine but also a stiff breeze - perfect weather for drying clothes on the line lol! 

It's time for a new challenge over at Krafty Chicks challenge and this week we are on Week 1; and as always the theme is 'birthday' and Leanne is our hostess. It can't get any easier than this week's challenge so we hope you will come over and join in the fun with us.
Today is my lovely mother's birthday so I'm sharing the card I made for her.  I always try to make her an extra special card and usually a larger than normal card (today's card is 6" x 7 3/4").  I hope you like it.
Here is my card:
A closer look at the florals:
Plus I decorated the inside:
I began by cutting my card base from a 12"x12" piece of white card.  I stamped all the florals in a light grey ink before colouring them using the coordinating stencils.  After all the stencilling was complete I then re-stamped the images using a black ink pad.  I used the matching dies to cut them out.  I created the stitched frame by die cutting 2 smaller frames (sized for an A2 card) from white card and used them horizontally instead of vertically. I laid them together and cut out the inside piece so that it would create one larger frame.  I cut a white panel to go behind the frame and using a stencil and light grey ink created a soft background.  I added thin foam strips behind the frame and adhered them together and then added a black mat layer behind with double sided tape.  For the panel behind the frame I used a pale purple piece of card and added a black mat layer with double sided tape.  This was added to the card base with double sided tape.  I fussed with the arrangement of my florals for quite some time but finally decided on adding them to the top right and bottom left corners going largest to smallest out from the corner.  I added them with a mixture of foam squares and liquid glue.  I also added a small leaf to the top left and bottom right corner with liquid glue.  I used a few different stamp sets to create my sentiments but I think the fonts really match.  I die cut all the sentiments except for the 'mother' which I had to fussy cut.  I added them all with teeny tiny slithers of foam squares.  I added a few black pearls for some bling and also added some white gelly roll highlights to the flowers.  For the inside I cut another purple card panel and added a black mat layer behind and also cut a white panel and adhered it with double sided tape.  I stamped the sentiment in black ink in the centre and as I had quite a few flowers left over replicated the arrangement from the front in the bottom right corner.  I also added a small leaf in the upper left corner.  The panel was then added to my card base with double sided tape.  I'm really happy with this card; I love the colour combo and the frame turned out exactly as I had hoped.

I would like to enter my card into the following challenges:

Allsorts challenge - spring flowers
As You Like It challenge - cute or floral (I like both but my mother loves florals so I always make a card with flowers for her)
Beautiful Blossoms challenge - Anything floral goes optional mood board
Classic Design challenge - ATG optional twist bunnies, blooms or butterflies
Inkspirational challenge - use 2 or more sentiments
Little Red Wagon challenge - I guess that's why they call it the blues (include blue)
Papercraft challenges - spring blooms
Stencil Fun challenge - Anything stencil goes optional theme patterns
The Four Seasons challenge - ATG spring optional mood board
The Paper Funday challenge - ATG optional twist things that begin with B (birthday, blooms, blue)
Triple B challenge - use at least one bird, blooms or butterflies optional inspiration board
Word Power challenge - make the sentiment the focus of your card

I hope you will be able to join us for our 'birthday' challenge and I cannot wait to see your creations in our linky. Please leave some love for my fellow chicks - Leanne, Diane and Lori.
Thank you so much for stopping by; I appreciate your lovely comments.

Love and hugs,

card ingredients
(all Gina K Designs)
Master Layouts 18 (for the frame)
Elegant Thoughts stamp & die bundle (for happy birthday sentiment)
Lovely Ladies stamp set (for mother sentiment)
On the inside - birthday (for inside sentiment)
ink cube - light spruce

other supplies:
Limetree Crafts - 250gsm silky smooth white card - not currently available - they do have 300gsm bright white card available here
Crafts UK Limited - 12"x12" white card (for card base)
Hobbycraft - A4 black card
Versafine - onyx black ink pad
purple card from stash

Thursday, 29 August 2024

Krafty Chicks challenge #731 - Anything Goes

Good Morning lovely friends; it's Thursday so that means it's time for a new challenge over at Krafty Chicks challenge.  We have a 5 week month so that means we have an extra 'Anything Goes' challenge this week and Diane is our hostess.  It can't get any easier than ATG so come and join in the fun with us. 
It was my little sister's birthday yesterday so this challenge was perfect timing for me.  I was inspired by a card I saw by Gina K Designs a few week's ago and as soon as I saw it I knew I was going to make my sister a card.  My card is 6" x 6" for a change and it need to be bigger to fit on the gorgeous wreath.  I hope you like it.
Here is my card:
A closer look at the wreath:
Plus I decorated the inside:
I began by stamping all my images and used the matching stencils to colour them in.  I love matching stencils as they make colouring so simple but look fantastic.  I also used the coordinating dies to cut them out.  I used the square dies from Master Layouts 3 to cut the panel behind my wreath and adhered them together with double sided tape.  I then cut a white panel 5 3/4' square and a slightly larger mat black.  I used a stencil and some very light grey ink to create a soft background for my card.  I temporarily placed the wreath where I wanted it so that I could stamp the 'sister' word in black ink and then adhered the wreath using foam squares.  I stamped and die cut the birthday sentiment and also added that with foam squares.  The smaller square was added to the stencilled square with double sided tape and then the whole thing was adhered to my card base with double sided tape.  For an extra bit of bling I added a few clear sequins around the sentiment and also on the wreath.  For the inside I created the same panels and also did the stencilling again.  I stamped, stencilled and die cut one more flower and adhered it to the bottom left corner with liquid glue.  I stamped a sentiment in black ink in the centre.  The panels were then adhered to the card base with double sided tape.  A really pretty card, which looked even nicer in real life, and my sister loved it.  

I would like to enter my card into the following challenges:

Addicted to Stamps & More challenge - die cuts and/or stencils
Beautiful Blossoms challenge - anything floral goes optional mood board
Creative Knockouts - ATG (10 challenges in total)
Tic Tac Toe challenge - multiples, die cuts, sparkle/shine
Triple B challenge - use at least one bird, butterfly or bloom
Try It On Tuesday challenge - make it feminine

I hope you will be able to join us for our 'Anything Goes' challenge and I cannot wait to see your creations in our linky.  Please leave some love for my fellow chicks - LeanneDiane and Lori and also our guest designer Rachelle who has created some amazing cards for us over the last few months; thank you Rachelle, it's been a pleasure having you with us.  

Thanks for stopping by today; I really appreciate you visiting my little corner of blogland. 

Love and hugs, 


card ingredients:
Gina K Designs - Radiant Roses stamp & die (for sentiment)
Gina K Designs - Lovely Ladies stamp (for sister)
Gina K Designs - thick brush stencil
Gina K Designs - clear quartz solid sequins 
Gina K Designs - Master Layouts 3 die set 
Hobbycraft - A4 black card
Craft UK Limited - 250gsm 12 x 12 white card (to make my card base)
Versafine - onyx black ink pad

Thursday, 2 May 2024

Krafty Chicks challenge #714 - Stamps

Good morning lovely friends; I hope you're having a brilliant week so far.  Well the weather here has turned decidedly chilly and wet again, so I'm still dreaming of spring; you would think by May 2nd we would be having spring weather by now wouldn't you?  Anyway enough of my waffling let's get on to the card making lol!

It's the start of a brand new challenge over at Krafty Chicks challenge and this week is Week 1 so we want to see your stamps/digis.  

It was my Father-in-law's birthday yesterday so I used the opportunity to make a card for my sons to give to their grandfather.  I hope you like it.
Here is my card:
A close up of the cute image:
Plus I decorated the inside:
It's strange for me to make a 6"x6" card these days, even though that's the only size I used to make years ago.  It's funny how our preferences change isn't it.  I started by making my own card base from a white 12"x12" piece of card (cut to 6"x12" and scored in the middle); I also made my own envelope using the envelope punch board.  I stamped the image onto white alcohol marker friendly card with black ink and coloured it with Promarkers.  I made a mask for the bear and once in place used a cloud stencil and grass stencil to create my background.  I also stamped 2 small butterflies, coloured them with Promarkers and added some white gel pen dots for extra detail.  I then stamped the sentiment onto the sign with black ink (the happy birthday was part of the same set as the bear but the grandad was from a different company).  I matted the image panel onto some light blue card with double sided tape.  I rediscovered a lovely paper pad which had some great generic patterns which suited a man and chose this 'hessian' looking pattern for behind my image panel.  I again adhered it to a light blue mat with double sided tape and also added it to my card base with double sided tape.  I added the image panel onto the patterned paper panel with foam tape.  I finished the front with a few gold pearls.  For the inside I chose to decorate it quite simply this time.  I cut a white panel and stamped the sentiment in the centre with black ink.  I matted it onto the same light blue card with double sided tape and took a piece of the patterned paper and added it to the bottom of the panel with double sided tape.  This was adhered to the card base with double sided tape.  A fairly simple card overall but I think perfect for my boys to give to their grandfather.  

I would like to enter my card into the following challenges:

Allsorts challenge - use a stencil (I used two)
As You Like It challenge - soft or bold colours (I tend to use bolder colours as I struggle with pastels)
Crafty Animals challenge - ATG must include an animal
Critter Crazy challenge - ATG with a featured critter
Incy Wincy Designs challenge - spring and/or animals
PINspirational challenge - designer/patterned paper
The Cutie Pie challenge - simply cuties
Tic Tac Toe challenge - butterflies/free/patterned paper (I appreciate my butterflies are dinky so delete if not appropriate)
I hope you will be able to join us for our 'Stamps' challenge and I cannot wait to see your creations in our linky.  Please leave some love for my fellow chicks - LeanneDiane and Lori and also our guest designer Rachelle, who is joining us again this month. 

Enjoy the rest of your day and thanks for stopping by. 

Love and hugs, 
Card ingredients:
Gina K Designs - ink pads - sea glass & jelly bean green
MFT - mini cloud edges stencil & grassy edges stencil
Clearly Besotted Stamps - simply said stamp set (for inside greeting)
Clearly Besotted Stamps - friends and family stamp set (for grandad) (retired)
blue card from stash

Thursday, 4 April 2024

Krafty Chicks Challenge #710 - stamps

Hello friends; I hope you're having a great week so far.  I'm back to share my card for this week's Krafty Chicks challenge.  As it's the start of the month we are back to Week 1 which is 'stamps' so we would like to see a stamp/digi on your project. 
I was my mother's birthday yesterday so this is the card I made for my sons to give to her using a new stamp set.  Here is my card:
a closer look at the cute image:
plus I decorated the inside:
I began by creating my shaped card base.  I took a piece of 12"x12" card and folded it in half and placed the largest hexagonal die slightly over the fold of the card and ran it through my die cutting machine.  My card was 250gsm so it cut through the two layers without any issue.  I then took the next size die and cut it from some hot pink card and the next size down from patterned paper.  I then cut another pink panel with a slightly smaller die and used the next size down to cut out my image.  At this point I felt the margins between the dies was too large so using my paper trimmer I made the pink panels a little smaller.  I coloured the image with Promarkers and added some highlights with a white gel pen.  I adhered each of the layers together with double sided tape; adding the largest one to the card base with double sided tape also.  For the image panel I used foam tape for some extra dimension.  I stamped the sentiment in black ink onto white card and die cut it out with a small circle.  I used a slightly larger circle to cut out a pink mat layer and adhered them together with double sided tape.  This is adhered onto the edge of the image panel with more double sided tape.  (In case you were wondering, I live in the South Wales valleys and we use Mam in the same way as you would use Mom/Mum.  When my nephew was born he used to copy us and call his grandmother Mam and it just stuck for all the grandchildren).  For the inside I cut the same two largest panels, one from pink and one from white, again trimming the pink one down a little.  I stamped the sentiment in the centre and a portion of the image in a light grey ink and then adhered the panels with double sided tape.  This was then added to the card base with double sided tape.  I really like the different card shape and it was simple to make, even with all the fussing of cutting down the layers, but at least they were straight edges lol).  I hope you like it.  The finished card size is approximately 5 1/4" x 6 1/2" so I had to make a custom envelope using my envelope punch board.  

I would like to enter my card into the following challenges:

Addicted to Stamps & More challenge - die cut and/or stencils
A Place To Start challenge - ATG option add one or more flowers
As You Like It challenge - cute or floral (I love both but I think I reach for the cute images more often)
Beautiful Blossoms challenge - anything floral goes
Classic Design challenge - ATG option 4 legged friends
Crafty Animals challenge - must include an animal
Critter Crazy challenge - ATG with a featured critter
Double D challenge - cute little animals
I Love Promarkers challenge - ATG option add a button
Sweet Stampin' challenge - birthday girls 
The Sisterhood of Crafters challenge - bunnies and/or chicks
Triple B challenge - must include birds, butterflies or blooms 

I hope you will be able to join us for our 'stamps' challenge and I cannot wait to see your creations in our linky.  Please leave some love for my fellow chicks - LeanneDiane and Lori and also our guest designer for April, Rachelle

Thanks for stopping by. 

Love and hugs, 
Promarkers
Clearly Besotted Stamps - happy birthday all (retired)
Honey Bee Stamps - inside: birthday sentiments
Tonic Studios - circles layering basics dies
Gina K Designs - soft stone ink pad
Versafine - onyx black ink pad
Memento - tuxedo black ink pad
pink card from stash
Hexagon dies - I bought them from a de-stash site but didn't realise they were not branded