My Lovely Followers

Wednesday 30 August 2023

Fall for Wednesdays IG hop - Week 2

Happy Wednesday friends.  I'm back to share week 2 of the Falling for Wednesdays IG hop.  This week's theme is 'fall favourites' so we want to see anything you love doing in the fall (or autumn to us Brits!).  

It may not come as any surprise but I am not an outdoorsy person so no pumpkin patches or walking in leaves for me lol!  I decided that my favourite thing to do in autumn in cuddle on the sofa with a nice warm coffee so that is what my card is all about.  I can't wait to see what your favourites are.  

Here is my card:


a closer look at the image:


I dug out a really old red rubber stamp and began by stamping the image and colouring it with Promarkers.  I fussy cut it out and put it one side.  I decided to use some patterned paper again today and dug out some patterns that I thought went well with the image.  I went for a dark green card for my mats and adhered them all together with liquid glue.  I die cut a decorative oval from white card and a matching plain oval from the green card and again adhered them with liquid glue.  My image was added with thin foam squares and placed onto the oval.  I found the perfect strip sentiment and stamped it in green ink and die cut it out.  I placed it bottom centre under my oval with thin foam squares.  A few enamel dots to compliment my colours and my card was finished.  A fairly simple card but it looks really pretty in real life. 

I would like to enter my card into the following challenges:

Crafters Cafe challenge - colours of the garden

I hope you will pop over to Instagram and check out the hop.  As always please use the hashtag #ffwcardgroup23 to see all the hop participants and for us to find your creations if you want to join in the fun.  

Have a lovely day and thank you so much for stopping by. 

Love and hugs, 


card ingredients:

Whiff of Joy stamps - Willow with hot chocolate (unfortunately WOJ is no longer open)
Promarkers
Gina K Designs - hygge time (for sentiment)
Gina K Designs - fresh asparagus ink pad
Gina K Designs - sentiment strips dies
Craftelier - enamel dots pastel
Limetree Crafts - 250gsm smooth white card

Monday 28 August 2023

Happy birthday sister

Happy Bank Holiday Monday friends; I hope you're having a great day so far.  I'm feeling a little out of sorts today so I'm taking it easy and hoping it's just one of those days and I feel better tomorrow.  It's my little sister's birthday today so I thought I would pop in to share the card I made for her.  I also made one for my boys to give her but I'll share that another day.  I made a Double D fun fold card that I saw Sam Calcott (Mixed Up Crafts) share on YouTube.  You can find her tutorial here.  It was quite difficult to photograph so there are quite a lot of photos sorry.  

Here is my card:


a few more photos:


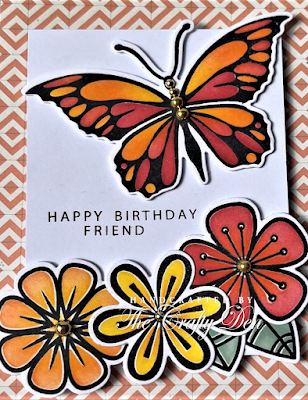
Following Sam's tutorial I began by cutting all the card pieces from white card, the mats from black card and layers from patterned paper.  I adhered them with liquid glue.  I decided to use the butterfly and flowers again from the Gina K Designs bundle (that you saw on my recent autumn card) but went for a bright and fun colour scheme to match the pretty papers.  I stamped the happy birthday sentiment in black ink and added a sister sentiment that I die cut 4 times (3 times from white card and once from the patterned paper) and also added that with liquid glue.  On the inside panel I stamped a birthday sentiment in black ink, added some strips of the paper and one flower and leaf in the bottom corner.  A few pearls and some shimmer pen as a finishing touch and my card was complete.  It was quite a simple card to complete but it will stand out from the crowd on a mantlepiece lol!  The card size is 5" x 7" but I did have to make a box envelope as the front part is quite thick; I used my envelope punch board for that.  

I would like to enter my card into the following challenges:

Simon Says Stamp Monday challenge - sparkle and shine (it's hard to see but my flowers and butterfly are covered in aqua shimmer pen)
Allsorts challenge - butterflies
Triple B challenge - mood board and/or birds, butterflies and blooms
Papercraft challenges - special card shapes

Thanks for stopping by and I'll be back soon with the 'auntie' card I made for my boys to give to my sister. 

Love and hugs, 


card ingredients:

Gina K Designs - You give me butterflies bundle (now available individually)
Gina K Designs - spring floral background (for the happy birthday sentiment)
Gina K Designs - rainbow pearl mix
MFT - little letters alpha dies
Limetree Crafts - 250gsm white smooth card
Hobbycraft - black card
Honey Bee Stamps - inside birthday sentiments
Lili of the Valley - bonnets & bowties 8x8 paper pad
Nuvo - aqua shimmer pen (glitter gloss)
Versafine onyx black ink pad

Saturday 26 August 2023

Anniversary shaker card

Happy Saturday friends.  I hope you've had a brilliant week and are ready to enjoy the Bank Holiday weekend.   I cannot believe we are in the last weekend of August; I love autumn, with the cooler weather and crunching leaves beneath your feet, but really don't like the dark nights so much.  I have enough trouble taking good photographs of my cards in the summer, let alone when it's dark and dreary lol!  

Anyway I'm here today to share an anniversary card that I made a little while ago but forgot to share.  It's a bright and cheerful colour scheme and I decided to make a shaker element too.  

Here is my card:


a closer look at the sweet lovebirds:


I stamped the gorgeous floral heart and adorable love birds and coloured them with Promarkers.  There aren't any dies so I fussy cut them out.  I decided to cut the centre out of the heart and make a shaker card so added acetate behind the heart.  I used a beautiful embossing folder for the background as I thought it was really elegant for an anniversary card and matted it onto a pale green card.  I gold heat embossed the sentiment (from the stamp set) and added a few tiny die cut flowers and leaves for decoration and to tie in with the larger floral heart.  To put my card together I added some sequins into my heart and sealed it close with foam tape.  This was then added to the embossed panel with liquid glue.  The birds were added with foam tape at the lower part of the heart and the sentiment was placed middle centre below the birds, again on foam tape.  I didn't added any extra embellishments as the shaker was enough.  

I would like to enter my card into the following challenges:

Sweet Stampin' challenge - wedding/anniversary
Stamping Sensations challenge - mood board (I was inspired by the colours and bird)
Krafty Chicks challenge - all occasions
Cardz for Galz challenge - cute animals or insects
Triple B challenge - I used birds and blooms
Can You Handle The Pressure? challenge - use an embossing folder option poppies
Tic Tac Toe challenge - anniversary/gold or silver/free (my sentiment is gold embossed)


Have a wonderful weekend and thanks so much for stopping by. 

Love and hugs, 


card ingredients:

Funky Fossil Designs - love birds stamp set
Spellbinders - mini blooms & sprigs
Promarkers
shaker mix from stash (I think it was a freebie)
pale green card from stash

Wednesday 23 August 2023

Falling For Wednesday IG Hop - week 1

Hello again friends; I hope you're having a wonderful Wednesday.  I can't believe I'm back again so soon; I hope you're not getting too bored of me lol!  

Today's post is week 1 of an IG hop that I'm taking part in called 'Falling for Wednesdays' organised once again by my lovely friend Kelly and this hop will last for the next 7 weeks.  It's a continuation of the Summer Crush Wednesdays hop that we did in the summer but this time it's all about fall (or autumn if you're this side of the pond).  Week 1 is all about fall colours so you can make whatever you like as long as your main colours are brown, orange, red, green etc.  


Here is my card:


a closer look at my images:


plus I decorated the inside:


For my card I used a Gina K Designs bundle which includes a stamp set, layering stencils and matching die cuts.  I began by stamping my images and used the layering stencils to 'colour' them.  Once coloured I cut them out with the dies.  I dug out an old 6x6 paper pad and this orange patterned paper was perfect to go with my butterfly and flowers.  I matted the paper onto a black card panel and adhered it to my card front with liquid glue.  I used a smaller white card panel as a base for my images which I added with foam tape and then stamped my sentiment in black ink.  A few gold pearls to the centres of the butterfly and flowers and my card was complete.  I had one flower left over and a small strip of the paper so decorated the inside and added a birthday sentiment.  

I would like to enter my card into the following challenges:

Stencil Fun challenge - use stencils option butterflies (I used layering stencils)
My Time To Craft challenge - stencilling (I used laying stencils)
Make My Monday challenge - 3 images of something (3 flowers)
Inspiration Station challenge - photo inspiration (inspired by butterflies and flowers)
NBUS - Never used this Gina K bundle before
Tic Tac Toe challenge - patterned paper/free/birthday


I hope you will pop over to Instagram and check out the hop; use the hashtag #ffwcardgroup2023 to see all the gorgeous creations and also if you want to participate we will be able to find you.  

Enjoy the rest of your day and thank you so much for stopping by.

Love and hugs, 


card ingredients:

Gina K Designs - You give me butterflies bundle (bundle has been broken up now but items can be purchased individually)
MME - now and then 'Izzy' 6x6 paper pad
Versafine - onyx black ink pad
Hobbycraft - black card
Limetree Crafts - 250gsm white smooth card

Monday 21 August 2023

You've passed!

Hello again friends; I hope you've had a great start to the week.  Hubby had his clips out today, which thankfully was quick and painless.  Apart from an allergic reaction to the plasters covering them, his wounds look fab and have healed really well.  Physio on Thursday, although not sure what they will tell him to do as he is walking around the house and up and down the stairs without too much trouble.  

I'm here today to share a card that I made for my son's work colleague who's daughter had passed her driving test.  I have to be honest I don't make many cards for this occasion so had to search through my stash for a 'you've passed' sentiment but eventually found one in my trusty Clearly Besotted oldies.  I'm never de-stashing my CBS stamp sets as they are so useful and I find myself reaching for them often.  

Here is my card:


and a closer look:


CAS decoration on the inside:


I began by die cutting the cute car from grey card and cut the additional pieces in mostly black, except for the hubcaps which I cut from silver card.  The cute dog was stamped and coloured with Promarkers and I fussy cut him out.  I glued the dog behind the car so that it looked like it was inside.  I put the car to one side and worked on my background.  I cut a piece of light blue card and added a strip of grey card to bottom and used my white gel pen to draw a faux road and at the top of the blue panel I added some white die cut clouds.  The L plate was created by die cutting a letter L from red card and adhering it to a white square.  I then took a torn edge die and cut the white square in half to look like it was ripped apart.  To assemble my card I added the car with foam squares along the 'road' and added the L plate below, also with foam squares.  The clouds and sentiments were attached with liquid glue.  The panel was added onto a white card base with foam tape; this was then matted onto a black panel.  I think the finished card turned out quite cute.  

I would like to enter my card into the following challenges:

Allsorts challenge - all creatures great and small
Try It On Tuesday challenge - sing a song (inspired by Madness 'driving in my car)
Cut It Up challenge - create a scene
Tic Tac Toe challenge - die cuts/free/alphabet (I die cut a letter L for my L plate)

Thanks for stopping by today; I hope you enjoy the rest of your afternoon/evening.  I appreciate you taking the time to comment and for all the love you leave for my little works of art.  

Love and hugs, 


card ingredients:

MFT - cute caravan die set
MFT - missing you every single day stamp set
MFT - little letters 
MFT - blueprints 13 (for die cut circles inside)
Clearly Besotted Stamps - framed sentiments
Gina K Designs - sentiment strip dies
Gina K Designs - so many sentiments (for the inside sentiment)
W Plus 9 - sunshine layers (for the cloud die cuts)
coloured card from stash
Limetree Crafts - 250gsm smooth white card
Sakura - gelly roll 10 white pen

Saturday 12 August 2023

A fishy card for Willow!

Hello friends and happy Saturday.  I hope you've had a great start to your weekend.  My husband had a partial knee replacement (and also some metalwork removed from his other leg) earlier in the week so this week has been busy and long lol!  He came home on Thursday and I have to say for a man he is doing remarkably well.  He's walking very well and not in too much pain, although I think he does have a high pain threshold normally.  He has to wait 10 days to have his clips out and then he can begin his physio, although honestly I don't think they will have to do too much with him.  

Anyway enough waffling let's get on with the card.  Last week was our Willow's 2nd birthday and I had to make her a card, even though hubby thought I was completely mad, especially when I wrote a heartfelt message inside it too lol!  I was a little stumped what to make so decided to make a fish shaped card for her.  Here is my card:


a little closer view:


I began by roughly drawing the fish shape by hand and cutting out a template from paper.  I then laid this onto a 5x7 card base and cut around it to make my shaped card base.  It's a little wonky in places but I think it looks ok.  I also cut a smaller piece out of yellow card for my panel.  I used a stencil to create the fish scales and punched a small black circle for the eye (I added some white gel pen to make it look more realistic).  The sentiments were stamped in black ink and cut out with a label die and I die cut the letters and number 2 from white card.  For a little contrast I ink blended them with the same ink but with a bit of a heavier hand so that they would stand out.  I went for an ombre look on letters, which I stacked 4 times and added them to the card panel with liquid glue.  The sentiments were added with foam squares.  The yellow fish panel was also added to the card base with foam tape.  I know I'm biased but isn't it adorable?  I'm really happy with the finished result, even if it isn't perfect.  Willow loved it and that is all that matters haha!  

Here is Willow admiring her card:


and I love this one cos it looks like the fish is eating her:


I would like to enter my fishy card into the following challenges:

Simon Says Stamp Monday challenge - happy birthday (happy 13th birthday SSS)
Time Out challenge - monochromatic
Aud Sentiments challenge - washi and/or shaped card + sentiment
Inspired By challenge - alphabet (inspired by the letters and big bold sentiment)


I hope you have a wonderful day and thank you so much for stopping by.

Love and hugs, 


card ingredients:

Limetree Crafts - 250gsm smooth white card (for card base)
yellow card from stash
Taylored Expressions - sweet scallop stencil 
Lawn Fawn - Henry's ABC dies
MFT - smitten kitten (for main stamped sentiment)
MFT - you wow me (for the 'you're')
MFT - by the numbers dies (retired)
Versafine onyx black ink
Sakura - gelly roll 10 white pen
Gina K Designs - sentiment strip dies
Gina K Designs - honey mustard ink pad

Sunday 6 August 2023

Dragonfly Dreams challenge - Guest Designer card

Good morning and happy Sunday lovely friends.  I hope you are all doing ok and finding lots of time to get crafty.  


I am delighted to be a guest designer over at Dragonfly Dreams challenge this month and they have a lovely theme of 'dragonflies'.  I used a stamp set that I think I won in a competition years ago.  I've had it in my stash but never used it, so this was the perfect time to dig it out!   Aren't the dragonflies just adorable?  I love their big googly eyes lol! 

Here is my card:


a closer look at the cute dragonflies:


plus I decorated the inside too:


I began by stamping my dragonflies and coloured them with a combination of Promarkers and Spectrum Noir tri-blend markers.  I don't have the matching dies so fussy cut them out.  I decided to white heat emboss the background onto a grey coloured card using a brick pattern stamp; I also stencilled some grass and clouds onto this once it had cooled down.  I used dies to cut out my panel and also a black matting panel.  I white heat embossed the sentiment onto black card and also fussy cut that out.  I finished my card by adding some smooth disc sequins around the dragonflies.  I had a small piece of the embossed background left over from when I die cut it so used a strip on the inside of my card.  I always try to decorate the inside of my cards, even if it's just a stamped sentiment.  Do you do anything on the side of your cards?  

I would like to enter my card into the following challenges:

Krafty Chicks challenge - stamp act (focus on stamping)
Inkspirational challenge - use stencils (I used 2 in the background)
Stencil Fun challenge - use stencils option butterflies
Double D Challenge - ATG option use stencils (I used 2 in the background)
Moving Along With The Times challenge - emboss wet/dry (I heat embossed my wall stamp)
Critter Crazy challenge - ATG but feature a critter
Tic Tac Toe challenge - use a stencil/birthday sentiment/blues & greens (in my background)

I hope you can join in with this fun challenge.  Please pop over to the blog to find out all the details and to check out the Design Teams gorgeous creations too.  

I hope you enjoy the last bit of your weekend and thanks so much for stopping by.  

Love and hugs, 


Card ingredients:

Your Next Stamp - dancing dragonflies (they are closing so grab a bargain as everything is reduced)
MFT - mini cloud edges stencil
Simon Says Stamp - fog card
Limetree Crafts - 250gsm smooth white card 
Gina K Designs* - jelly bean green and sea glass ink pads
Gina K Designs* - master layouts 2
Promarkers
Spectrum Noir Tri-Blend Markers
Memento tuxedo black ink

*I link directly to the Gina K Designs store as that is where I bought my items but they are also available in the UK at Bumbleberry Crafts and Dies to Die For

Saturday 5 August 2023

My first Christmas card of 2023!

Hello friends and happy Saturday to you.  I hope you're having a lovely, relaxing start to your weekend, although it's more like winter outside at the moment.  At least it means more time to craft when you're stuck indoors lol!  Every year I plan on starting my Christmas cards in January and each year I'm not disciplined enough and end up chasing my tail in December.  Well I can now say I have at least one card made before December this year haha!  I recently picked up this stamp in the retirement sale over at MFT so I thought I would show it some love.  Here is my card:


and a close up of the cute image:


I also decorated the inside:


and I made a matching envelope:


I began by stamping the image and colouring it with Promarkers; I didn't have the die so fussy cut it out (don't look too closely though).  I wanted to use some gingham paper that I found in my stash; I think it was a 12x12 piece that I cut down but I've had it in my stash for years.  I matted that onto some dark green paper and adhered that to my card base.  I added foam tape to the cute image and placed that onto a plain white panel which was matted onto dark red card.  A black stamped sentiment to finish and no extra embellishments this time - shocker I know!  I had some smaller pieces of paper left over so decorated the inside of my card and also an envelope so that they all co-ordinated.  

I would like to enter my card into the following challenges:

The Crafters Cafe challenge - Christmas in July
Sweet Stampin' challenge - based on book/song/film (O Christmas Tree)
As You Like It challenge - floral or gingham (I'm Team Gingham all the way as you can use it for any occasion and it looks so good in any colour)
Crafty Gals Corner challenge - Christmas in July 
Krafty Chicks challenge - stamp act (focus on stamping)
Try It On Tuesday challenge - use pretty papers
Addicted to Stamp and More challenge - make your mark (used promarkers to colour)

I hope you enjoy the rest of your weekend and thanks for stopping by. 

Love and hugs, 


card ingredients:

MFT - sweet holiday penguins (for the sentiment)
Gina K Designs - holiday tapestry (for the inside sentiment)
Promarkers
Versafine onyx black ink pad
Memento tuxedo black ink pad
Limetree Crafts - 250gsm white smooth card
gingham paper and coloured card from stash