My Lovely Followers

Showing posts with label Funky Fossil Designs. Show all posts

Thursday, 12 March 2026

Stencil Fun IG Hop - March 26

Hello again friends; I am back to share my card for the Stencil Fun IG Hop organised by my lovely friend Jane. We a group of crafters who are determined to use their forgotten and neglected stencils. I'm definitely guilty of this; I have so many stencils but usually forget to reach for them so this hop is perfect for me. The theme is always anything goes but we will have an optional theme to use if we want to. This month's optional theme is 'words' and I'm excited to see what everyone has made.
After a dig around in my stencils I found this fun birthday words stencil which I thought would be perfect as it had lots of different words.  I also found a postage style stencil which looked like a present to me so I thought I would combine them.  It turned out exactly as I had hoped and it's such a happy card.  I hope you like it too.  
Here is my card:
A closer look at the stencilling:
Plus I decorated the inside:
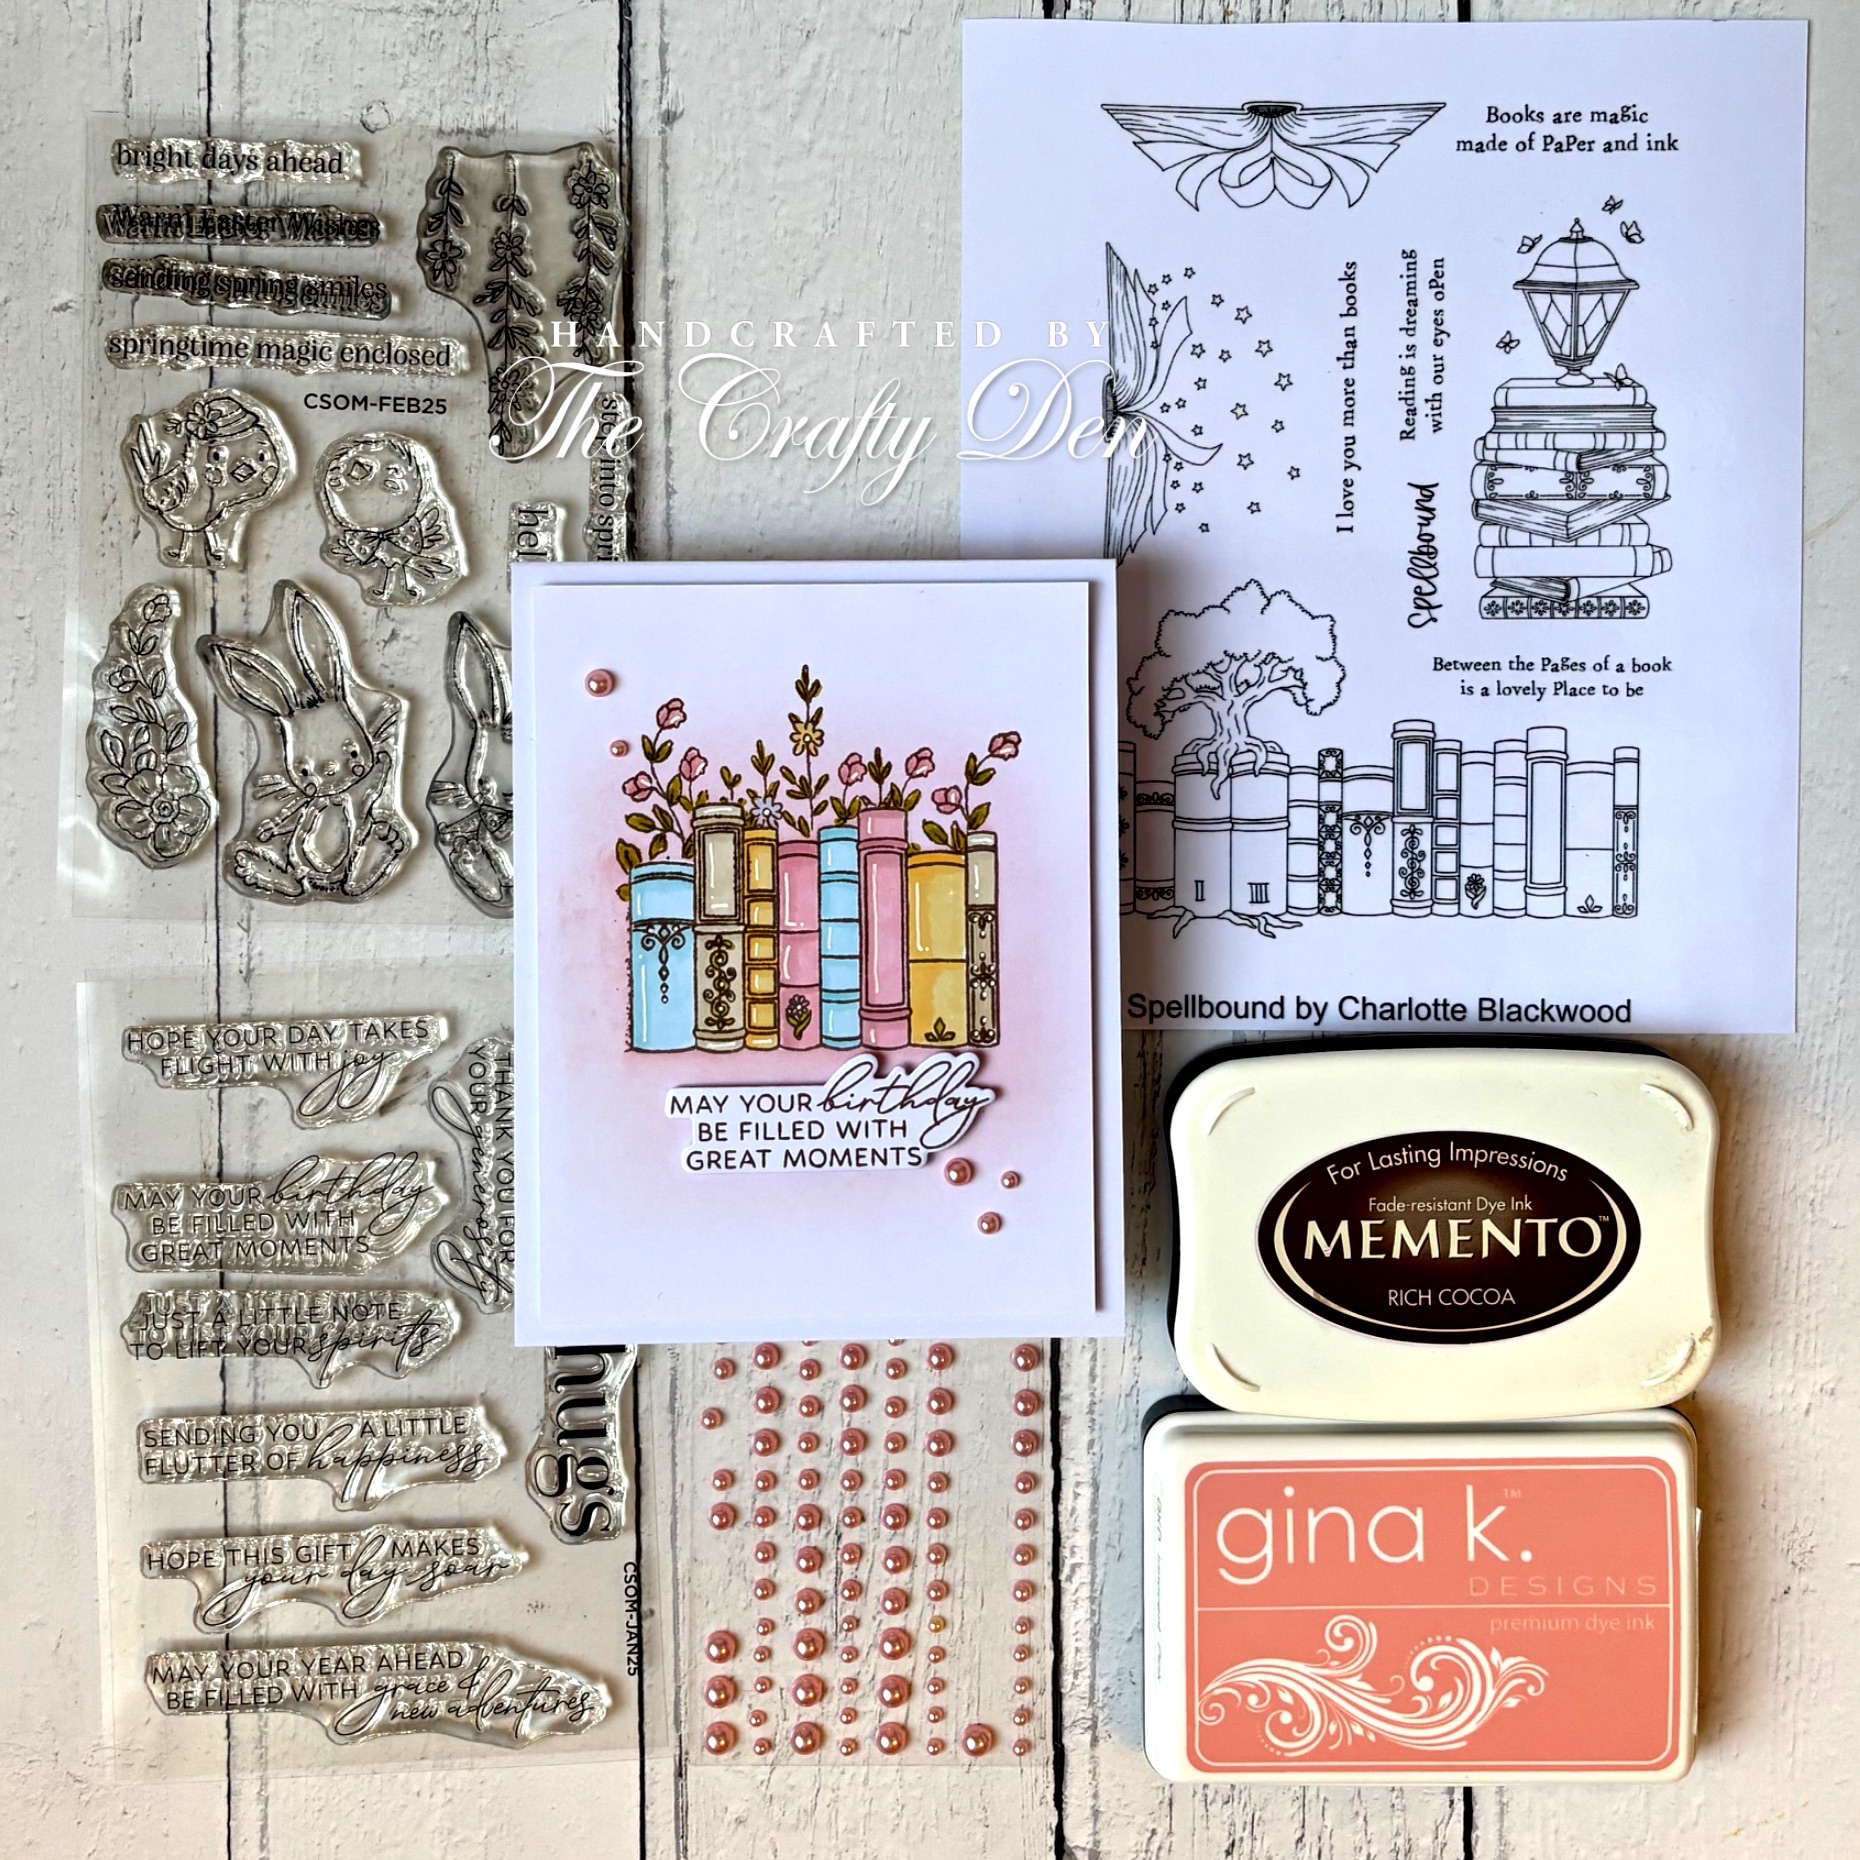
I began by cutting a white panel 4" x 5 1/4" and firstly used the postage stencil and some light grey ink added some shading to the very edges of the boxes to give them some definition.  Without removing the first stencil I added the words stencil on top and did a diagonal rainbow blend from the top left to the bottom right corner.  I removed both stencils and I loved how bright and happy the blending turned out.  To enhance the look of the 'present' I die cut a bow from white card and used liquid glue to assemble it before adhering it to the panel with foam squares.  I stamped a tiny greeting along the horizontal 'ribbon' in black ink and finished off with some black pearls.  I added some scrap white card behind the panel before adhering it to the card base with double sided tape.  For the inside I cut another white panel 4" x 5 1/4" and used the words stencil to create a border at the bottom, again using a rainbow of colours.  I added a smaller white bow along the edge of the stencilling with liquid glue and stamped the sentiment in black in the centre.   The panel was then adhered to the card base with double sided tape.  

I would like to enter my card into the following challenges:

Colorful Options challenge - green or rainbow inspired
Craft Rocket challenge - no design paper
Cut It Up challenge - happy birthday
Stencil Fun challenge - use a stencil optional vines/vinery
Word Power challenge - make the sentiment the focus of your card

We hope you will be inspired by our Stencil Fun Instagram Hop and will pop over and check out all the gorgeous cards along the way. If you would like to join us please visit my Instagram page or use the hashtag #stencilfunmarch2026 and we will find you. 

Thanks for stopping by.  I'll be sharing another card with you on Saturday so please pop back and check it out.   

Lots of love

card supplies:
Funky Fossil Designs - birthday words stencil 
Memory Box Co. - postage set stencil
Memory Box Co. - truly gifted die set
Clearly Besotted - teeny tags stamp (for outside sentiment)
Clearly Besotted - simply said birthday stamp (for inside sentiment)
Limetree Craft - 280gsm silky smooth white card (not available but other options are here and here)
Versafine Clair - nocturne ink pad
*Gina K Designs - ink pads - lipstick, tangerine twist, wild dandelion, lucky clover, blue sky, wild lilac, soft stone
Gina K Designs - black, gold & silver metallic pearl mix

*I now have an Affiliate Link for the Gina K Designs store. If you are considering making a purchase I would appreciate you using my link as it will earn me a small commission at no extra cost to you. 
Thank you x

Thursday, 25 December 2025

Krafty Chicks challenge #800 - Masculine

Good morning lovely friends and a very Merry Christmas to all of you that celebrate. I know it can be a tough time for some and to those I am sending big hugs and love.  If you are lucky enough to be spending it with family or friends I hope you have a wonderful day.  

I'm sharing my card for the new challenge over at Krafty Chicks challenge and this week we are on Week 4; as always the theme is 'Masculine' and Lori is our hostess. We hope you will come over and join in the fun with us.
It was my son's birthday last month and this is the card I made for him.  The colours are not overly masculine but I thought they were fun, bright and happy colours.  He's a proper teapot and drinks copious amounts through the day so this die set was perfect for him.  I hope you like it.
Here is my card:
A closer look at the details:
Plus I decorated the inside:
As the card was for my son I made the card base 6" x 8" (using a piece of 12" x 12" card and cutting it to 12" x 8" and scoring it at 6" on the longer side).  I cut a white panel 5 1/4" x 7 1/4" and ink smooshed the background using blue, yellow and green ink pads.  Once it was dry I matted it onto a black layer with double sided tape.  I stamped and die cut 3 of the teacups and also die cut 6 more white cups so that I could layer them up.  I ink blended the 3 same colours onto the teacups, blending more heavily around the edges.  I also stamped the dog, coloured him with Promarkers and fussy cut him out.  Finally I stamped and die cut the teabag image and blended it with some light brown ink and used Promarkers to colour the heart.  Now it was time to arrange my pieces.  I stacked the cups in a 'wobbly' arrangement and added them with foam squares.  I popped the dog at the top, so that he looked like he was sitting in the teacup.  I stamped the tea-riffic sentiment in black ink onto white card and use a sentiment strips die to cut it out.  I stamped the second sentiment directly onto the bottom teacup with black ink.  I finished off with some gold pearls.  I added some scrap white card behind my panel and added it to the card base with double sided tape.  For the inside I cut the same white and black panels and did some ink smooshing at the bottom of the white panel.  Once it was dry I stamped the outline of the dog over the smooshing with black ink and added a sentiment in the centre.  I adhered the layers together and added them to the card base with double sided tape.  

I would like to enter my card into the following challenges:

Color Dare challenge - #683 bold & bright colours
Crafter's Cafe challenge - ATG optional use the colour yellow
First Cup challenges - ATG must include a drink on your project
I Love Promarkers challenge - ATG or use purple & yellow
Paper Rocks Scissors challenge - use paper and/or scissors (I fussy cut the dog image)
We Love Stamping challenge - red & green or ATG


I hope you will be able to join us for our 'Masculine' challenge and I cannot wait to see your creations in our linky. Please leave some love for my fellow chicks - Leanne, Diane and Lori.

Thank you so much for stopping by; I appreciate your lovely comments.

Love and hugs,
card supplies:
Funky Fossil - layering cup dies (retired)
Funky Fossil - critters in cups (retired)
Promarkers
Clearly Besotted - happy birthday all stamp (retired)
Stampin' Up! - family party stamp (retired)
Honey Bee Stamps - inside: birthday sentiments (for inside sentiment)
Limetree Crafts - 220gsm black card
Versafine Clair - nocturne ink pad
Heffy Doodle - alcohol marker friendly card (store now closed)
*Gina K Designs - large strip sentiments dies
Gina K Designs ink pads - in the navy, blue raspberry, grass green, lucky clover, sweet mango, honey mustard
Gina K Designs - black, gold & silver metallic pearl mix

*I now have an Affiliate Link for the Gina K Designs store. If you are considering making a purchase I would appreciate you using my link as it will earn me a small commission at no extra cost to you. 
Thank you x

Wednesday, 23 July 2025

Cards for All Seasons IG Hop - Week 15

Hello friends; I hope you're having a great week so far. I'm back today to share my card for this week's Cards for All Seasons IG hop organised by my lovely friend Kelly. We are now on Week 15 and our theme is 'Hollywood Glam'.  Such a fun theme this week; think glitter, sparkle and glamourous.  There are going to be so many awesome creations along the hop this week and I can't wait to see what sparks your imagination.
As soon as I saw the theme I immediately thought of Marilyn Monroe; to me she is the epitome of old school Hollywood Glam.  I didn't have anything Marilyn related in my stash but found an awesome stamp set online that I purchased immediately.  It has two different images so used the second one on the inside of my card.  I hope you like it. 
Here is my card:
A closer look at the image:
Plus I decorated the inside:
I began by stamping both the images onto alcohol marker friendly card, coloured them with Promarkers and fussy cut them out.  It's hard to tell in the photos but I did add some gold glitter gel pen onto the shoes and as eyeshadow on main image but I couldn't really capture it that well but it looks fab in real life.  I cut a panel from black shimmer card 3 3/4" x 5" and using a spotlight stencil and some white pigment ink created a fun background to emulate a stage.  I also white heat embossed the sentiment in the top left corner.  I matted the panel onto some gold glitter card; my border is slightly larger than my usual cards because I wanted the gold glitter to stand out a bit more. I added the image, standing in the spotlight, with foam squares.  As the sentiment was all about stars and twinkling I decided to cut some stars from the glitter card and placed them randomly around the image with liquid glue, apart from the two larger ones which were added with foam squares.  I added some scrap white card behind my panel and then this was adhered to my card base with double sided tape.  For the inside I cut a white panel 3 3/4" x 5" and again a gold glitter mat layer and adhered them together with double sided tape.  I added a 1" strip of the black shimmer card to the bottom of the panel and also a thin strip of the glitter card above it, both with liquid glue.  I added the second image in the bottom left corner and 3 glitter stars with liquid glue.  Finally I stamped the sentiment in the upper centre in black ink.  The panel was adhered to the card base with double sided tape.  I love how this card turned out and I think the colour combo is dramatic and gorgeous.  

I would like to enter my card into the following challenges:

Creative Inspirations challenge - stars and/or stripes
Creative Knockouts challenge - sparkle and shine
I Love Promarkers challenge - ATG or super heroes
The Paper Funday challenge - ATG optional theme fun with stencils

I hope you will pop over to Instagram and check out the hop; please use the hashtag #cfascardhop2025 to see all the gorgeous creations and also if you want to participate we will be able to find you.

I'll be back in the morning with my card for the Krafty Chicks challenge so I hope you will pop back and check it out. Until then thank you so much for stopping by.

Love and hugs,

card supplies:
AALL and Create - Marilyn stamp set
Promarkers
Funky Fossil Designs - in the spotlight stencil - retired
Gina K Designs - white pigment ink cube
MFT - sweet 16 stamp set
MFT - blueprints 13 die set (for larger stars)
Mama Elephant - confetti creative cuts (for smaller stars) - retired
Limetree Crafts - 250gsm silky smooth white card - not currently available - but they do have 280gsm silky smooth white card available here
Versafine - onyx black ink pad
black shimmer card from my stash

Tuesday, 1 July 2025

Pearly Sparkles challenge - guest designer

Hello again friends; here I am again back with my second post for today!  I am delighted to be a guest designer over at Pearly Sparkles challenge this month and their theme is 'shaped card' so we want you to make a fun shaped card - no squares or rectangles allowed.  I hope you have fun with the challenge and I can't wait to see what you create.
Blog Badge
I decided to make a circle card but with a fun twist - I made it into a doughnut shaped card.  It is so much fun and because my son loves pink sprinkled doughnuts I had to make it pink lol!  It's only a dinky 4 1/4" diameter but it makes it even more adorable.  I hope you love it too.
Here is my shaped card:
A closer look:
Plus I decorated the inside:
I began by making a 5" x 5" card base from white card and used the largest of my new nesting circle die set to cut out my circle card base.  I also cut a circle from kraft card to place on the front on my card.  I cut out the next circle down from the die set from pink card and traced a wobbly outline with pencil and cut it out with my scissors for the icing of my doughnut (I should have cut it a little bigger so that the kraft card wasn't showing quite so much but I still think it looks great).  I took one of the smaller circles in the set (approx 1 1/2" diameter) and cut the doughnut hole from the card base, the kraft circle and the pink circle. I adhered the kraft circle with liquid glue and the 'icing' with foam squares.  I was thinking about what to use for the sprinkles when I saw a die on my desk from a previous project that I thought would be perfect - a film strip die - the bits that fell out of the die cut were the perfect size and shape.  I cut out multiples from pink, blue, yellow and white card and added them randomly on the icing with liquid glue.  I added some crystal glaze to the sprinkles so that they would stand out and look dimensional.  I stamped the sentiment onto white card and cut it out with a sentiment strip die, adhered it with foam squares and then added a cute twine bow above it with liquid glue.  For the inside I cut another smaller circle from white card, again cutting the doughnut centre, stamped a small sentiment on either side in black ink and then adhered this to my card base with liquid glue.  I added a few of the sprinkles around the sentiment too.  I did cut a small piece off the back of the card base so that my card would stand up straight without toppling over.  This card really makes me smile and I hope it makes you smile too.  

I would like to enter my card into the following challenges:

Christmas (or not) BINGO challenge - Line I - circle or oval card shape, free, button or knot
Seize The Birthday challenge - ATG birthday/no topping

I would like to thank Helen and everyone at Pearly Sparkles challenge for having me as a guest this month. I hope you will be able to play along with the challenge and I cannot wait to see all your shaped card projects.

Ok, that is it from me for today, but thank you for stopping by and visiting my corner of blogland.

Love and hugs,

card supplies:
Waffle Flower - nesting circle die set
MFT - sweet birthday wishes stamp (for outside sentiment) - no longer available
MFT - sweet 16 stamp (for inside sentiment) - no longer available
Funky Fossil Designs - filmstrip dies (for sprinkles)
Crafter's Companion - kraft cardstock 
Versafine - onyx black ink pad
Tonic Studios - Nuvo crystal glaze 
Limetree Crafts - 250gsm silky smooth white card - not currently available - but they do have 280gsm silky smooth white card available here - but limited numbers
pink card from stash
twine from stash

Wednesday, 30 April 2025

Cards For All Seasons IG Hop - Week 9

Hello friends; I hope you're having a great week so far. I'm back today to share my card for this week's Cards for All Seasons IG hop organised by my lovely friend Kelly. We are now on Week 9 and we have a beautiful mood board/colour challenge to inspire you this week.  You can take whatever you like from the mood board; the colours, arches, birds, books, flowers, the world is your oyster!  A really fun theme for you this week and I can't wait to see what sparks your imagination.
Isn't is such a pretty mood board; it's so soft and dreamy.  I was immediately drawn to the books and flowers as I knew I had a book stamp in my stash somewhere lol!  I tried to use as many of the colours as I could and went for a soft, vintage style and even stamped in brown ink so that it wouldn't be as harsh as black.  I hope you like it.
Here is my card:
A closer look at the image:
I decorated the inside, as always:
I began by partially stamping the book image by masking the part I wanted (it was quite large and I didn't need all of it) in brown ink onto alcohol marker friendly card.  I also made a mask for the image so that I could ink blend around it and also stamp the flowers coming out from behind the books. Once all the stamping was done, I removed the mask and coloured everything with my Promarkers, adding some white gelly roll pen highlights.  I trimmed the panel to 3 7/8" x 5 1/8" as I stamped the image a little off centre.  I stamped the sentiment onto a scrap of white card using the same brown ink and used the coordinating die to cut it out.  I adhered it below the image with foam squares.  I added 3 pieces of scrap white card behind the image panel (instead of using foam tape) and adhered it to my card base with double sided tape.  I finished off with some soft pink adhesive pearls.  For the inside I stamped another book to the bottom of a white panel cut to 4" x 5 1/4" and again ink blended around it with a soft pink ink.  I coloured the books again with Promarkers and added white gelly roll pen highlights.  I decided not to add any flowers on the inside as I didn't want to take up too much room.  I stamped the sentiment in the centre with brown ink.  The panel was then adhered to the card base with double sided tape.  I wish you could see this card IRL as it's much softer and prettier (in my opinion).  

I would like to enter my card into the following challenges:

Allsorts challenge - inspired by a song (paperback writer by The Beatles)
Classic Design challenge - ATG optional twist feminine
Crafter's Cafe challenge - ATG optional feminine
CRAFT-alnica challenge - book best friend
I Love Promarkers challenge - ATG or masculine

I hope you will pop over to Instagram and check out the hop; please use the hashtag #cfascardhop2025 to see all the gorgeous creations and also if you want to participate we will be able to find you.

I'll be back in the morning with my card for the Krafty Chicks challenge so I hope you will pop back and check it out. Until then thank you so much for stopping by.

Love and hugs,
card supplies:
Funky Fossil Designs - spellbound stamp - ? retired
Promarkers
Spellbinders - spring smiles stamp (for flowers)
Spellbinders - nature's dance stamp & die (for outside sentiment)
Honey Bee Stamps - inside: birthday sentiments 
Gina K Designs - innocent pink ink pad
Limetree Crafts - 250gsm silky smooth white card - not currently available - they do have 300gsm bright white card available here
Heffy Doodle - alcohol marker friendly card - store now closed

Sunday, 30 March 2025

AAA Cards challenge - guest designer

Good morning lovely friends.  Well can you believe we are almost at the end of March....where is the time going?  It only seems like 5 minutes ago I was wishing everyone a Happy New Year lol!  

I'm here today to share a card I made for the new AAA Cards challenge.  I won a challenge at the end of last year and was invited to be a guest designer, which I immediately accepted.  Their challenges are always 'anything CAS goes' but there is an optional theme, which this time is '1+1'; which means you use the centre prompt and choose 1 other prompt from the outer circles.  
here's a closer look at the graphic:
I wanted to make a card for a friend's birthday and had this fun stamp set in mind so I chose to pair silhouettes with geometric or organic shapes (although it would also fit pets) as my 1+1.  I hope you like it.
Here is my card:
A closer look at my funny cat:
Plus I decorated the inside:
I began by cutting a white panel 3 7/8" x 5 1/8" and using a stencil and some cool ink colours created my organic shaped background.  I then stamped the cat image in black ink and the sentiment just below him.  I adhered the panel to the card base with foam tape.  I didn't add any embellishments or extras as I wanted to keep my card as CAS as possible.  For the inside I cut another white panel and stamped the sentiment in black ink in the centre (it's an inside joke as that is what my friend and I used to call each other) and also stamped another smaller cat in the bottom right corner.  I adhered the panel to my card base with double sided tape.  A super quick card but it turned out really fun.  

I would like to enter my card into the following challenges:

Crafter's Cafe challenge - ATG optional clean & simple
Fab 'n' Funky challenge - one for the boys/men
Just Us Girls challenge - ATG stencil week

I can't wait to see what you create for this challenge; there are lots of fun options for this one. I would like to thank Maaike and the Team at AAA Cards challenge for the opportunity to be a guest designer; please go and check out their amazing creations and leave them some love. 

Thank you so much for stopping by; I appreciate you taking the time to visit me and leave me comments.  I'll be back on Tuesday with my card for the AAA Birthday challenge so I hope you can call back again and check it out.  

Love and hugs,

card ingredients:
Funky Fossil Designs - what meow? stamp set
MFT - smitten kitten stamp (for outside sentiment)
Neat & Tangled - kitty's favourite things (for inside sentiment) - store sadly closed
Gina K Designs - ink pads - lucky clover, ocean mist and blue raspberry
Versafine - onyx black ink 
Limetree Crafts - 250gsm silky smooth white card (currently not available but this 250gsm smooth white card is an alternative in stock here)

Thursday, 13 February 2025

Krafty Chicks challenge #755 - Christmas

Good morning lovely friends. I hope you're all doing ok and having a great week so far. It's time for a new challenge over at Krafty Chicks challenge and this week we are on Week 2.  As always the theme is 'Christmas' and I am your hostess. We want you to see all your festive creations this week and we hope you will come over and join in the fun with us.
I recently bought a fun Christmas mug die that I've been itching to use so today's challenge was the perfect opportunity (although the mug itself could be used for various occasions).  A bit of stencilling and lots of die cutting and my card was done.  I hope you like it.
Here is my card:
A closer look at the mug:
Plus I decorated the inside:
I began by cutting my white panel 3 7/8" x 5 1/8" and using a snowflake stencil created my background using a very light grey ink.  I matted this panel onto a grey panel cut to 4" x 5 1/4" using double sided tape.  I cut the mug die from red ink and inked the edges with a slightly darker red ink for some definition.  I also cut the inner part of the mug from brown card to resemble cocoa.  I cut the candy cane from red and white card and adhered it together with liquid glue.  I cut 3 marshmallows and 2 snowflakes from white card and using my trimmer I cut a strip of black card for the belt.  I don't have the holiday additions die set that coordinates with the mug set so I had to make my own buckle using gold mirri card (it's not perfect but I think you can recognise it as a belt buckle lol!).  Once all the die cutting was done I assembled all the pieces.  The inner of the mug was adhered with liquid glue before the candy cane and marshmallows were tucked into the mug and secured on the back with some double sided tape.  The belt, buckle and 2 snowflakes were added with liquid glue.  I stamped the sentiment with black ink and die cut it out with the coordinating die (I cut another 2 from white so that I could add some dimension without fiddling with tiny strips of foam tape).  I added foam squares behind the mug and added it to the centre of my panel.  The sentiment was added across the mug with liquid glue.  I added gold sequins to the centres of the snowflakes and onto the background.  I added some scrap white card behind my panel, instead of using foam tape, and adhered it to my card base with double sided tape.  For the inside of my card I cut the same size white and grey panels, I stencilled the very bottom of the white panel using the snowflake stencil and adhered the panels together with double sided tape.  I stamped the sentiment in the centre with black ink and added a die cut snowflake in the bottom left corner.  I also added a gold sequin into the centre.  The panel was then added to the card base with double sided tape.  Although there was a bit of die cutting it wasn't too fiddly and the card came together quite quickly.  

I would like to enter my card into the following challenges:

The 12 months of Christmas Link Up challenge - ATG Christmas optional twist couples
ABC Christmas challenge - D is for die cuts
Crafty Catz challenge - ATG optional theme use a die
Cupcake Inspirations challenge - colour challenge - red, black and white
Daisy Chain challenge - layer it up 
Merry Little Christmas challenge - anything Christmas goes
Scrapping4Fun challenge - black, white + 1 other colour (I went with red)
Stencil Fun challenge - anything stencil goes optional theme pink and/or red
The Four Seasons challenge - ATG winter optional mood board

I hope you will be able to join us for our 'Christmas' challenge and I cannot wait to see your creations in our linky. Please leave some love for my fellow chicks - Leanne, Diane and Lori.

Thank you so much for stopping by; I appreciate your lovely comments.

Love and hugs,

card ingredients:
Pretty Pink Posh - winter mug die set
Funky Fossil Designs - snow is falling stencil
Gina K Designs - graphic tree stamp & die set (for outside sentiment)
Gina K Designs - soft stone ink pad 
Spellbinders - Santa's sippin' sayings stamp (for inside sentiment) - on sale!
Versafine - onyx black ink pad
Limetree Crafts - 250gsm silky smooth white card (currently not available but this 250gsm smooth white card is an alternative in stock here)
coloured card from scraps bin