My Lovely Followers

Showing posts with label Waffle Flower. Show all posts

Saturday, 5 July 2025

Gorgeous Gift Tags IG Hop July 25

Hello friends, I hope you're having a lovely Saturday so far. It's time for this month's Gorgeous Gift Tags IG Hop, which takes place on the 5th of each month. You always have the option to go for anything goes but the extra prompt this month is 'stencil(s)', which is a fab theme. I expect the rest of the hop will have some gorgeous stencilled creations so I hope you will pop over to Instagram and check them out.  
Stencils are such a staple in a crafters arsenal these days that it's not really a challenge to use them. I actually used two different stencils on my tag and it ended up with a mixed media vibe, which I love.  I hope you like it too. 
Here is my tag:
A closer look at the details:
Plus I decorated the back:
I began by stencilling the sun spots stencil using red and pink ink onto a piece of white card and then used my tag die to cut it out.  I wanted to add some texture so grabbed my white texture paste but unfortunately it had dried up and I couldn't use it so instead found a sparkle texture paste so used that instead.  The sparkle paste is really pretty and although it doesn't stand out as much as the white the paste really glistens in the light for a different effect.  Once that was dry I added some white splatters all over the tag.  I debated for ages as to what to use as my focal point and then remembered I had this cute birdie die set that hadn't been used so thought I would show him some love.  I ink blended some of the pink and red ink onto scraps of white card and used that to die cut most of my pieces for the bird.  I did use black for the base layer and white for the eye patch piece.  I adhered him together with liquid glue and added the top layer of the wing with a foam square.  I die cut the 'branch' from brown card.  So that my bird wouldn't be lost on the tag I die cut a circle from vellum to use as a grounding piece and I adhered the bird with foam squares.  The vellum was also added to the tag with foam squares.  I white heat embossed my sentiment onto a scrap of black card and cut it out with a sentiment strip die; this was adhered with liquid glue.  I felt that my tag needed a bit more black so grabbed a stamp set of distressed patterns and randomly stamped them onto the background with black ink.  I recycled some ribbon from a dress I bought recently but as it was white I decided to ink blend some of the pink ink onto it with a blending brush; I think it turned out really well.  I die cut another two white tags and adhered them behind my tag with liquid glue.  I wasn't going to decorate the back this time but couldn't leave it plain, however I had already stuck everything down so had to careful adding things as it was an uneven surface.  I decided not to stencil but instead inked around the edges with the inks and added some of the distressed stamps as I thought it wouldn't matter if they didn't stamp properly.  I did risk stamping the 'to and from' stamp using a clear block but thankfully it stamped ok.  This tag went in a completely different direction that what I planned but I love the finished result.  

I would like to enter my tag into the following challenges:

Alphabet challenge - f is for feathers (my bird has feathers)
Crafty Animals challenge - ATG must include an animal/bird
Creative Moments challenge - use a die cut 
Creative Friday challenge - neon colours or bold colours
Little Red Wagon challenge - to boldly go (use bold colours)
Mix It Up challenge - ATG optional twist mixed media
Stencil Fun challenge - use stencils optional theme your flag colours
Tag-Along (& ATC's) challenge - in the garden/ATG
The Paper Funday challenge - ATG optional twist fun with stencils 
Triple B challenge - birds, blooms or butterflies optional mood board

We hope you will be inspired by our Gorgeous Gift Tags Instagram Hop and will pop over and check out all the gorgeous tags along the way. If you would like to join us please visit my Instagram page or use the hashtag #gorgeousgifttagshop2025 and we will find your tags.
Thanks for stopping by and take care.

Lots of love

card supplies:
Gina K Designs - sun spots stencil
Spellbinders - sweet birdie die set
Spellbinders - big jolly Santa die set (I used Santa's stick as my branch)
Waffle Flower - nesting tags die set
Waffle Flower - nesting circles dies
MFT - distressed patterns stamp - ? retired
Cosmic Shimmer - frosty dawn sparkle texture paste - discontinued
Clearly Besotted - bird bath stamp (for sentiment) - retired
Gina K Designs - sketched wreath builder (for to/from stamp)
Gina K Designs - ink pads - passionate pink and red hot
Limetree Crafts - 250gsm silky smooth white card - not currently available - but they do have 280gsm silky smooth white card available here - but limited numbers
Hobbycraft - A4 black card
ribbon recycled from a dress

Tuesday, 1 July 2025

Pearly Sparkles challenge - guest designer

Hello again friends; here I am again back with my second post for today!  I am delighted to be a guest designer over at Pearly Sparkles challenge this month and their theme is 'shaped card' so we want you to make a fun shaped card - no squares or rectangles allowed.  I hope you have fun with the challenge and I can't wait to see what you create.
Blog Badge
I decided to make a circle card but with a fun twist - I made it into a doughnut shaped card.  It is so much fun and because my son loves pink sprinkled doughnuts I had to make it pink lol!  It's only a dinky 4 1/4" diameter but it makes it even more adorable.  I hope you love it too.
Here is my shaped card:
A closer look:
Plus I decorated the inside:
I began by making a 5" x 5" card base from white card and used the largest of my new nesting circle die set to cut out my circle card base.  I also cut a circle from kraft card to place on the front on my card.  I cut out the next circle down from the die set from pink card and traced a wobbly outline with pencil and cut it out with my scissors for the icing of my doughnut (I should have cut it a little bigger so that the kraft card wasn't showing quite so much but I still think it looks great).  I took one of the smaller circles in the set (approx 1 1/2" diameter) and cut the doughnut hole from the card base, the kraft circle and the pink circle. I adhered the kraft circle with liquid glue and the 'icing' with foam squares.  I was thinking about what to use for the sprinkles when I saw a die on my desk from a previous project that I thought would be perfect - a film strip die - the bits that fell out of the die cut were the perfect size and shape.  I cut out multiples from pink, blue, yellow and white card and added them randomly on the icing with liquid glue.  I added some crystal glaze to the sprinkles so that they would stand out and look dimensional.  I stamped the sentiment onto white card and cut it out with a sentiment strip die, adhered it with foam squares and then added a cute twine bow above it with liquid glue.  For the inside I cut another smaller circle from white card, again cutting the doughnut centre, stamped a small sentiment on either side in black ink and then adhered this to my card base with liquid glue.  I added a few of the sprinkles around the sentiment too.  I did cut a small piece off the back of the card base so that my card would stand up straight without toppling over.  This card really makes me smile and I hope it makes you smile too.  

I would like to enter my card into the following challenges:

Christmas (or not) BINGO challenge - Line I - circle or oval card shape, free, button or knot
Seize The Birthday challenge - ATG birthday/no topping

I would like to thank Helen and everyone at Pearly Sparkles challenge for having me as a guest this month. I hope you will be able to play along with the challenge and I cannot wait to see all your shaped card projects.

Ok, that is it from me for today, but thank you for stopping by and visiting my corner of blogland.

Love and hugs,

card supplies:
Waffle Flower - nesting circle die set
MFT - sweet birthday wishes stamp (for outside sentiment) - no longer available
MFT - sweet 16 stamp (for inside sentiment) - no longer available
Funky Fossil Designs - filmstrip dies (for sprinkles)
Crafter's Companion - kraft cardstock 
Versafine - onyx black ink pad
Tonic Studios - Nuvo crystal glaze 
Limetree Crafts - 250gsm silky smooth white card - not currently available - but they do have 280gsm silky smooth white card available here - but limited numbers
pink card from stash
twine from stash

Thursday, 20 March 2025

Krafty Chicks challenge #760 - CAS

Good morning lovely friends. I hope you're all doing ok and having a great week so far. It's time for a new challenge over at Krafty Chicks challenge and this week we are on Week 3. As always the theme is 'CAS' and Diane is our hostess. We want you to see all your clean and simple creations this week and we hope you will come over and join in the fun with us.
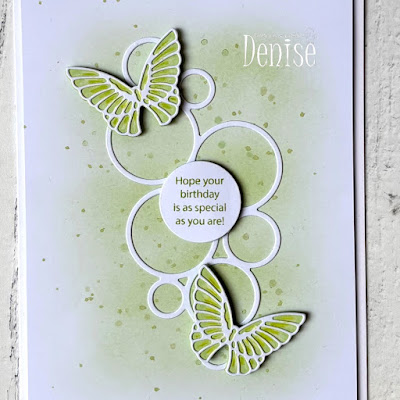
It was my nephew's fiancee's birthday earlier this week and I used this opportunity to make her a card.  Her birthday is on St. Patrick's Day so of course I had to use green (again) as my starting point.   My card is 5" x 7" as always for family.  I hope you like it.
Here is my card:
A closer look at the details:
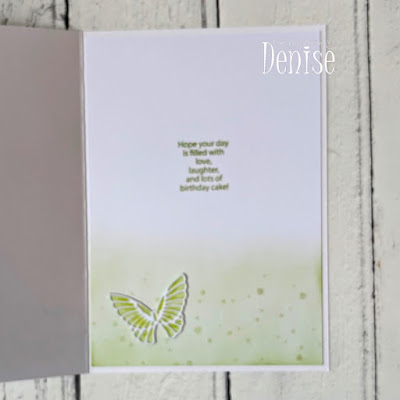
Plus I decorated the inside:
(I didn't realise my photo was out of focus until after I'd posted it)
I began by cutting my white panel 4 3/4" x 6 3/4" and blended some green ink into the centre.  I took a speckle background stamp and used the same green ink to randomly stamp it over the blending (I used second generation stamping for a subtle look).  I smooshed some of the ink onto my glass mat and sprayed it with water and splattered it over the stamped and blended panel for some extra interest.  I die cut the outlined circles from white card and added it to the panel with liquid glue.  I used one of the inner portions that fell out of the die and stamped my sentiment using the same green ink pad and added it into the centre with foam squares.  I die cut two butterflies, which comes in two parts; the detail layer from white card and the backer piece from green card.  I adhered them together with liquid glue.  I also added some pencil highlights so that it wasn't a flat colour.  These were added over the top left and bottom right of the white die cut with liquid glue.  I didn't add any embellishments and I liked it as it was.  The inside photo is out of focus but I didn't realise until after I had posted the card but I think you can get the gist.  I cut another panel 4 3/4" x 6 3/4" and ink blended the green ink at the very bottom, again using the speckle background and some splatters as before.  I die cut another butterfly and added it with liquid glue to the left lower corner.  I stamped my sentiment in the centre with green ink.  A really simple card but I think it's really pretty.  
I would like to enter my card into the following challenges:

AAA Cards challenge - follow my lead
AAA Colourful challenge - colour board #14
Aud Sentiments challenge - glitter & bling or St. Patrick's Day/Green + sentiment
Classic Design challenge - ATG optional twist bunnies, blooms or butterflies
Colourful Options challenge - it's not easy being green
Craft Rocket challenge - for the girls
Crafter's Cafe challenge - ATG option CAS
Get Creative challenge - happy birthday Barbie (card for a woman)
Make My Monday challenge - use a die or punch (3rd entry)
PINspirational challenge - spring greens optional inspiration photo
Triple B challenge - use at least one bird, bloom or butterfly optional mood board

I hope you will be able to join us for our 'CAS' challenge and I cannot wait to see your creations in our linky. Please leave some love for my fellow chicks - Leanne, Diane and Lori.

Thank you so much for stopping by; I appreciate your lovely comments.

Love and hugs,

card ingredients:
Waffle Flower - outlined circles die
Visible Image - speckle background clear stamp - no longer available
Clearly Besotted - butterfly duo die collection - retired
Gina K Designs - birthday cheer mini stamp
Gina K Designs - grass green ink pad
Limetree Crafts - 250gsm silky smooth white card - currently unavailable

Wednesday, 14 August 2024

Summer Soiree Card Making IG Hop - Week 9

Hello friends; I hope you've had a great start to your week.  Another week has whizzed by in a blink of an eye; it will be Christmas before we know it lol!  

We are now up to Week 9 of our Summer Soiree IG card hop, which has been organised by my lovely friend Kelly. This week's theme is 'road trips or summer celebrations' so this one is really open as you could even have a wedding card as a summer celebration. 
I decided to combine the themes and have a car load of friends celebrating a birthday on a road trip haha!  I recently picked up this stamp set on an amazing deal and it was really perfect timing for my card this week.  I hope you like it.
Here is my card:
A close up of the fun image:
I decorated the inside too:
I began by stamping the images onto alcohol marker friendly card and coloured them with Promarkers.  I used the matching dies to cut everything out.  I cut a white card panel 4" x 5 1/4" and lightly ink blended some clouds in the top 2/3rds using a mini cloud edge stencil.  For the 'road' I cut a piece of mid grey card 1 1/4" x 4" and adhered this to the bottom of the panel.  Before adding the panel to the card base I stamped the party time sentiment in alcohol marker friendly black ink and again coloured it with Promarkers.  I adhered the panel with foam tape and arranged the die cut images before adding them with foam squares.  No extra embellishments this time but I did add a few white gel pen highlights to the images.  For the inside I cut another white panel 4" x 5 1/4" and stamped 3 of the presents in the bottom right corner and again coloured them with Promarkers.  I stamped a sentiment across the centre in black ink.  I adhered the panel to the card base with double sided tape.  A really fun image and I enjoyed making this card.

I would like to enter my card into the following challenges:

AAA Cards challenge - anything CAS goes optional twist: holidays/travels
Allsorts challenge - summer days/ATG
As You Like It challenge - bugs, feathers or fur - I love cute critters so will always go fur 
Crafty Animals challenge - ATG must include an animal
Critter Crazy challenge - ATG with a featured critter
Dream Valley challenge - hand coloured image
I Love Promarkers challenge - ATG/my best friend
Inkspirational challenge - mood board - inspired by the colours
Stencil Fun challenge - anything stencil goes optional twist: summertime
The Cutie Pie challenge - four legged friends
We Love Stamping challenge - focal sentiment or quote/ATG

If you would like to follow the hop over on Instagram please use the hashtag #summersoireecardmakinghop2024 to find us or alternatively visit my profile and you will find the list of participants in my post.  We would love it if you would give the summer soiree challenges a try and again use the hashtag and we will find your projects.  

I'll be back tomorrow with my card for the Krafty Chicks challenge but until then enjoy the rest of your day and thank you for stopping by. 

Love and hugs,

card ingredients:
Waffle Flower - limo ride stamp & die set (it looks like the stamp is now sold out)
Promarkers
MFT - mini cloud edge stencil - retired
Gina K Designs - on the inside stamp (inside sentiment)
Gina K Designs - sea glass ink pad
Memento - tuxedo black ink 
Versafine - onyx black ink 
grey card from scraps bin

Sunday, 24 March 2024

A bit o' green (and gold)

Hello and happy Sunday friends.   I hope you've all had a wonderful weekend; although it seemed to go by in a blur it was so fast.  I'm sharing a card that I originally was going to post last Sunday (St. Patrick's Day) but time got away from me but I thought I would still share it.  It's not a SPD card but it is green so I thought I would have been perfect for last Sunday.  I hope you like it.  
Here is my card:
a close up of the focal image:
I decorated the inside:
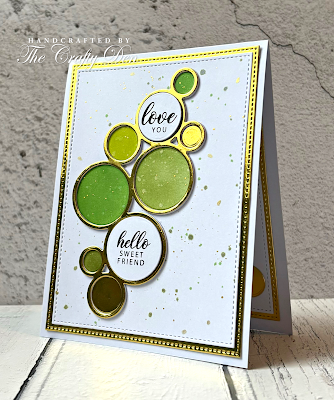
I began by die cutting the circle die from gold mirror card and a further 3 times from white card and adhering them together with liquid glue.  I took the circle pieces from one of the white die cuts and ink blended onto them using 5 different colours of green ink.  I cut a white panel with a stitched rectangle and a slightly larger gold panel with another stitched panel.  Using some of the green ink that I used to ink blend with I splattered the background; I also added some gold splatter.  I adhered the panels together with double sided tape.  I took 2 of the white circles and stamped them with sentiments using black ink.  I added the gold circle outline die cut and the green ink blended circles with liquid glue.  The white stamped circles were added with foam squares for some dimension.  I didn't think the card needed any further embellishments as it was sparkly enough.  For the inside I cut another 2 stitched rectangle panels and added a few ink blended and gold circles randomly at the very bottom.  I didn't add a sentiment as I thought this card could be used for many different occasions and I can add it when needed.  

I would like to enter my card into the following challenges:

Allsorts challenge - keep it simple
Aud Sentiments challenge - use glitter/bling and/or green/St. Patrick's + sentiment
Double D challenge - green/clover/shamrock/luck
Dream Valley challenge - dies and/or punches (3rd entry)
Inspiration Station challenge - I was instantly drawn to the colour of their skirts

That's it for now but I'll be back on Wednesday with my Week 3 card for the Spring into Cardmaking IG Hop so until then take care and thanks for stopping by.  
  
card ingredients:
Waffle Flower - outlined circles die
Gina K Designs - Lovely Flowers stamp set (for sentiments)*
Gold mirror card from my stash
Kuretake Gansai Tambi - starry colours palette (I used yellow gold for my splatter)
Versafine - onyx black ink 

* should be available once new kit is released

Wednesday, 1 November 2023

AAA Birthday challenge - DT card

Hello friends and happy 1st of November.  I hope you had a great October (although not too sure where it went) and are ready for a brand new AAA Birthday challenge.  We have two hostesses this month and they will each pick a winner - Helen and Kati - and their theme this month is 'large sentiment'; but remember it has to be birthday themed.  Our guest designer this month is Deborah Wheeler so please pop over and show her some love.  
I made two cards this month but was really struggling with lack of mojo so they ended up being very clean and simple.   Here are my cards:
a close up of card one:
I also decorated the inside:
a close up of card two:
I also decorated the inside:
For card one, I began by ink blending a panel using 3 warm colours of ink, added some water droplets and stamped the sentiment over top in black ink.  I used the matching die to cut it out.  I used a dashed rhombus panel die for my background and I did try partial ink blending but didn't like it so in the end I stuck with white.  I cut a black mat layer and adhered them together with double sided tape.  The large sentiment was added with foam squares.  I decided to add a sub sentiment from the same stamp set and stamped it onto black card with white embossing powder.  I then die cut it with a strip sentiment die and added it below the large sentiment with liquid glue.  The panel was added to an A2 card base with foam tape.  I finished off with some black sequins.

For card two, as I had a spare die cut left over I thought I would try and stamp directly onto the die cut and if I messed up it wouldn't matter.  I wanted something different to my first card so I stamped it in versa mark and heat embossed it in gold.  I surprised myself by stamping it perfectly (although I did a test stamp first onto acetate to double check my placement - a tip I learned from Gina K).  I used an embossing folder for this background and matted it onto gold mirror card with double sided tape.  I added the large sentiment with foam squares and finished off with some gold sequins.  The panel was adhered onto the card base with double sided tape.  

Please pop over to the challenge blog and check out the wonderful creations from the rest of the DT; you will not be disappointed.  

I would like to enter my cards into the following challenges:

Allsorts challenge - embossing heat or dry (I've used both on my gold/white card)
Can You Handle the Pressure challenge - embossing option vines/greenery
Cut it Up challenge - add a sentiment (must include a die cut)
Just Us Girls challenge - CAS week - just use the centre of your card
Seize the Birthday challenge - ATG birthday - no topping this time
Simon Says Stamp Wednesday challenge - emboss it (heat and dry embossing on my gold card)
The Sisterhood of Crafters challenge - get inky (I ink blended on my red/pink/purple card)

I hope you will be able to find the time to enter our challenge this month and I cannot wait to see your birthday creations in our linky.  

Enjoy the rest of your day and thank you so much for stopping by. 

Love and hugs, 

card ingredients:

Waffle Flower - dashed rhombus panel die
Spellbinders - essentials sequins in black smooth and gold smooth discs
Gina K Designs - sentiment strips dies
Gina K Designs - birthday cheer (for inside sentiments)
Gina K Designs - inks for blending red velvet, passionate pink and wild lilac
Gina K Designs - blending brushes
Limetree Crafts - 250gsm white smooth card
gold mirror card from stash