My Lovely Followers

Showing posts with label Gorgeous Gift Tags IG Hop. Show all posts

Tuesday, 5 August 2025

Gorgeous Gift Tags IG Hop August 25

Hello friends, I hope you're doing ok and that you've had a lovely day so far. It's time for a new theme for the Gorgeous Gift Tags IG Hop, which takes place on the 5th of each month. You always have the option to go for anything goes but the extra prompt this month is travel/vacation', which is fun theme and open to interpretation. I can't wait to see what the rest of my fellow hoppers have made.  I hope you can pop over to Instagram and join us. 
I decided to make a little scene on my tag this month and went bright, summery and cute.  I hope you like it. 
Here is my tag:
A closer look at the image:
Plus I decorated the back:
I began by die cutting the tag and the inner panel from white card (I didn't realise how large the tag was when I bought it - it's 4" x 6" so plenty of room to create my scene).  I ink blended the clouds on the inner panel and added a grey piece of card at the bottom; to imitate the road I used a white gelly roll pen to add some dashed lines.  I stamped the little critter and the sun, coloured them with Promarkers and used the coordinating die to cut them out.  I die cut the cute car from a light orange card, the little clouds from white card and the 'for you' from black card.  I added the inner panel onto the tag with liquid glue as well as the 'road' to the bottom.  I die cut 3 extra cars from white card and layered them with liquid glue.  I adhered the critter with liquid glue and then added that to the road with liquid glue also.  The sun and the 'for you' were adhered with liquid glue and the clouds were added with foam squares.  I found 3 different ribbon/twine that coordinated with my colour scheme and tied them to my tag.  I finished off with some white gelly roll pen highlights.  For the back of the tag I again ink blended the clouds, die cut the 'to/from' from black card and 2 more white clouds; I adhered them all with liquid glue.  A really sweet tag and suitable for children and adults alike I think.  

I would like to enter my tag into the following challenges:

613 Avenue Create challenge - ATG optional twist summer fun
As You Like It challenge - favourite, cats or dogs (this is a hard one as I love both (and have one of each); cats today but it will be dogs tomorrow lol!)
Aud Sentiments challenge - any shape (except rectangle) and/or washi tape + sentiment
Color Dare challenge - #663 - orange, yellow blue
Crafty Animals challenge - ATG must include an animal
Critter Crazy challenge - ATG with a featured critter
Show Us Your Pussy challenge - ATG but must feature a cat
Sweet Stampin' challenge - use a stencil

We hope you will be inspired by our Gorgeous Gift Tags Instagram Hop and will pop over and check out all the gorgeous tags along the way. If you would like to join us please visit my Instagram page or use the hashtag #gorgeousgifttagshop2025 and we will find your tags. 

Thanks for stopping by and take care.

Lots of love
 
card supplies:
Marianne Design - big tag CR1551 die set
MFT - mini cloud edges stencil
MFT - gifty greetings die set
Gina K Designs - the good life stamp & die set (for sunshine)
Gina K Designs - ocean mist ink pad
Heffy Doodle - alcohol marker friendly card - store now closed
Limetree Crafts - 250gsm silky smooth white card - not currently available - but they do have 280gsm silky smooth white card available here
ribbon and coloured card from stash

Saturday, 5 July 2025

Gorgeous Gift Tags IG Hop July 25

Hello friends, I hope you're having a lovely Saturday so far. It's time for this month's Gorgeous Gift Tags IG Hop, which takes place on the 5th of each month. You always have the option to go for anything goes but the extra prompt this month is 'stencil(s)', which is a fab theme. I expect the rest of the hop will have some gorgeous stencilled creations so I hope you will pop over to Instagram and check them out.  
Stencils are such a staple in a crafters arsenal these days that it's not really a challenge to use them. I actually used two different stencils on my tag and it ended up with a mixed media vibe, which I love.  I hope you like it too. 
Here is my tag:
A closer look at the details:
Plus I decorated the back:
I began by stencilling the sun spots stencil using red and pink ink onto a piece of white card and then used my tag die to cut it out.  I wanted to add some texture so grabbed my white texture paste but unfortunately it had dried up and I couldn't use it so instead found a sparkle texture paste so used that instead.  The sparkle paste is really pretty and although it doesn't stand out as much as the white the paste really glistens in the light for a different effect.  Once that was dry I added some white splatters all over the tag.  I debated for ages as to what to use as my focal point and then remembered I had this cute birdie die set that hadn't been used so thought I would show him some love.  I ink blended some of the pink and red ink onto scraps of white card and used that to die cut most of my pieces for the bird.  I did use black for the base layer and white for the eye patch piece.  I adhered him together with liquid glue and added the top layer of the wing with a foam square.  I die cut the 'branch' from brown card.  So that my bird wouldn't be lost on the tag I die cut a circle from vellum to use as a grounding piece and I adhered the bird with foam squares.  The vellum was also added to the tag with foam squares.  I white heat embossed my sentiment onto a scrap of black card and cut it out with a sentiment strip die; this was adhered with liquid glue.  I felt that my tag needed a bit more black so grabbed a stamp set of distressed patterns and randomly stamped them onto the background with black ink.  I recycled some ribbon from a dress I bought recently but as it was white I decided to ink blend some of the pink ink onto it with a blending brush; I think it turned out really well.  I die cut another two white tags and adhered them behind my tag with liquid glue.  I wasn't going to decorate the back this time but couldn't leave it plain, however I had already stuck everything down so had to careful adding things as it was an uneven surface.  I decided not to stencil but instead inked around the edges with the inks and added some of the distressed stamps as I thought it wouldn't matter if they didn't stamp properly.  I did risk stamping the 'to and from' stamp using a clear block but thankfully it stamped ok.  This tag went in a completely different direction that what I planned but I love the finished result.  

I would like to enter my tag into the following challenges:

Alphabet challenge - f is for feathers (my bird has feathers)
Crafty Animals challenge - ATG must include an animal/bird
Creative Moments challenge - use a die cut 
Creative Friday challenge - neon colours or bold colours
Little Red Wagon challenge - to boldly go (use bold colours)
Mix It Up challenge - ATG optional twist mixed media
Stencil Fun challenge - use stencils optional theme your flag colours
Tag-Along (& ATC's) challenge - in the garden/ATG
The Paper Funday challenge - ATG optional twist fun with stencils 
Triple B challenge - birds, blooms or butterflies optional mood board

We hope you will be inspired by our Gorgeous Gift Tags Instagram Hop and will pop over and check out all the gorgeous tags along the way. If you would like to join us please visit my Instagram page or use the hashtag #gorgeousgifttagshop2025 and we will find your tags.
Thanks for stopping by and take care.

Lots of love

card supplies:
Gina K Designs - sun spots stencil
Spellbinders - sweet birdie die set
Spellbinders - big jolly Santa die set (I used Santa's stick as my branch)
Waffle Flower - nesting tags die set
Waffle Flower - nesting circles dies
MFT - distressed patterns stamp - ? retired
Cosmic Shimmer - frosty dawn sparkle texture paste - discontinued
Clearly Besotted - bird bath stamp (for sentiment) - retired
Gina K Designs - sketched wreath builder (for to/from stamp)
Gina K Designs - ink pads - passionate pink and red hot
Limetree Crafts - 250gsm silky smooth white card - not currently available - but they do have 280gsm silky smooth white card available here - but limited numbers
Hobbycraft - A4 black card
ribbon recycled from a dress

Monday, 5 May 2025

Gorgeous Gift Tags IG Hop May 25

Hello friends and Happy Bank Holiday Monday. I hope you've had a lovely day and a chilled weekend. I am delighted to be joining a new Instagram Hop called Gorgeous Gift Tags, which not surprisingly is all about tags! I don't make them very often but think they are so useful to decorate a plain gift bag. I have joined a fantastic group of crafty friends who love to create gorgeous gift tags. We will be hopping on the 5th of each month to share our ideas.  Each month will be ATG but we will have an optional theme; however as it's our first month we are just going with ATG this time.  
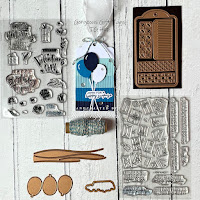
I bought a tag die set from Spellbinders ages ago and hadn't used it so wanted to give it some love. My son and my BIL's birthdays are coming up soon so I went with blue as my colour scheme so one of them will be getting this tag on their present lol!. I hope you like it.
Here is my tag:
A closer look at the details:
I stamped a simple To: From: on the back:
I began by die cutting the tag twice from white card so that I could stamp the back separately in case I messed up lol! I die cut the fringed detail from 4 different shades of blue card and also cut 3 balloons, 2 from blue and one from white for some contrast. I also cut some balloon strings from white card. I added the fringed pieces, starting from the bottom from darkest to lightest, with double sided tape. The balloons were added with foam squares and I added some liquid glue to the strings. I stamped the sentiment onto some scrap white card using a dark blue ink pad and used the coordinating die to cut it out. I cut an additional 2 layers from white card and adhered them together with liquid glue. This was added over the balloon strings with liquid glue. For a finishing touch I added some clear quartz sequins. For the tag on the back I simply stamped a To: From: using the same dark blue ink pad and adhered them together with liquid glue. For decorating the top of the tag I used some white tulle ribbon (which was recycled from the box of my husband's birthday cake) and some blue/white twine which was tied around the tulle in a tiny bow. I'm really pleased with how my tag turned out.

I would like to enter my tag into the following challenges:

Christmas (or not ) Bingo challenge - tag, monochrome, free
Colorful Options challenge - color palette (I was inspired by the blue colours)
Little Red Wagon challenge - use that stash (my tag die is old but never used)
The Neglected Stuff challenge - ATG but use neglected stuff (my tag is old but never used)
Tic Tac Toe challenge - die cut, birthday, stripes

We hope you will be inspired by our Gift Tag Instagram Hop and will pop over and check out all the gorgeous tags along the way. If you would like to join us please use the hashtag #gorgeousgifttagshop2025 and we can find your tags.

Thanks for stopping by and take care.

Lots of love

card supplies:
Spellbinders - send & seal stamp & die set (released Apr but can't find it)
Spellbinders - balloons & birthday wishes die set - retired
Gina K Designs - in the navy ink pad
Limetree Crafts - 250gsm silky smooth white card - not currently available - they do have 300gsm bright white card available here
coloured card stock from scraps bin
twine from stash
tulle ribbon recycled from packaging