My Lovely Followers

Showing posts with label my minds eye. Show all posts

Tuesday, 19 May 2026

Patterned Paper Party IG Hop - May 26

Hello friends, welcome back to my little blog. I'm here today to share my card for this month's Patterned Paper Party Instagram Hop. Do you love patterned paper? Do you have a huge stash that needs using? Well so do we and it's time to get it used! We will be hopping on the 20th of each month to share our ideas. We will definitely be creating cards, but maybe sometimes tags, ATCs, gift bags/boxes, mini albums and scrapbook pages too. We want our patterned paper to be used.
The theme is always 'anything goes' but each month we will have an optional twist that can be used if you like; this month the twist is 'distressed edges' which I know was really popular quite a few years ago but it can look really fun, especially for mixed media or masculine cards. I made a card for my sons to give to their uncle for his birthday and it's 5" square for a change.  Unbelievably no dies and only sentiment stamps were used on my card.  I hope you like it.
Here is my card:
A closer look at the details:
Plus I decorated the inside:
I began by choosing my papers (all from the same paper pad) and tore thin strips, leaving the raw edges on show and I used what was left on my blending brushes to ink the edges.  I used one of the strips to stamp my greeting in black ink.  I was going to put the strips directly onto my card blank but I thought it looked 'too clean' so choose another paper from the paper that looked quite grungy and distressed and added that to the card base with double sided tape.  I added my strips, adding foam squares behind the outer and middle strips and double sided tape to the two inner strips.  Before I added the sentiment I curled up some black twine for some extra interest and placed it behind.  The sentiment was then laid across the strips using a combination of foam squares and liquid glue.  I didn't add any embellishments as I thought it looked ok as it was.  A fairly simple layout but perfect for my brother in law.  For the inside I cut a white panel 4 3/4" square and as I had some leftover torn strips I added them to the bottom with double sided tape.  I stamped a sentiment in the centre with black ink and then adhered the panel to the card base with double sided tape.  

I would like to enter my card into the following challenges:

Classic Design challenge - ATG optional twist anniversary or birthday
Creative Crafting Uncles challenge - vintage (I hope my distressed papers are ok, if not delete me)
Creative Moments challenge - make it masculine
Love Those Pretty Papers challenge - ATG must use your papers optional theme fancy folds
Paper Rocks Scissors challenge - use papers and/or scissors

We hope you will be inspired by our Patterned Paper Party IG Hop and will pop over and check out all the gorgeous creations along the way. If you would like to join us please visit my Instagram page or use the hashtag #patternedpaperpartyhopmay2026 and we will find you.

Thanks for stopping by and take care.

Lots of love

card supplies:
My Minds Eye - now & then 'Izzy' 6x6 paper pad
Uniko - everyday family stamp (for uncle part of sentiment)
Uniko - floral vines stamp (for happy birthday)
Uniko - birthday wishes stamp (for inside sentiment)
Limetree Craft - 280gsm silky smooth white card (not available but other options are here and here)
Versafine Clair - nocturne ink pad
black twine from my stash

Monday, 1 September 2025

AAA Birthday challenge #77 - snarky

Hello again friends and happy 1st of September.  I hope you all had a wonderful summer and the kids are ready to go back to school soon.   Let's hope the first of the 'ber' months isn't too bad and we have some crisp, dry days and not lots of rain!  

I'm here today to share my card for this month's AAA Birthday challenge and this month our theme is 'snarky' which is such a fun challenge. The urban dictionary's definition is:

"Snarky" is used to describe speech with a specific emotional tone, typically a form of sarcasm informed by cheekiness and a mild, playful irreverence or impudence".

We all love playful, fun sentiments and there are loads of stamp companies that make these types of greetings.  Dig through your stash, I'm sure you have some; even if it's just 'you're how old?'  Our guest designer this month is the lovely Carol so please pop over to her blog and leave her some love.
As you know I love MFT Stamps (so sad they are now closed) and I had the perfect set for this challenge.  I don't think I will ever not grab for my MFT products as they are so fun.  Anyway enough waffling, I hope you like it.
Here is my card:
A closer look at the image:
Plus I decorated the inside:
I began by cutting a white panel using a stitched rectangle die.  I cut the strip of striped patterned paper using a torn edge die and also the stitched rectangle die so that it would match up with the white panel (in hinsight I could have skipped the torn edge as I ended up covering most of it lol!).  I adhered this to the left edge of the panel with liquid glue.  I cut a small strip of spotty paper and added that to the bottom of the panel with liquid glue.  I also die cut a stitched rounded rectangle from some grid paper and adhered that to the centre with double sided tape, overlapping the other patterned papers.  I stamped the image onto alcohol marker friendly card and coloured it with Promarkers.  I don't have the dies for this set so I fussy cut him out.  I stamped the snarky sentiment onto orange card with Versamark ink and white heat embossed it, using my trimmer to cut it out.  I added foam squares to the sentiment and image and adhered the sentiment just overlapping the spotty paper and the image on top so that he looked like he was standing on it.  I finished off with some enamel dots (still trying to use them up).  For the inside I cut a white panel 4" x 5 1/4" and added a strip of orange card at the bottom with double sided tape and then a piece of the striped paper with liquid glue, which I again cut with the torn edge die.  I fussy cut another image, but this time only the top half, coloured him with Promarkers and added him with liquid glue.  I stamped the sentiment in the centre with navy ink.  The panel was adhered to the card base with double sided tape.  A really fun card and I think this will be perfect for any of my older relatives.  

I would like to enter my card into the following challenges:

A Cut Above challenge - ATG with a die cut
Allsorts challenge - birthdays or ATG (it is a birthday card, it says HBD on the inside)
As You Like It challenge - favourite colouring medium (I have used Promarkers for over 15 years; they blend well and most of my pens are the original ones and are still going strong)
Christmas (or not) BINGO challenge - Line N - stripes, free, stamped phrase
Crafter's Cafe challenge - ATG optional 'use patterned papers'
Dream Valley challenge - 2 or more papers
Little Red Wagon challenge - G is for gentlemen
Simon Says Stamp Monday challenge - stamp it in STAMPtember

The Design Team have created amazing cards as always so please pop over to the blog and check them out and perhaps leave them some love on their personal blogs. I hope you will be able to join in with the challenge this month but don't forget it has to be birthday themed. I can't wait to see your creations in the linky.

Have a great day.

Love and hugs,

card supplies:
MFT - blueprints 13 (for stitched rectangle)
MFT - torn paper edges die set
MFT - stitched rounded rectangle stack die set
LDRS Creative - happy fall 6x6 paper pad (for striped paper)
My Mind's Eye - now & then 'Izzy' 6x6 paper pad (for other papers)
Versamark - watermark ink pad
Gina K Designs - in the navy ink pad
Your Next Stamp - self adhesive enamel dots - summer chill & white sugar & sparkle
orange card from my scraps bin

Wednesday, 20 August 2025

Patterned Paper IG Hop - August

Hello friends; I hope you're having a great week so far.  I'm here today to share my card for this month's Patterned Paper Party Instagram Hop. Do you love patterned paper? Do you have a huge stash that needs using? Well so do we and it's time to get it used! We will be hopping on the 20th of each month to share our ideas. We will definitely be creating cards, but maybe sometimes tags, ATCs, gift bags, boxes, mini albums and scrapbook pages too. We want our patterned paper to be used.
The theme is always 'anything goes' but each month we will have an optional twist that can be used if you like; this month the twist is 'banner' so grab your banner dies and your patterned papers and have fun. I was inspired by a gorgeous layout I saw on Pinterest so that was my starting point.  I used pretty, soft colours and a CAS design.  I hope you like it.  
Here is my card:
A closer look at the pretty papers:
Plus I decorated the inside:
I began by cutting a white panel 4" x 5 1/4".  I wanted a strip of grey behind my banners but couldn't find any paper I liked so I cut a 1 1/2" strip from fog grey card and stamped a pin dot pattern in a tone on tone grey ink.  I added this to the right side of the panel with double sided tape.  I cut the banners from 3 different patterned papers (but from the same pad) and also one from white card, which I used to stamp my sentiment.  I'm finding lately that I need thank you cards so that's what I made today.  I adhered the 3 patterned banners in a staggered layout with liquid glue; the white banner was added over the top with foam squares.  I finished off with some enamel dots (I found quite a few packets recently so I'm trying to use them up).  I added some scrap white card behind my panel for stability and dimension and then this was added to my card base with double sided tape. For the inside I cut another white panel 4" x 5/14" and added a tone on tone stamped grey strip of card to the bottom with double sided tape.  I die cut another set of banners and adhered them at the bottom of the panel with liquid glue.  I stamped a sentiment in the centre with black ink.  The panel was adhered to the card base with double sided tape.  I'm really happy with how this card turned out and it was relatively quick to make too, which was a bonus.  

I would like to enter my card into the following challenges:

AAA Cards challenge - anything CAS goes optional twist 'all the greens'
A Cut Above challenge - ATG with a die cut
Allsorts challenge - I spy something beginning with B - banners
CAS Colours & Sketches challenge - colour challenge #567
Let's Craft and Create challenge - ATG must use a punch/die optional polkadots and/or stripes
Love Those Pretty Papers challenge - ATG focus on pretty papers optional summertime
Simon Says Stamp Wednesday challenge - stitch it (my banners have stitching detail)

We hope you will be inspired by our Patterned Paper Party IG Hop and will pop over and check out all the gorgeous creations along the way. If you would like to join us please visit my Instagram page or use the hashtag #patternedpaperpartyhopaugust2025 and we will find you.

I'll be back tomorrow with my card for the Krafty Chicks challenge, so I hope you can pop back and check it out.  Thanks for stopping by and take care.

Lots of love

card supplies:
Gina K Designs - Master Layouts 5 die set (for banner die)
Gina K Designs - sketched roses stamp (for sentiment) - last month's incentive set but will be available very soon
Gina K Designs - pin dot background stamp
Gina K Designs - you are enough stamp (for inside sentiment)
Gina K Designs - soft stone ink pad
Simon Says Stamp - fog gray card 
Echo Park - little girl dots & stripes 6x6 paper pad 
Versafine Clair - nocturne ink pad
My Mind's Eye - 'ashbury heights' enamel dots

Thursday, 9 May 2024

Krafty Chicks challenge #715 - Christmas

Good morning lovely friends; I hope you're having a brilliant week so far.  Well the weather here has 
been glorious this week so I've nothing to complain about lol!  I even have an (almost) empty washing basket - which makes me very happy!  

It's the start of a brand new challenge over at Krafty Chicks challenge and this week is Week 2 and as always I am the hostess.  For this week's challenge it's all about Christmas so grab your festive supplies and beat the rush in December.
I decided to dig out an old wood rubber stamp and show it some love.  I have a drawer full and they are so lovely that I feel bad neglecting them.  I must start making an effort to use them in the coming weeks.  
Here is my card:
A close up of the image:
I decorated the inside (not sure why the gold edge looks so wonky, it doesn't look like that in real life):
I began by stamping the image onto alcohol marker friendly card using memento ink and used my Promarkers to colour it.  I have also rediscovered my 'puffy stuff' so added that to the bottom of the image to mimic snow.  It's pretty cool stuff, it goes on like a thick paint but when you heat it with your heat tool it puffs up and hardens.  I die cut the image with a circle die and used the larger size to make a frame with gold mirror card.  I also die cut a topper die so that it would look like a bauble which was adhered to the circles with liquid glue. I stamped a simple sentiment in black ink onto the white circle.  I used some old 6x6 papers to create my background and added some thin strips of the gold card to cover the joins.  I added foam tape behind the patterned paper and added it to my card base.  The bauble was then also adhered with foam tape (I also added a thin sliver of foam tape behind the topper 'string').  I didn't add any extra bling as there was lots of shine from the mirror card.  For the inside I added a thick strip of the green paper, a small strip of the red paper and a thin strip of the gold card at the bottom of my panel.  I then stamped a sentiment in the centre with black ink.  This panel was adhered to the card base with double sided tape.  A fairly simple card but I think it looks really cute.  

I would like to enter my card into the following challenges:

As You Like It challenge - soft or bold colours (I prefer bold colours especially when colouring an image as I'm a bit too heavy handed to use soft colours!)
Crafty Animals challenge - ATG must include an animal
Critter Crazy challenge - ATG with a featured critter
Cut It Up challenge - add a sentiment
Incy Wincy Designs challenge - spring and/or animals
Inkspirational challenge - seasonal (winter)
Merry Little Christmas challenge - anything Christmas goes
Peace on Earth challenge - anything Christmas themed
Penny Black Saturday challenge - ATG option pastel colours
PINspirational challenge - designer or patterned paper

I hope you will be able to join us for our 'Christmas' challenge and I cannot wait to see your creations in our linky.  Please leave some love for my fellow chicks - Leanne, Diane and Lori and also our guest designer Rachelle, who is joining us again this month. 

Enjoy the rest of your day and thanks for stopping by. 

Love and hugs, 
Card ingredients:
Penny Black Stamps - Wishing (2998H)
Gina K Designs - holiday toppers dies
Inkylicious - fluffy puffy stuff 
My Mind's Eye - Be Merry 6x6 paper pad
Personal Impressions - Big Christmas Essentials stamp set
Personal Impressions (Paula Pascual) - Christmas messages stamp set (for inside sentiment)
Promarkers
Versafine - onyx black ink pad
gold mirror card from stash

Wednesday, 23 August 2023

Falling For Wednesday IG Hop - week 1

Hello again friends; I hope you're having a wonderful Wednesday.  I can't believe I'm back again so soon; I hope you're not getting too bored of me lol!  

Today's post is week 1 of an IG hop that I'm taking part in called 'Falling for Wednesdays' organised once again by my lovely friend Kelly and this hop will last for the next 7 weeks.  It's a continuation of the Summer Crush Wednesdays hop that we did in the summer but this time it's all about fall (or autumn if you're this side of the pond).  Week 1 is all about fall colours so you can make whatever you like as long as your main colours are brown, orange, red, green etc.  


Here is my card:


a closer look at my images:


plus I decorated the inside:


For my card I used a Gina K Designs bundle which includes a stamp set, layering stencils and matching die cuts.  I began by stamping my images and used the layering stencils to 'colour' them.  Once coloured I cut them out with the dies.  I dug out an old 6x6 paper pad and this orange patterned paper was perfect to go with my butterfly and flowers.  I matted the paper onto a black card panel and adhered it to my card front with liquid glue.  I used a smaller white card panel as a base for my images which I added with foam tape and then stamped my sentiment in black ink.  A few gold pearls to the centres of the butterfly and flowers and my card was complete.  I had one flower left over and a small strip of the paper so decorated the inside and added a birthday sentiment.  

I would like to enter my card into the following challenges:

Stencil Fun challenge - use stencils option butterflies (I used layering stencils)
My Time To Craft challenge - stencilling (I used laying stencils)
Make My Monday challenge - 3 images of something (3 flowers)
Inspiration Station challenge - photo inspiration (inspired by butterflies and flowers)
NBUS - Never used this Gina K bundle before
Tic Tac Toe challenge - patterned paper/free/birthday


I hope you will pop over to Instagram and check out the hop; use the hashtag #ffwcardgroup2023 to see all the gorgeous creations and also if you want to participate we will be able to find you.  

Enjoy the rest of your day and thank you so much for stopping by.

Love and hugs, 


card ingredients:

Gina K Designs - You give me butterflies bundle (bundle has been broken up now but items can be purchased individually)
MME - now and then 'Izzy' 6x6 paper pad
Versafine - onyx black ink pad
Hobbycraft - black card
Limetree Crafts - 250gsm white smooth card

Monday, 14 September 2020

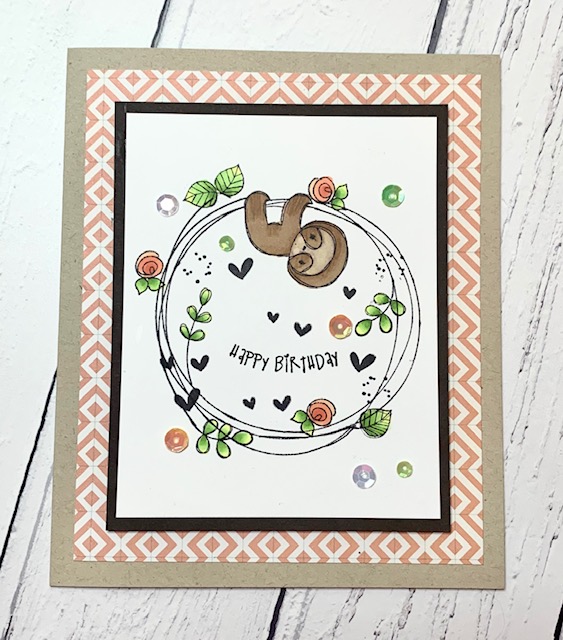
Sloth happy birthday

A colleague at work recently celebrated her birthday and she is obsessed with sloths.  I remembered I had this fun stamp set from Tracey Hey which would be so perfect for her.  

This is the card I made:


I made a matching envelope:


close up of the card:


I also decorated the inside:


I began by stamping the fun image with memento tuxedo black ink and coloured the image with Promarkers.  I cut the panel and added a chocolate brown layer behind it to frame the image.  I made a kraft card blank and attached a piece of patterned paper with liquid glue.  I then attached my coloured panel onto this with foam tape.  I finished by adding some sequins for a bit of bling.  For the inside I used the same chocolate card and added the left over pieces of patterned paper to the edges and stamped a sentiment in the centre.  Simple but I think it ties everything together to use elements from the front of my card on the inside.  

I am entering this card into the following challenges:

Allsorts challenge - I love.... challenge (I love colouring, cute images and making my own envelopes)

I hope you are all keeping well.  The news is full of talk that there may be another lockdown soon; I really hope it doesn't happen this time.  Let's hope everyone complies with wearing their masks and social distancing before it gets that far.  

Enjoy the lovely weather but remember to stay safe. 

card ingredients:
Tracey Hey Alpaca Pals - rocking the wreath stamp set
Crafter's Companion - Neenah desert storm card
Chocolate card from stash
Little Things from Lucy's Cards - just peachy sequins
MME 'now & then' - Izzy 6x6 paper pad
Memento Tuxedo black ink pad
Versafine Onyx black ink pad (for sentiments)
We R Memory Keepers - envelope punch board
Promarkers:
forest green, bright green, leaf green, lime zest
orange, mango, soft peach
burnt sienna, cinnamon, caramel, sandstone

Thursday, 12 April 2012

Charisma cardz challenge–DT card

Good morning dear friends.  I cannot believe it’s Thursday already, the week is flying by, although I’m not complaining!!  Work is super busy at the moment and the day just whizzes by, which is fantastic, although I do think I’m wishing my life away lol!

It’s time for a brand new challenge over at charisma cardz challenge and it’s Team Gem’s week to share their cards.  The lovely Joyce has set the theme this week and she has chosen “fancy folds”.  Now as I was a bit tight for time I played it safe and made an easel card although I do find them extremely difficult to photograph and I forgot to take a ‘side-on’ view!  Here is my card:

charisma cardz #14 - fancy folds (view 2) 

charisma cardz #14 - fancy folds (view 1)

charisma cardz #14 - fancy folds (close up)

I have used a super gorgeous new image from DigiStamp Boutique called ‘Hoop Rosie’ from the April offer of the month set called ‘funtime Rosie’ which is available for a special price until the end of the month.  There are 3 images in the set and all are equally as cute as this one.  I coloured the image with promarkers and had a go at doing a cloud background with chalks.  I will try using my promarkers in the future but it was really quick using the chalks (and my finger tip!).  I have to say I am really chuffed with the clouds as it was only my second time of doing it.  The pretty pastel papers are my mind’s eye from the “dwell” 6x6 paper pad.

We have two sponsors this week.  Firstly we have Some Odd Girl who are offering one lucky winner 3 digi images of their choice. 

some odd girl new logo

Our second sponsor is Digi Doodle Shop and 2 winners will receive a $5.00 voucher to spend in their online store. 

digi doodle  shop

The rest of the design have created gorgeous fancy fold cards (and much more imaginative than me lol) so please pop over to the challenge blog and check them out.  We really appreciate the lovely comments you leave for us. 

I would like to enter my card into the following challenges:

Sketch and stash challenge – fantastic sketch by Kevin (I used a new image and neglected papers)

One stop craft challenge – pastels and die-cuts

Sweet stampin’ challenge – dies and/or doodles

Stampin’ sisters in Christ challenge – make a joy-ful card

Love to create challenge – birthday

Crafty sentiments challenge – spring and pastel colours

Digital Tuesday challenge – birthdays

Top tip Tuesday challenge – spotty dotty (my papers)

Flutterby Wednesday challenge – birthday card

My mum’s craft shop challenge – it’s a celebration

I hope you can join in with our challenge this week and I look forward to seeing all your fancy folds.  I would like to welcome my newest follower Nat *waves hello* – thanks for becoming a follower and I hope you will visit me often.  Enjoy your day and thanks so much for stopping by today.

My signature

charisma cardz #14 - fancy folds (view 1)

Card ingredients:

Image: DigiStamp Boutique – ‘hoop Rosie’ from the “funtime Rosie” offer of the month set

Papers: my mind’s eye – ‘dwell’ paper pad, black card from eBay

Tools: Promarkers, circle nesties, pearls from the hobby house, die-namics butterfly dies, sakura stardust pen, personal impressions clear sentiment stamp, chalk for cloud background