My Lovely Followers

Showing posts with label Studio Katia. Show all posts

Tuesday, 21 April 2026

Patterned Paper Party IG Hop - April 26

Hello friends, welcome back to my little blog. I'm here today to share my card for this month's Patterned Paper Party Instagram Hop. Do you love patterned paper? Do you have a huge stash that needs using? Well so do we and it's time to get it used! We will be hopping on the 20th of each month to share our ideas. We will definitely be creating cards, but maybe sometimes tags, ATCs, gift bags/boxes, mini albums and scrapbook pages too. We want our patterned paper to be used.
The theme is always 'anything goes' but each month we will have an optional twist that can be used if you like; this month the twist is 'Easter, which I know was a little while ago, but you can get ahead for next year if you follow the twist, so grab your patterned papers and join in the fun.  I needed a last minute Easter card for my in-laws so I'm sharing that today plus I have a bonus birthday card which I made with some leftover paper after making my hubby's birthday card (I'll be sharing that on Thursday).  I hope you like them.
Firstly here is the Easter card:
A closer look at the image:
Plus I decorated the inside:
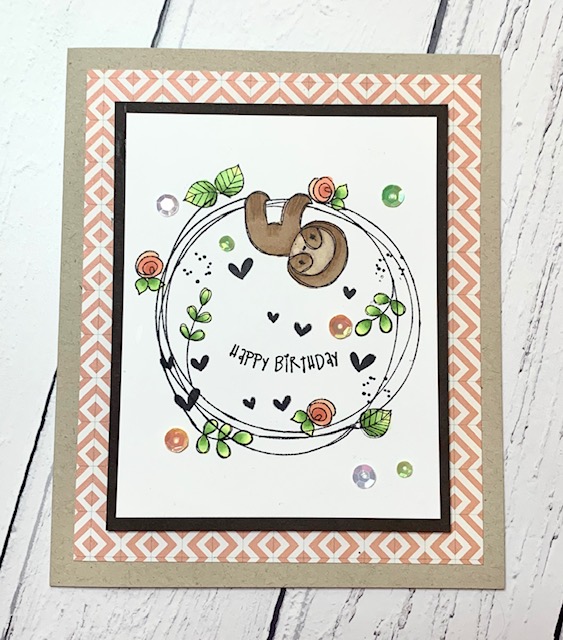
Here is the bonus birthday card:
A closer look at the details:
Plus I decorated the inside:
For the Easter card I stamped the floral cross image onto alcohol marker friendly card and coloured it with Promarkers, adding a few white gelly roll pen highlights.  I cut it out with a stitched rectangle and matted it onto some yellowy/peach patterned paper. I then cut a piece of wood grain paper to cover the front of my card base (4 1/14" x 5 1/2") and adhered it with double sided tape. I added some scrap white card behind the smaller panel and added that to the background with double sided tape.  I stamped the sentiment in black ink and used a sentiments strip die to cut it out before adhering it to the centre of the image with foam squares.  I finished off with some gold pearls.  For the inside I cut a white panel 4" x 5 1/4" and added a strip of the wood grain paper to the bottom with liquid glue.  I stamped the sentiment in the centre with black ink and adhered the panel to the card base with double sided tape.  

For the birthday card I cut a white panel 4" x 5 1/4" (but I will cut it down later) and used some leftover strips of patterned paper to create my background which I adhered with liquid glue.  Once dry I used a stitched rectangle die to cut it out and added a black mat layer behind with double sided tape.  I stamped the sentiment in black ink and used a stitched circle die to cut it out.  I added the sentiment to the lower left side of the panel with foam squares.  I added some scrap white card behind the panel before adhering it to the card base with double sided tape.  I finished off with some black pearls around the sentiment.  For the inside I cut another white panel 4 " x 5 1/4" and added a strip of pink card to the bottom with double sided tape.  I stamped two presents onto the pink strip with black ink and added some details with a white gelly roll pen.  I then stamped the sentiment in the centre with black ink.  I added a black mat layer before adhering the panel to the card base with double sided tape.  

Two very different cards but both using up some of my vast collection of patterned paper.  Do you have a favourite?  I like them both; the Easter card is elegant and beautiful and the birthday card is just bright and fun.  

I would like to enter my cards into the following challenges:

Easter card:
A Cut Above challenge - ATG with a die cut optional twist pastels
Aud Sentiments challenge - watercolour and/or spring + sentiment
Beautiful Blossoms challenge - anything floral goes optional inspiration photo
Crafty Gals Corner challenge - ATG optional spring
Creative Moments challenge - gone but not forgotten (Studio Katia is no more)
Pick 3 challenge - rustic (paper), feminine, pastels
Stamping Sensations challenge - inspired by nature
The Four Seasons challenge - anything spring optional mood board

Birthday card:
AAA Colourful challenge - colour board #27
Addicted to Stamps & More challenge - die cuts and/or stencils
As You Like It challenge - brights or pastels (I like both but I am drawn more to bright colours; they make me happy)
Colourful Options challenge - yellow or use rainbow colours (I went with rainbow)
Creative Knockouts challenge - 2 or more papers
The Dream Factory challenge - use at least 3 colours (I used all the colours of the rainbow)

We hope you will be inspired by our Patterned Paper Party IG Hop and will pop over and check out all the gorgeous creations along the way. If you would like to join us please visit my Instagram page or use the hashtag #patternedpaperpartyhopapril2026 and we will find you.

Thanks for stopping by and take care.

Lots of love

Easter card supplies:
Studio Katia - floral cross stamp
Promarkers
Limetree Craft - 280gsm silky smooth white card (not available but other options are here and here)
Versafine Clair - nocturne ink pad
*Gina K Designs - friendly wishes mini stamp (for inside sentiment)
Gina K Designs - sentiment strips dies
Gina K Designs - master layouts 02 (for stitched rectangle)
Gina K Designs - black, gold & silver metallic pearl mix

birthday card supplies:
Spellbinders - color block slices die set
echo park - summer dots & stripes 6x6 paper pad
echo park - metropolitan dots & stripes 6x6 paper pad
Limetree Craft - 280gsm silky smooth white card (not available but other options are here and here)
Versafine Clair - nocturne ink pad
*Gina K Designs - master layouts 02 die set (for stitched rectangle)
Gina K Designs - master layouts 03 (for stitched circle)
Gina K Designs - birthday cheer mini stamp (for inside sentiment)
Gina K Designs - sketched wreath builder stamp (for outside sentiment)

*I now have an Affiliate Link for the Gina K Designs store. If you are considering making a purchase I would appreciate you using my link as it will earn me a small commission at no extra cost to you. 
Thank you x

Tuesday, 17 March 2026

ATC Scrap Makes IG Hop - March 26

Hello friends, I hope you're doing great and you've had a great start to your week. I'm sharing my creations for this month's ATC Scrap Makes IG Hop. We challenge you to use leftover die cuts, sentiments and card stock to create Artist Trading Cards (ATC's). You can send them in happy mail, save them on a ring to highlight your favorite creations, swap them with friends or add sweet notes to a lunchbox. Join us if you like; the only rules are to use scraps and create cards that are 2.5” x 3.5” in size. We share our little snippets of happiness on the third Tuesday of the month.
I have decided to make an alphabet series of ATC's and this month have created the first three.  I think it will be fun each month finding images/dies for each letter and I'm excited to see them all at the end.  I used mostly older, retired products but I still love them so why not use them.  I hope you like them. 
Here are all three ATC's:
A closer look at 'A':
A closer look at 'B':
and finally 'C':
I decorated the backs all the same:
When I ink blend I always keep a scrap of white printer paper to place underneath so that I don't make too much mess; I re-use this paper over and over again and it ends up either looking a hot mess or sometimes it becomes a really interesting piece that I keep for backgrounds.  I used this piece of paper to create the backgrounds for my ATC's today and to be honest they are better than something I would create from scratch as I can't always do random and messy well.  I added some white and gold spatter for some extra interest and some blending around the edges but other than that they are exactly as they were.  I stamped, coloured and die cut the cute images (I had to fussy cut the apple) and die cut 3 frames from gold mirror card.  The alphabet letters were already cut in my stash but I did cut some extra ones just to stack them up.  I added the frames and letters with liquid glue and the images with foam squares.  For the backs of the ATC's I simply ink blended the matching colours around the edges and stamped one the ATC info stamps (that I won a few months ago) in black ink.  

I would like to enter my ATC's into the following challenges:

Crafty Animals challenge - ATG must include an animal
Critter Crazy challenge - ATG with a featured critter
Paper Rocks Scissors challenge - must use paper and/or scissors (I used scissor to fussy cut my apple)
Tag-along (&ATC's) challenge - spring flowers or ATG
The Dream Factory challenge - sweet little things (small ATC's)
The Paper Funday challenge - ATG optional twist fur or feathers
We Love Stamping challenge - wild life or ATG (the bear is wild)

I hope you will pop over to Instagram and check out the hop; please use the hashtag #ATCscrapmakes2026 or #ATCscrapmakesMar26 to see all the gorgeous creations and also if you want to participate we will be able to find you.

I really appreciate you stopping by today.

Love and hugs,

ATC supplies:
Studio Katia - teacher's apple stamp
Mama Elephant - carnival cupcakes stamp & die
MFT - furever friends stamp & die
MFT - little letters die set
ATC silicone stamp won in a recent challenge
Limetree Craft - 280gsm silky smooth white card (not available but other options are here and here)
Versafine Clair - nocturne ink pad
Winsor & Newton - white gouache (for white spatter)
Gansai Tambi - starry colours palette (for gold spatter)
coloured card and mirror card from scraps bin
*Gina K Designs - ink pads - red velvet, warm cocoa, stormy sky

*I now have an Affiliate Link for the Gina K Designs store. If you are considering making a purchase I would appreciate you using my link as it will earn me a small commission at no extra cost to you. 
Thank you x

Saturday, 14 February 2026

CASE IT IG Hop - February 26

Hello again friends. I hope you've had a great start to your Saturday; it's actually been sunny here today but I think it's just a blip and we will be back to rain tomorrow lol!  I'm back to share this month's card for the CASE IT Instagram Hop where we find a project on Instagram that inspires us and we will share that project as well as the project we’ve created. There are so many beautiful creations on Instagram the only difficult part is narrowing down which one to CASE (which means Copy And Share Everything).
This month I was inspired by Stacey (@StaceysCreativeCorner over on IG); her cards are super cute and this one instantly called to me - a cute image, kraft and pretty papers. I don't have any baby cards in my stash so I changed it from Valentine's to new baby.  Here is her card for my inspiration:
Isn't Stacey's card just so adorable? I kept the scalloped layers but I went with white instead of kraft and my layout is vertical instead of horizontal although I think you can still see how I was inspired by Stacey's card! I hope you like it.
Here is my card:
a closer look at the details:
Plus I decorated the inside:
I began by stamping the cute llama onto alcohol marker friendly card, coloured it with Promarkers and used the coordinating die to cut it out.  I die cut the scallop layer and a stitched layer from white card and adhered them together with double sided tape.  I cut three strips of patterned paper (not sure if you can tell but two of them have glittery highlights running through them) and adhered them onto the stitched panel with double sided tape.  I die cut a circle from vellum and adhered the llama on top with foam squares.  I stamped and white heat embossed the sentiment directly onto the vellum but it looked a little lost so I re-stamped it onto white card using sea glass ink and used a sentiments strips die to cut it out.  I then added this over the embossed sentiment with foam squares.  I added foam squares behind the vellum and adhered it onto the background in the bottom right.  I finished off with some mint sequins and also added some glitter accents to the centre so that they would match the papers.  I added some scrap white card behind the panel and then adhered it to my card base with double sided tape.  For the inside I cut the same white layers, cut some small pieces of the papers and added them to the bottom of the panel with liquid glue.  I masked the papers and stamped the llama peeking over the top and stamped a sentiment in the centre with black ink.  I adhered the panel to the card base with double sided tape.  

I would like to enter my card into the following challenges:

* to be updated * 

We hope you will be inspired by our CASE IT Instagram Hop and will pop over and check out all the gorgeous cards along the way. If you would like to join us please visit my Instagram page or use the hashtag #caseithop and we will find you.

Thanks for stopping by and enjoy the rest of your weekend.

Lots of love

card supplies:
Taylored Expressions - llama love stamp & die - retired
Promarkers
MFT - blueprints 27 die set (for scalloped die)
MFT - itty bitty baby stamp (for sentiments)
DCWV - nana's nursery baby boy paper pad - discontinued
Spellbinders - fluted classic circles (for circle die)
*Gina K Designs - ML 14 (for stitched rectangle die)
Gina K Designs - sentiment strips dies
Gina K Designs - sea glass ink pad (for sentiment)
Studio Katia - magic mint sequins
Limetree Craft - 280gsm silky smooth white card (not available but other options are here and here)
Versafine Clair - nocturne ink pad
Stampin' Up! - card stock vellum - retired 
Heffy Doodle - alcohol marker friendly card - store now closed

*I now have an Affiliate Link for the Gina K Designs store. If you are considering making a purchase I would appreciate you using my link as it will earn me a small commission at no extra cost to you. 
Thank you x

Monday, 28 September 2020

Floral wreath card

Hello again friends.  I hope your Monday has gone better for you than mine.  My husband has been unwell since yesterday and went for a Covid test this morning so this means I have to stay home from work until he has his result - fingers crossed it will be back tomorrow and negative, otherwise we will all have to self isolate for 14 days!!  The trouble is flu is so similar to Covid that without a test you cannot be 100% sure can you? 

On a brighter note I have another card to share with you that I made for another of my lovely Design Team.  It has an autumnal feel due to the colours but it was for her birthday.

Here is the card:


a close up of the image:


I began by stamping the gorgeous image onto a white card panel and coloured it with Promarkers, I also added a small sentiment into the centre.  This panel was then layered onto green and orange card before adding to my white card blank.  I decided to add a small die-cut butterfly and a few sequins for interest.  The finishing touch was some sparkle onto the flowers and butterfly.  A really clean and simple card once again but the image is so pretty I didn't think it needed anything else. 

I would like to enter my card into these challenges:

Sweet Stampers challenge - things with wings
Chocolate Baroque challenge - wings with anything goes option
Allsorts challenge - autumn colours
Crafty Friends challenge - autumn colours
Inspired by challenge - colors of fall (I hope it's ok I didn't use the sketch)


So hopefully I'll see you again in a couple of days with good news!  Take care of yourselves and stay safe. 

Love and hugs, 

Card ingredients:
Funky Fossil Designs - blooming birthday stamp set
Promarkers
Uniko Stamps - birthday wishes (for sentiment)
Heffy Doodle - white card
green & orange card from stash
Nuvo Aqua shimmer pen - glitter gloss
Little Things from Lucy's card - just peachy sequins
Studio Katia - dazzling celery fusion sequins
Versafine onyx black ink
Memento tuxedo black ink

Monday, 14 September 2020

Sloth happy birthday

A colleague at work recently celebrated her birthday and she is obsessed with sloths.  I remembered I had this fun stamp set from Tracey Hey which would be so perfect for her.  

This is the card I made:


I made a matching envelope:


close up of the card:


I also decorated the inside:


I began by stamping the fun image with memento tuxedo black ink and coloured the image with Promarkers.  I cut the panel and added a chocolate brown layer behind it to frame the image.  I made a kraft card blank and attached a piece of patterned paper with liquid glue.  I then attached my coloured panel onto this with foam tape.  I finished by adding some sequins for a bit of bling.  For the inside I used the same chocolate card and added the left over pieces of patterned paper to the edges and stamped a sentiment in the centre.  Simple but I think it ties everything together to use elements from the front of my card on the inside.  

I am entering this card into the following challenges:

Allsorts challenge - I love.... challenge (I love colouring, cute images and making my own envelopes)

I hope you are all keeping well.  The news is full of talk that there may be another lockdown soon; I really hope it doesn't happen this time.  Let's hope everyone complies with wearing their masks and social distancing before it gets that far.  

Enjoy the lovely weather but remember to stay safe. 

card ingredients:
Tracey Hey Alpaca Pals - rocking the wreath stamp set
Crafter's Companion - Neenah desert storm card
Chocolate card from stash
Little Things from Lucy's Cards - just peachy sequins
MME 'now & then' - Izzy 6x6 paper pad
Memento Tuxedo black ink pad
Versafine Onyx black ink pad (for sentiments)
We R Memory Keepers - envelope punch board
Promarkers:
forest green, bright green, leaf green, lime zest
orange, mango, soft peach
burnt sienna, cinnamon, caramel, sandstone

Monday, 10 August 2020

MFT summer school - day 1

Hello again friends.  I can't believe it's been a week since my last post.  I had very good intentions of sharing more cards last week but to be honest the heatwave had knocked me for six.  I'm a woman of a certain age now and I don't need any extra heat - I'm already a walking radiator at times lol!  

My Favourite Things is currently running it's Summer School and although I had hoped to complete all 5 days I have only managed 2 so far, although there are still a few days left so I will try and get them all done.  If you want to check out all the details pop over to their blog.  Day 1 was all about the 'Visual Triangle.  The idea of a visual triangle is that you use a trio of common elements or similar colors, placed as if at the points of a triangle, to direct the eyes around your card design.

Here is my entry for Day 1:


close up of the card:


I used super cute images from MFT Farm Friends and coloured them with Promarkers and die cut them with the coordinating dies.  I used 2 stencils to create the background with distress oxide inks - the MFT mini cloud stencil and the MFT drifts and hills stencil.  I die cut a frame from white card using the largest MFT rectangle frame and stamped a sentiment from the stamp set.  Finally I drew some 'birds' with a black fine liner pen and added some sequins from Studio Katia for a bit of sparkle.   

I hope you like this fun, cute card.  I'll be back later with my card for Day 2 - rainbow.  

Have fun and stay safe.


Card ingredients:
MFT - farm friends stamp & die set
MFT - rectangle frame die set
Various Promarkers
Letraset black fine liner pen 0.3
Distress Oxide inks in tumbled glass & mowed lawn

Thursday, 16 July 2020

Pretty butterflies

Hello again friends.  Well I finally had my hair cut yesterday and I feel so much better.  I always have a fringe but over the last 4 months I've had to endure it growing out and I hated it but now I have a fringe again and had about 3 inches cut off the length *yay*.  I know a lot of you are having hair cuts or due to have them so I know you appreciate how I feel.

I have a pretty butterfly card for you today and I ink blended the background using a masking stencil to ensure I had pristine borders.  I made this card for a neighbour whose birthday was last week.


Here's a close up of the card


I think ink blending is my favourite technique at the moment as it's relatively quick and gives amazing results.  After ink blending I again sprinkled water over the panel and dabbed with a piece of kitchen roll to achieve the splattered look.  The butterflies were coloured with promarkers, fussy cut and added to the panel with foam tape.  The sentiment is from the same stamp set and for a final touch I added some crystals.  

I love this colour combination and I hope you do too.  

I'm entering my card into the following challenges: 

Allsorts challenge - I spy with my little eye something beginning with B (butterflies)
CCC Digi Creations challenge - no patterned paper

I can't believe it's Thursday already.  I'm off from work this week and apart from having my hair cut and a little bit of organising in my craft room I haven't really achieved anything but it has been nice chilling out and having some extra crafting time.  

Take care and thanks for stopping by.


Card ingredients:

Jane's Doodles - doodle butterflies
Distress oxide inks in fossilised amber, mowed lawn and peacock feathers
Taylored Expressions - blender brushes
Taylored Expressions - masking stencils rectangle
Studio Katia - April (white diamond) crystals