My Lovely Followers

Wednesday 29 November 2023

Winter Wonderland IG Hop - Week 5

Hello friends and happy hump day.  I hope you've had a great day so far.  It's Wednesday so it's time for this week's instalment of the Winter Wonderland IG Hop organised by my lovely friend Kelly.  This is technically the last week of the hop but don't worry as we have an extra bonus week for you next week!  Each Wednesday we are sharing our creations with a winter theme. 
This week is Week 5 and our theme is plaid poinsettia.  Now the brief was you can make something that includes a poinsettia or include some plaid or both.  I decided to use both.  Here is my card:
A close up of my poinsettia:
I decorated the inside as usual:
here is what the paper looked before and after inking:
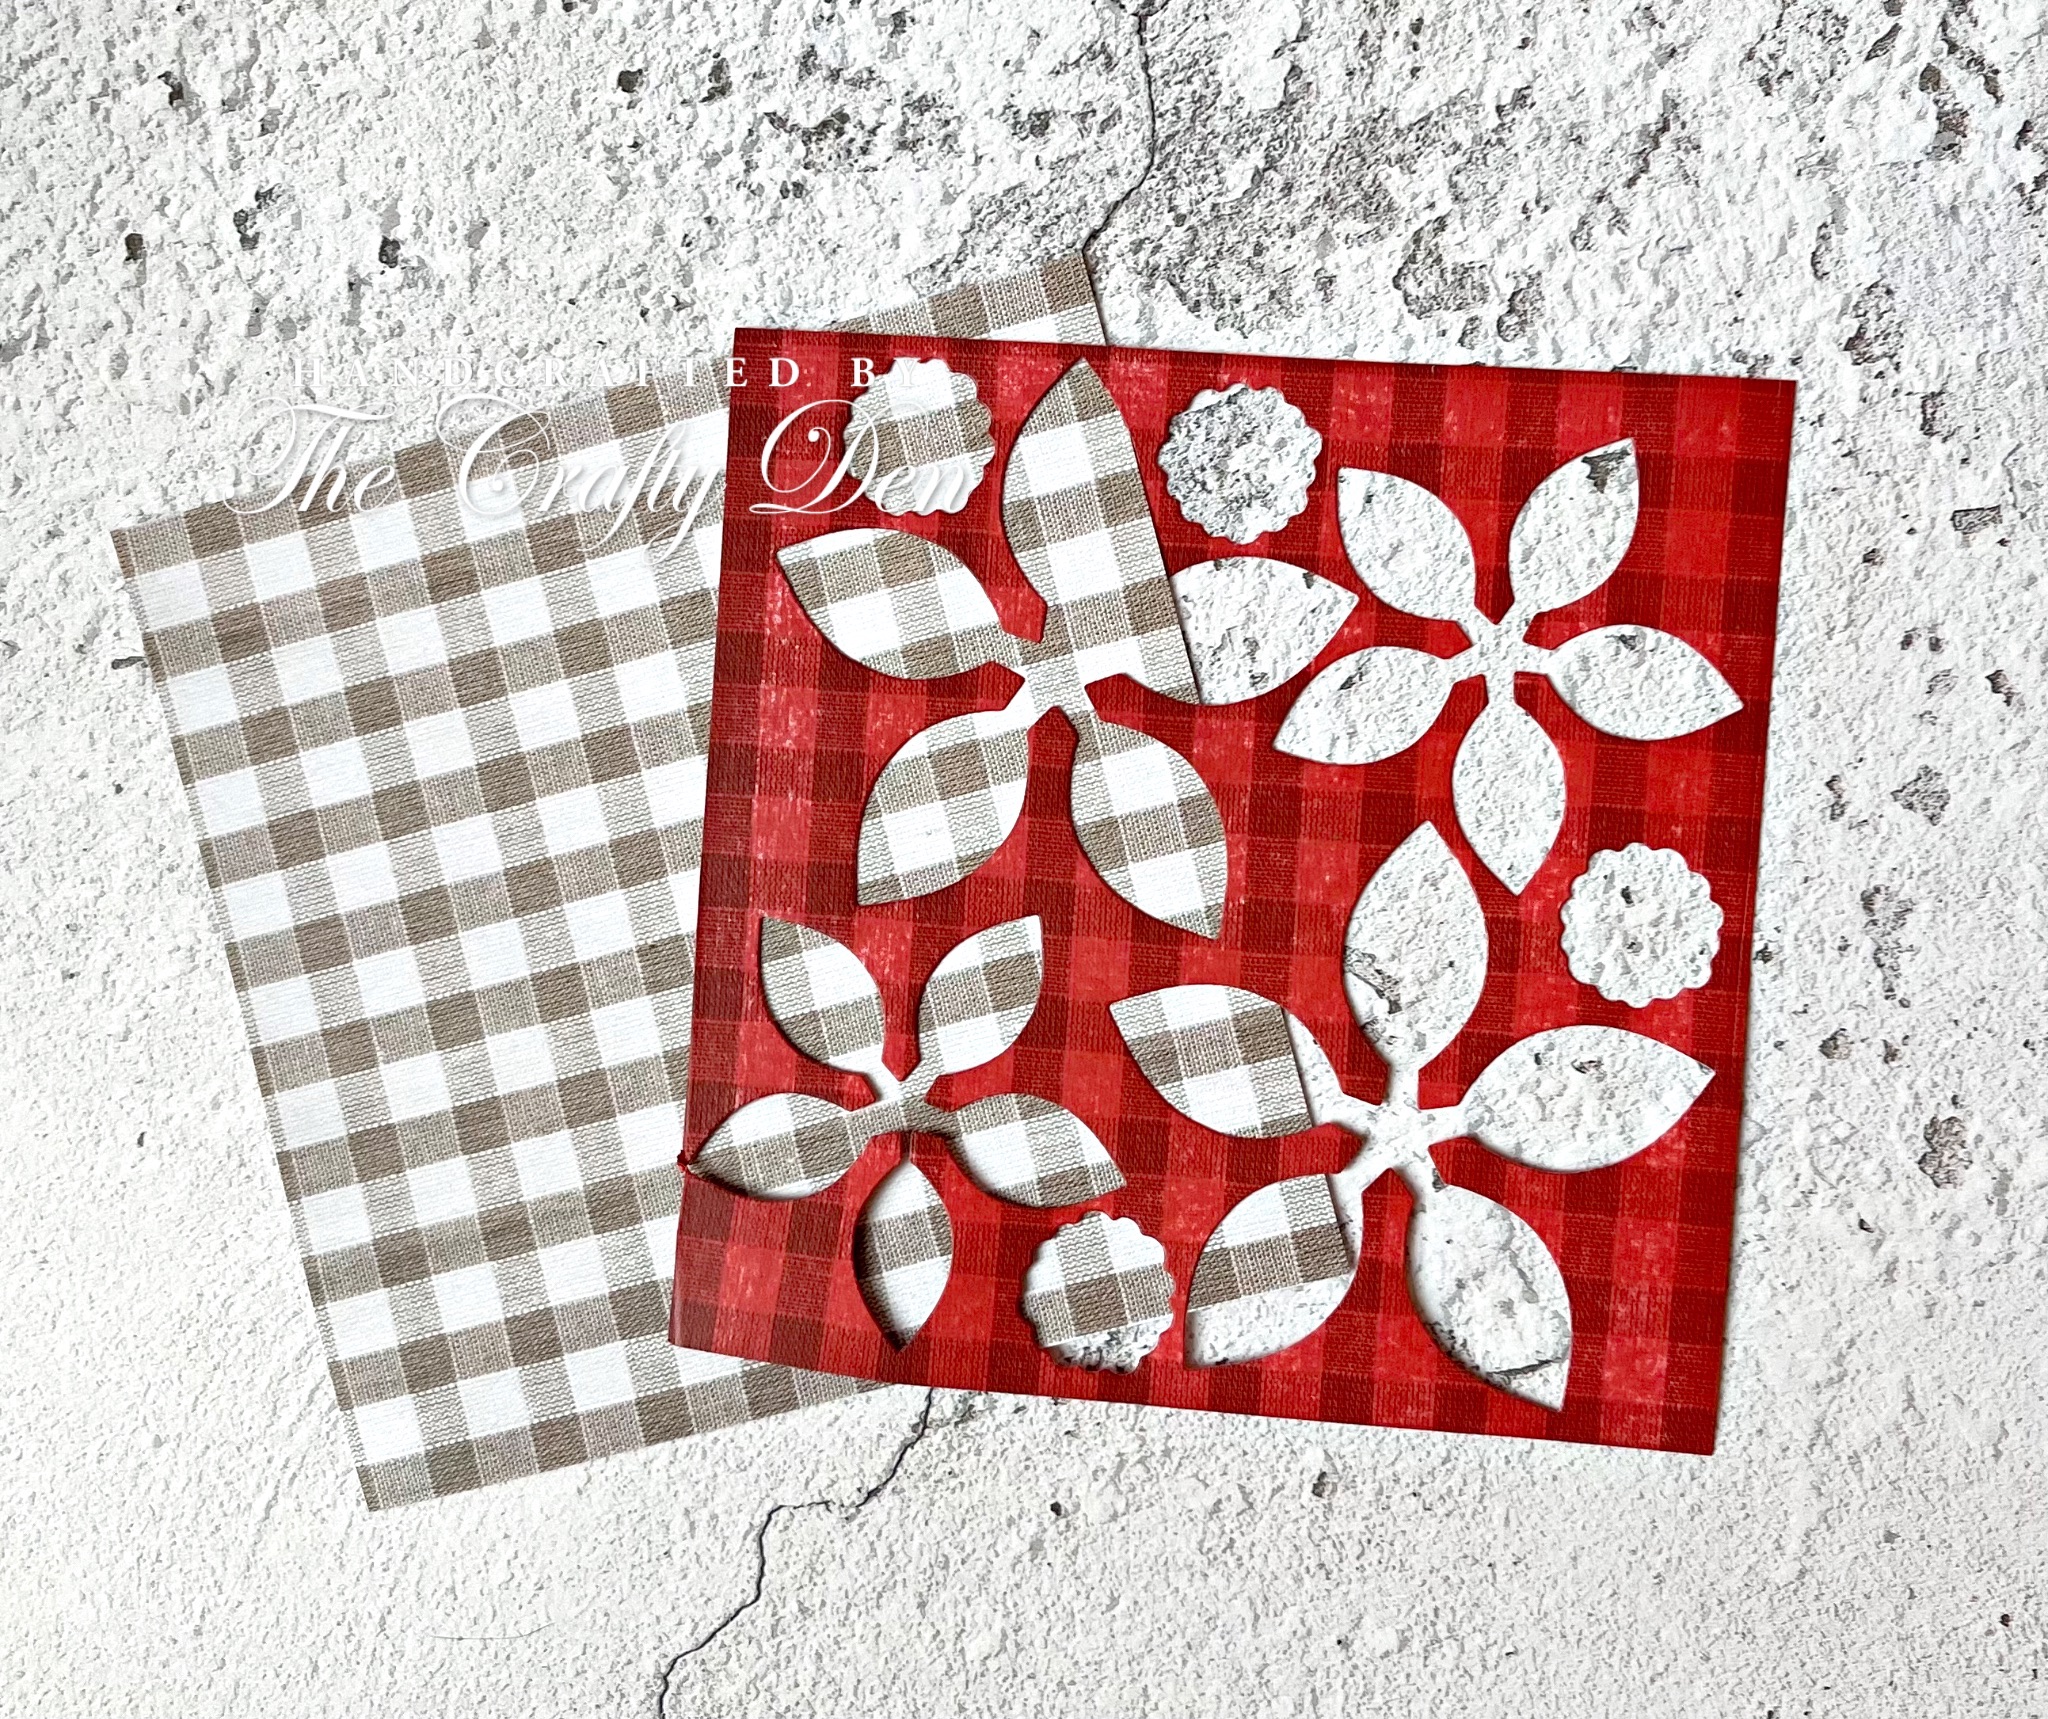
I began by trying to find some plaid patterned paper, which was not easy.  I eventually found one but it was a beige/neutral colour.  I decided to ink swipe onto the paper with a red ink pad to make it the colour I wanted.  I think it turned out really good and just what I was looking for.  I then die cut my poinsettia; one large layer and 2 smaller layers, plus a few leaves from dark green card and the centre from gold mirri card; I then added gold pearls onto the centre.  I used foam squares to attach all the layers so it ended up being very dimensional.  I cut a piece of white card to a 3 3/4" x 5" panel and added a strip of red spotted paper and a smaller strip of the gold mirri card to the left hand side.  I adhered the leaves with liquid glue and stamped my sentiment in black ink.  I then added the poinsettia with liquid glue over the leaves.  For a final touch I added some gold splatter over the entire card panel.  The panel was then attached to my A2 card base with double sided tape.  For the inside I added another strip of spotty paper and gold mirri card and as I had one poinsettia left over I cut it up and layered it into the bottom left corner.  I stamped a sentiment in black ink.  A really dimensional and shimmery card in real life and I'm really happy with it.  

I would like to enter my card into the following challenges:

Crafty Gals Corner challenge - dots and/or stripes
Double D challenge - stripes and/or dots
Inkspirational challenge - seasonal (obviously I've gone for Christmas again)
Time Out challenge - winter/holiday
Try It On challenge - traditional Christmas
Use Your Stuff challenge - shine bright (mirri card, gold pearls, gold splatter)

We hope you will be able to join us over on Instagram and follow the hop.  Please use the hashtag #winterwonderlandcardhop2023 to find all of our creations and we will be able to find yours if you feel inspired to join in.  

Enjoy the rest of your day and thank you so much for stopping by.  

Love and hugs, 
  
card ingredients:
MFT - all star high top die-namics
Gina K Designs - red hot ink pad
Personal Impressions - big Christmas essentials (for outside sentiment)
Personal Impressions (Paula Pascual) - Christmas messages (for inside sentiment)
Limetree Crafts - 250gsm smooth white card
Echo Park - dots & stripes (Valentine) for spotty paper
Gansai Tambi - starry colours palette (for gold splatter)
green card & mirri card from scrap box

Wednesday 22 November 2023

Winter Wonderland IG Hop - Week 4

Hello friends; I hope your day is going well and you've had a great start to your week.  It's Wednesday so that means it's time to share my card for this week's Winter Wonderland IG Hop which has been organised by my lovely friend Kelly.  Can you believe this week is week 4 already!  Each Wednesday we will be sharing our cards with a winter theme.  
This week is the lovely theme of Santa!  I always reach for cutesy images so I thought I would mix it up this week and go for a traditional/vintage style image and actually used a red rubber wood mounted stamp!!  Here is my card:
a close up of the image:
I decorated the inside:
I apologise for the photos today but it's quite gloomy here and I struggled to get anything better, but they are better than horrible (maybe!). 

I began by stamping the gorgeous Santa image in Memento London Fog ink which is a lovely light grey.  There wasn't much colouring to do, I coloured his face, beard and glasses with a mix of Promarkers and SN Tri-blend markers and then went over the beard and snowflakes with some glitter glue.  I put the image to one side to dry and then created my background with a snowflake stencil using red ink on a white panel cut to 3 3/4" x 5".  I made an A2 card base from red cardstock and I adhered the stencilled panel with double sided tape.  I used a strip of white card and stamped my sentiment in Versafine Clair morning mist ink.  I added this strip onto a slightly larger strip of same red card as my card base and adhered this with double sided tape.  Once the image panel was dry I used a rectangle die and cut it out and then used the matching scalloped die to cut a red mat panel.  I added this to the card with foam tape.  I decided to add some glitter glue to the snowflakes in the background for some extra sparkle and finished off with 3 small sequins under my sentiment.  It really does look much nicer in real life and really sparkles when it catches the light.  

I would like to enter my card into the following challenges:

Allsorts challenge - Christmas time
Craft challenge - Christmas
Daisy Chain challenge - Christmas/winter
Inkspirational challenge - seasonal (obviously I've gone for Christmas)
Mix it Up challenge - ATG option stamping
My Time to Craft challenge - got to be Christmas
Scrapping4Fun challenge - traditional Christmas colours
Stamping Sensations challenge - get ready for Christmas
Tic Tac Toe challenge - sparkle/free/monochromatic

We hope you will be able to join us over on Instagram and follow the hop.  Please use the hashtag #winterwonderlandcardhop2023 to find all our creations and, if we inspire you and you decide to join in, we can find yours too.  

Enjoy the rest of your day and thank you so much for stopping by. 

Love and hugs, 

Card ingredients:

Rubber Stampede - Santa collage wooden stamp (very old and probably no longer available)
Spellbinders - classic rectangles large & classic scalloped rectangles large
Funky Fossil Designs - snow flurry stencil
Stickles glitter glue - crystal 
Versafine Morning Mist ink pad (for sentiment)
Memento London Fog ink pad (to stamp image)
Gina K Designs - red velvet ink pad 
Paula Pascal - Christmas messages
Promarkers
Spectrum Noir Tri Blend markers
Limetree Crafts - 250gsm smooth white card
Stampin' Up! - red card from brights selection pack (again very old!)


Wednesday 15 November 2023

Winter Wonderland IG Hop - Week 3

Happy Hump Day friends; I hope you're having a great week so far.  I'm back with Week 3 of the Winter Wonderland IG Hop which has been organised by my lovely friend Kelly.  Each Wednesday in November we will be sharing our cards with a winter theme.  
This week is a fun one - pink Christmas!  I love traditional colours for Christmas but it's nice to step out of our comfort zone from time to time and have a play with different colour schemes.  I had lots of ideas for my make this week but finally settled on CAS and super cute!  Here is my card:
a close up of my cute penguin:
I also decorated the inside:
I used mostly Promarkers with a couple of Tri-blend markers:
I began by stamping the cute penguin image with memento tuxedo black ink and coloured it with mostly Promarkers but I did use 2 x Spectrum Noir tri-blend markers too (I'm actually liking these pens a lot as they take away the stress of colour blending as there are 3 colours in each pen).  I don't have the coordinating dies so fussy cut him out and put him to one side.  I then cut a white panel of card 3 3/4" x 5" and used a stencil and some pink ink to make my background.  I found some hot pink card in my scrap bin and used that as my mat layer behind my white panel.  I cut a 2 1/2" strip of the hot pink card and used a scalloped edge die to cut a decorative border on the top and bottom.   I then added a white strip on top with double sided tape.  Before adding to the card panel I stamped my sentiment.  This was then adhered to the card panel with double sided tape.  The penguin was added with foam squares and I added 5 small pink pearls as a finishing touch.  I did forget to add some white gel pen highlights but I'll do that before I give the card to someone.  The panel was then added to a white card blank with foam tape.  I decorated the inside in my usual way - a small strip of the stencilled card added to the bottom and a sentiment stamped in black ink.  A really sweet card and I think once you've settled on the idea it's really easy to mass produce.

I would like to enter my card into the following challenges:

Crafty Animals challenge - ATG include an animal
Crafty Gals Corner challenge - dots and/or stripes
Creative Inspirations challenge - contemporary Christmas colours
Critter Crazy challenge - ATG with a featured critter
Daisy Chain challenge - Christmas/winter
Cut it Up challenge - layer it up (must use a die cut)
Double D challenge - stripes and/or dots
Dream Valley challenge - occasions other than birthday
Pearly Sparkles challenge - Christmas/winter
Stamping Sensations challenge - get ready for Christmas
Stencil Fun challenge - anything stencil goes - option leaves
Unicorn challenge - Christmas
We Love Stamping challenge - Christmas characters

Wow lots of Christmas themed challenges around at the moment (understandably)!  I believe I checked all the rules but if I've entered too many challenges and broken your rules I apologise and just delete me.

We hope you will be able to join us over on Instagram and follow the hop.  Please use the hashtag #winterwonderlandcardhop2023 to find all of our creations and if you decide to join in too we will be able to find yours too.  

Enjoy the rest of your day and thank you so much for stopping by. 

Love and hugs, 

card ingredients:

Clearly Besotted Stamps - scalloped edges die collection
Concord & 9th - Boughs and holly stamp (for sentiment)
Gina K Designs - bubblegum pink ink pad
Gina K Designs - pearl mix rainbow
Limetree Crafts - 250gsm white smooth card 
pink card from scrap bin
Promarkers & Spectrum Noir tri-blend markers
Paula Pascal - Christmas message (inside sentiment) (I've seen it on eBay)
Versafine onyx black ink pad
Memento tuxedo black ink pad

Wednesday 8 November 2023

Winter Wonderland IG Hop - Week 2

Hello again friends; I hope you're having a great day.  It's time for Week 2 of the Winter Wonderland IG Hop, which has been organised by my lovely friend Kelly.  Each Wednesday in November we will be sharing cards with a winter theme.  
This week's theme is snowflakes and despite having lots of ideas running through my head, I really struggled to make a card I liked.  I'm relatively happy with my finished result although I may have done some things differently if I was to make it again.  Unfortunately I was still frantically completing my card very late last night so it had to do lol!  Here is my card (it's a very dark and gloomy day here today so the lighting wasn't the best either!):
A close up of the snowflake:
I decorated the inside:
and I decorated the envelope too:
I began by stamping the snowflakes in blue ink and used the matching dies to cut them out.  I then took a white panel and embossed it with a snowflake embossing folder.  I lightly inked round the edges with the same blue ink for some contrast.  I die cut 2 circles, 1 from blue card and 1 from white card and layered them together with liquid glue.  I tried so many sentiments but none looked right then I found this one in my stash and thought it looked the best.  I again stamped it in blue ink and die cut it with a banner die.  I'm not really a bow person but found an odd piece of kraft coloured twine and decided to add it to the top of my circle to give it a 'bauble-esque' feel about it.  The circle is quite dimension as the snowflake was added with foam squares and also the sentiment banner too.  The white embossed panel was added onto a blue card panel and this was added to the card base with liquid glue.  My final touch was some tiny gold pearls which I liberally added all over my card.  I had two snowflakes left over; I was originally going to put them on the front but I couldn't get them to work there, so I added one onto the inside and one onto the envelope.  

I would like to enter my card into the following challenges:

Alphabet challenge - P is for peace
As You Like It challenge - favourite Christmas colours (and why) - I'm a traditionalist at heart but when it comes to snowflakes it has to be blue and white!
Aud Sentiments challenge - gift tag/packaging and/or Christmas + sentiment
Can You Handle the Pressure challenge - ATG embossing option vines/greenery
Craft Rocket challenge - wintertime (no Christmas)
Cut It Up challenge - layer it up
Daisy Chain challenge - Christmas/winter
Pearly Sparkles challenge - Christmas/winter
Shopping Our Stash challenge - emboss like a boss 
Stamping Sensations challenge - get ready for Christmas
Tic Tac Toe challenge - challenge 223 - blue, free, ribbon (please delete if twine is not the same as ribbon) 
Unicorn challenge - Christmas

I hope you will be able to join us over on Instagram and follow the hop.  Please use the hashtag #winterwonderlandcardhop2023 to find all our creations and if you decide to join in we will be able to find yours too.  

I really appreciate your stopping by.

Love and hugs, 

card ingredients:

Most of the supplies I used are from Gina K Designs - 

Master Layouts 5 (for the circles)
Master Layouts 10 (for the banner)
Holiday Silhouettes for sentiment

Other products used:

Limetree Crafts - 250gsm smooth white card 
blue card from scrap bin
twine from packaging

Tuesday 7 November 2023

Pink/blue & white card

Hello lovely friends; I hope you've had a great start to your week.  I hope you've managed to miss most of the really bad weather we've had recently.  It's been really wet and windy here but no damage thankfully; I really feel for the poor people in Jersey whose homes have been destroyed.  Nature is definitely a force to be reckoned with on times.  

On to happier things; I'm here to share a card I made recently for a crafty friend.  I saw the colour challenge over on the Less is More challenge so based my card on that.  Here is my card:
here is a close up of the sweet image:
I also decorated the inside:
plus I decorated the envelope (ignore the crease!):
I began by stamping by image and colouring with Promarkers and then fussy cut it out.  I put the image to one side and began decorating my panel.  I used a stencil with light blue ink, darker in the centre and fading out to white.  I stamped the sentiment on a thin strip of white card in pink ink (although it looks a little red in the photos) and placed this directly onto my panel with liquid glue.  The image was added over the sentiment with foam squares.  The panel was then added to the card base with liquid glue.  Very clean and simple for me and I had to control myself from adding anything else lol!  For the inside of my card I lightly ink blended the same blue ink around the whole of the panel and then use the same daisy stencil at the very bottom for some interest.  For the envelope I used the stencil on the bottom and on the lower part of the flap on the back.  I remember seeing in a Kristina Werner video to use distress micro glaze over your decorated envelopes to protect it from moisture so I tried it in view of the bad weather we'd been experiencing.  I did manage to crease the flap with my overly energetic rubbing but it was ok once the card was inside.  I wouldn't normally use pink and blue together but I think it turned out quite sweet.  Let me know what you think.  

I would like to enter my card into the following challenges:

Less is More challenge - colour challenge - blue, pink & white
Addicted to Stamps & More challenge - make your mark (I used Promarkers)
Crafty Catz challenge - ATG with option of show some flowers
Mix it Up challenge - ATG with optional stamping (I used a red rubber stamp)
Triple B challenge - include birds, blooms or butterflies
NBUS challenge - never used this stamp or stencil before

I hope you have a wonderful week.  Thanks for stopping by.  I'll be back on Wednesday for Week 2 of the Winter Wonderland IG Hop so see you soon. 

Love and hugs, 

Card ingredients:

The Greeting Farm - Anya blooms *retired*
Tonic Studios - dreamy daisies stencil
Promarkers
Personal Impressions - Big sentiments 
Gina K Designs - birthday cheer stamp set (for inside greeting)
Gina K Designs - passionate pink ink pad & blue raspberry ink pad
Limetree Crafts - 250gsm white smooth card

Wednesday 1 November 2023

Winter Wonderland IG Hop - week 1

Hello again friends; look at me, I haven't posted for ages and now 2 posts in one day lol!  I'm taking part in a Winter Wonderland Card Hop over on Instagram organised by my lovely friend Kelly.  Each Wednesday in November we will creating cards with a winter theme.  I needed this hop to kickstart my Christmas card production and at least I will have a few cards ready by the end of the hop!

Today is week 1 and our theme is 'Christmas trees'.  My mojo is still hiding from me so I again went CAS with my card.  I hope you like it:


here is a close up of the gorgeous tree:

I decorated the inside very simply this time:
I actually die cut a bunch of the trees last year but didn't get around to using them. Before inlaying the pieces back into the tree I ink blended each piece with a green ink (from a coordinating trio) to make an ombre colour tree and a bright yellow for the star (I should have masked off the top part of the tree but I think it looks ok all yellow).  I adhered the tree panel onto a slightly smaller white piece of card and then placed each ink blended piece back into the tree with liquid glue.  This panel was then adhered to a dark green panel with double sided tape.  This was then added to a white card base with double sided tape.  I stamped the sentiment with versamark ink and covered it with gold embossing powder before heat setting it.  I used the coordinating die to cut it out.  I added the sentiment with foam squares that I cut to be teeny tiny!  I finished off with a few gold pearls and my card was complete.  I'm really happy with the way it turned out and my goal is to use up all the trees I die cut last year for this year's cards but maybe in different colourways.  

I would like to enter my card into the following challenges:

Allsorts challenge - embossing heat or dry (my sentiment is heat embossed)
Cut it Up challenge - add a sentiment (must include a die cut)
Just Us Girls challenge - CAS - use just the centre of your card
Pearly Sparkles challenge - Christmas/winter
Scrapping4fun challenge - traditional Christmas colours
SSS Wednesday challenge - emboss it (my sentiment is heat embossed)
The Sisterhood of Crafters challenge - get inky (I ink blended my tree pieces)

I hope you will be able to join us over on Instagram and follow the hop.  Please use the hashtag #winterwonderlandcardhop2023 to find all the participants creations and if you want to join in we can find your creations too.  

Enjoy the rest of your day and thank you so much for stopping by. 

Love and hugs, 

card ingredients:

Gina K Designs - holiday silhouettes (for inside greetings)
Gina K Designs - wild dandelion ink pad
Gina K Designs - connect glue
Gina K Designs - blending brushes
Versamark ink pad
Limetree Crafts - 250gsm white smooth card 
dark green card from my scrap bin

AAA Birthday challenge - DT card

Hello friends and happy 1st of November.  I hope you had a great October (although not too sure where it went) and are ready for a brand new AAA Birthday challenge.  We have two hostesses this month and they will each pick a winner - Helen and Kati - and their theme this month is 'large sentiment'; but remember it has to be birthday themed.  Our guest designer this month is Deborah Wheeler so please pop over and show her some love.  
I made two cards this month but was really struggling with lack of mojo so they ended up being very clean and simple.   Here are my cards:
a close up of card one:
I also decorated the inside:
a close up of card two:
I also decorated the inside:
For card one, I began by ink blending a panel using 3 warm colours of ink, added some water droplets and stamped the sentiment over top in black ink.  I used the matching die to cut it out.  I used a dashed rhombus panel die for my background and I did try partial ink blending but didn't like it so in the end I stuck with white.  I cut a black mat layer and adhered them together with double sided tape.  The large sentiment was added with foam squares.  I decided to add a sub sentiment from the same stamp set and stamped it onto black card with white embossing powder.  I then die cut it with a strip sentiment die and added it below the large sentiment with liquid glue.  The panel was added to an A2 card base with foam tape.  I finished off with some black sequins.

For card two, as I had a spare die cut left over I thought I would try and stamp directly onto the die cut and if I messed up it wouldn't matter.  I wanted something different to my first card so I stamped it in versa mark and heat embossed it in gold.  I surprised myself by stamping it perfectly (although I did a test stamp first onto acetate to double check my placement - a tip I learned from Gina K).  I used an embossing folder for this background and matted it onto gold mirror card with double sided tape.  I added the large sentiment with foam squares and finished off with some gold sequins.  The panel was adhered onto the card base with double sided tape.  

Please pop over to the challenge blog and check out the wonderful creations from the rest of the DT; you will not be disappointed.  

I would like to enter my cards into the following challenges:

Allsorts challenge - embossing heat or dry (I've used both on my gold/white card)
Can You Handle the Pressure challenge - embossing option vines/greenery
Cut it Up challenge - add a sentiment (must include a die cut)
Just Us Girls challenge - CAS week - just use the centre of your card
Seize the Birthday challenge - ATG birthday - no topping this time
Simon Says Stamp Wednesday challenge - emboss it (heat and dry embossing on my gold card)
The Sisterhood of Crafters challenge - get inky (I ink blended on my red/pink/purple card)

I hope you will be able to find the time to enter our challenge this month and I cannot wait to see your birthday creations in our linky.  

Enjoy the rest of your day and thank you so much for stopping by. 

Love and hugs, 

card ingredients:

Waffle Flower - dashed rhombus panel die
Spellbinders - essentials sequins in black smooth and gold smooth discs
Gina K Designs - sentiment strips dies
Gina K Designs - birthday cheer (for inside sentiments)
Gina K Designs - inks for blending red velvet, passionate pink and wild lilac
Gina K Designs - blending brushes
Limetree Crafts - 250gsm white smooth card
gold mirror card from stash