My Lovely Followers

Showing posts with label Taylored Expressions. Show all posts

Thursday, 25 June 2026

Just Us Girls challenge #829 - Stencil Week

Hello again friends!  I'm back to share my DT card for the Just Us Girls challenge and this week it's 'ATG Stencil Week'.  As long as you use a stencil you can create anything you like so I'm sure there will be lots of entries.
I'm really enjoying using my stencils more and it's making me re-visit ones I haven't used for years. My card today is using a stencil set that I really love but not used for a very long time.  I used a fun orange and teal colour combo and I think it turned out super cute.  I hope you like it.
Here is my card:
A closer look at the details:
Plus I decorated the inside:
I began by stencilling the gorgeous butterfly background and cut it down using a stitched rectangle die.  I also cut an orange mat layer which I adhered together with double sided tape.  I die cut a white circle, which has some pretty dot detail, and stamped the sentiment in black ink.  I fussy cut one of the butterflies and added it above the sentiment with foam squares.  I also die cut a slightly larger vellum circle and adhered them with liquid glue. The circle was added in the bottom right corner with foam squares and I finished off with some black pearls. The panel was adhered to the card case with double sided tape. For the inside I cut another white stitched rectangle and stamped the sentiment in the centre with black ink.  As I had managed to cut the front panel fairly evenly I decided to add that around the stitched panel for a different look adhering them with liquid glue.  I fussy cut another butterfly and added that in the bottom right corner with liquid glue.  The panel was adhered to the card base with double sided tape.  

I would like to enter my card into the following challenges:

Addicted to Stamps & More challenge - die cuts and/or stencils (I've used both)
Crafty Animals challenge - ATG must include an animal
Fab 'n' Funky challenge - something beginning with B (butterflies)
Make My Monday challenge - use a stencil
Paper Rocks Scissors challenge - I used scissors to fussy cut my butterflies
Stencil Fun challenge - use a stencil optional theme butterflies

I had stencilled an extra panel thinking I would use it on the inside but changed my mind so I used some of it to fussy cut the butterflies but then had quite a lot left over.  I decided to make a matching tag to go with my card.  
Here is my matching tag:
Plus I decorated the back of the tag:
I simply cut two tags from white card (one for the front and one for the back).  For the front I had a piece of the stencilled panel that was large enough to cover 3/4 of the tag, and adhered it with liquid glue; I also added a thin strip of the orange card.  I fussy cut another butterfly and die cut a small vellum circle and adhered them together with foam squares.  I stamped and cut out a sentiment and placed that across the butterfly with foam squares.  I finished off with a few black pearls.  For the back of the tag I added a small border of the stencilled panel along the bottom and also a strip of orange card using liquid glue.  I stamped a sentiment above this with black ink.  I also added an orange hole re-inforcer to both tags.  I adhered both tags together using liquid glue, threaded through some white ribbon and tied a bow using teal twine. 

I would like to enter my tag into the following challenges:

A Place to Start challenge - ATG optional twist anything but a card
Tag-Along (& ATC's) challenge - add some text or ATG


Here is the card and tag together:
Such a great challenge and I cannot wait to see what you create. Please pop over to the challenge blog and leave some love for the rest of the design team. Our guest designer is Kellianne so please leave her some love too. 

I appreciate you stopping by. 

Love and hugs,

card supplies:
Taylored Expressions - butterflies stamp & stencil combo
Waffle Flower - nesting circle dies
MFT - sweet 16 freebie stamp 
*Gina K Designs - master layouts 02 (for stitched and plain rectangle)
Gina K Designs - master layouts 19 (for decorative circle die)
Gina K Designs - ink pads - butterscotch and blue lagoon
Limetree Craft - 280gsm silky smooth white card (not available but other options are here and here)
Limetree Craft - 300gsm smooth white card (for card base)
Versafine Clair - nocturne ink pad
Stampin' Up! - card stock vellum (no longer available)

tag supplies (in addition to above):
Waffle Flower - nesting tag dies
Clearly Besotted - a little sentiment stamp (no longer available)
ribbon & twine from my stash

*I now have an Affiliate Link for the Gina K Designs store. If you are considering making a purchase I would appreciate you using my link as it will earn me a small commission at no extra cost to you. 
Thank you x

Saturday, 14 February 2026

CASE IT IG Hop - February 26

Hello again friends. I hope you've had a great start to your Saturday; it's actually been sunny here today but I think it's just a blip and we will be back to rain tomorrow lol!  I'm back to share this month's card for the CASE IT Instagram Hop where we find a project on Instagram that inspires us and we will share that project as well as the project we’ve created. There are so many beautiful creations on Instagram the only difficult part is narrowing down which one to CASE (which means Copy And Share Everything).
This month I was inspired by Stacey (@StaceysCreativeCorner over on IG); her cards are super cute and this one instantly called to me - a cute image, kraft and pretty papers. I don't have any baby cards in my stash so I changed it from Valentine's to new baby.  Here is her card for my inspiration:
Isn't Stacey's card just so adorable? I kept the scalloped layers but I went with white instead of kraft and my layout is vertical instead of horizontal although I think you can still see how I was inspired by Stacey's card! I hope you like it.
Here is my card:
a closer look at the details:
Plus I decorated the inside:
I began by stamping the cute llama onto alcohol marker friendly card, coloured it with Promarkers and used the coordinating die to cut it out.  I die cut the scallop layer and a stitched layer from white card and adhered them together with double sided tape.  I cut three strips of patterned paper (not sure if you can tell but two of them have glittery highlights running through them) and adhered them onto the stitched panel with double sided tape.  I die cut a circle from vellum and adhered the llama on top with foam squares.  I stamped and white heat embossed the sentiment directly onto the vellum but it looked a little lost so I re-stamped it onto white card using sea glass ink and used a sentiments strips die to cut it out.  I then added this over the embossed sentiment with foam squares.  I added foam squares behind the vellum and adhered it onto the background in the bottom right.  I finished off with some mint sequins and also added some glitter accents to the centre so that they would match the papers.  I added some scrap white card behind the panel and then adhered it to my card base with double sided tape.  For the inside I cut the same white layers, cut some small pieces of the papers and added them to the bottom of the panel with liquid glue.  I masked the papers and stamped the llama peeking over the top and stamped a sentiment in the centre with black ink.  I adhered the panel to the card base with double sided tape.  

I would like to enter my card into the following challenges:

* to be updated * 

We hope you will be inspired by our CASE IT Instagram Hop and will pop over and check out all the gorgeous cards along the way. If you would like to join us please visit my Instagram page or use the hashtag #caseithop and we will find you.

Thanks for stopping by and enjoy the rest of your weekend.

Lots of love

card supplies:
Taylored Expressions - llama love stamp & die - retired
Promarkers
MFT - blueprints 27 die set (for scalloped die)
MFT - itty bitty baby stamp (for sentiments)
DCWV - nana's nursery baby boy paper pad - discontinued
Spellbinders - fluted classic circles (for circle die)
*Gina K Designs - ML 14 (for stitched rectangle die)
Gina K Designs - sentiment strips dies
Gina K Designs - sea glass ink pad (for sentiment)
Studio Katia - magic mint sequins
Limetree Craft - 280gsm silky smooth white card (not available but other options are here and here)
Versafine Clair - nocturne ink pad
Stampin' Up! - card stock vellum - retired 
Heffy Doodle - alcohol marker friendly card - store now closed

*I now have an Affiliate Link for the Gina K Designs store. If you are considering making a purchase I would appreciate you using my link as it will earn me a small commission at no extra cost to you. 
Thank you x

Thursday, 29 January 2026

Krafty Chicks challenge #805 - ATG with a twist!

Good morning lovely friends; I hope your week is going well so far. I'm sharing my card for the new challenge over at Krafty Chicks challenge and this week we are on Week 5; and as it's an extra week this month we have an anything goes theme.  However we are mixing it up this year and adding an optional twist and the twist this time is embossing wet or dry.  Such a fun and easy theme and we hope you will come over and join in the fun with us.
I made my card at the end of December for my sister and brother-in-law's second wedding anniversary.  I don't know why but I always struggle with anniversary cards but I think this turned out super cute. For my embossing twist I used a gorgeous heart swag embossing folder.  The card was 5 1/2" x 7 1/2" as I like to make bigger cards for my family.  I hope you like it.
Here is my card:
A closer look at the cute image:
Plus I decorated the inside:
I began by cutting a white panel and used the beautiful heart swag embossing folder to create my background.  I also cut a gold mat layer and adhered them together with double sided tape.  I stamped the images onto alcohol marker friendly card, coloured them with Promarkers and added some white gelly roll pen highlights.  I die cut the pretty heart wreath frame from the gold card, cut the image panel from a slightly smaller circle die so that it would fit behind the frame and adhered them together with liquid glue.  I stamped the sentiments in black ink and cut them out using an oval die.  I adhered the heart frame in the centre of the embossed panel with foam squares and added the sentiments with double sided tape.  To embellish I used some of the hearts that fell out of the frame and adhered them with liquid glue.  I added some scrap white card behind my panel and then adhered it to the card base with double sided tape.  A fairly clean and simple design but I was really happy with it.  For the inside I cut another white panel and gold mat layer and adhered them with double sided tape.  I embossed another panel of white card and cut two strips for the top and bottom of the panel, adhering them with liquid glue.  I also added thin strips of the gold card to the edges of the embossed pieces to make it look more 'finished' and a few gold hearts to match the front.  I stamped the sentiment in the centre with black ink and then adhered the panel to the card base with double sided tape. 

I would like to enter my card into the following challenges:

Alphabet challenge - T is for texture
Can You Handle The Pressure challenge - must use an EF optional twist all white
The Dream Factory challenge - love actually (love, hearts and/or Valentine's Day)

I hope you will be able to join us for our 'ATG with a twist of embossing' challenge and I cannot wait to see your creations in our linky. Please leave some love for my fellow chicks - Leanne, Diane and Lori.

Thank you so much for stopping by; I appreciate your lovely comments.

Love and hugs,
Sunny Studio - turtley awesome stamp
Promarkers
Heffy Doodle - alcohol marker friendly card - store sadly closed 
Spellbinders - heart swag embossing folder - currently on clearance!
Spellbinders - essential stylish oval dies (to cut sentiments)
Poppy Crafts - heart wreath die
Taylored Expressions - flip the floral stamp (for anniversary sentiment)
*Gina K Designs - succulent spray stamp (for inside sentiment)
Versafine Clair - nocturne ink pad
gold mirror card from stash

*I now have an Affiliate Link for the Gina K Designs store. If you are considering making a purchase I would appreciate you using my link as it will earn me a small commission at no extra cost to you. 
Thank you x

Wednesday, 30 October 2024

Fall Friends IG Card Making Hop - Week 8

Hello again friends; I hope you're having a wonderful Wednesday. I'm back with my card for Week 8 of the 'Fall Friends' IG card hop organised by my lovely friend Kelly. For Week 8 we have special edition 'anything goes' week so we are celebrating all things Halloween, autumn or beautiful harvest.  
I don't usually make a lot of Halloween cards as I don't send them but I fancied a change from autumn this week and besides they will look cute on my shelf for a few weeks lol!  I ended up making two cards as they were very clean and simple designs and took minutes to make!  I hope you like them.
Here are both cards together:
This is card 1:
and a close up of the image:
Plus I decorated the inside:
Here is card 2:
Again a close up of the images:
Plus I decorated the inside:
I began by cutting a white panel 4" x 5 1/4" and using a circle mask ink blended some orange and purple inks in the upper centre of the panel.  I stamped my images in black ink and went with the batty for you sentiment, again stamped in black ink.  I did trim the panel down to 3 3/4" x 5" and adhered it to my card base with foam tape.  For the inside panel I decided to add a circle in the bottom left corner, again using the orange and purple inks and stamping the tree, bird and bat.  I also stamped the Happy Halloween sentiment along side it at the bottom of the panel.  However once I had finished it I decided I really liked it and kept it as the front panel of my second card instead.  So I needed another inside panel for my first card.  I ink blended the same inks, stamped the tree, bird and bat and then placed the sentiment in the centre of the panel.  This was adhered to the card base with double sided tape.  As I already had the second card front completed I just needed to do the inside.  Once again I replicated the inside of my first card but added a ghostly greetings sentiment instead.  As a final touch on both my cards I sprayed through the masks with a spray I made with perfect pearls and water for a shimmery effect (although it was hard to capture in the photos).  No embellishments as I wanted my cards to remain clean and simple.  

I would like to enter my cards into the following challenges:

AAA Cards challenge - anything CAS goes optional twist Halloween
Addicted to Stamps & More challenge - die cuts and/or stencils (I used circle stencils)
CAS on Friday challenge - use the corner of your card (card 2)
Craft Rocket challenge - autumn or Halloween
Fab 'n' Funky challenge - autumn/Halloween
Inkspirational challenge - season - fall (Halloween)
Just Us Girls challenge - stencil week (I used circle stencils)
Make My Monday challenge - spooky/Halloween
Papercraft challenges - spooky season
Simply Create Too challenge - Halloween/Halloween colours
Simon Says Stamp Monday challenge - stencil it (I used circle stencils)
Stencil Fun challenge - must use a stencil optional theme: anything Halloween
Sweet Stampin' challenge - Hallowe'en or colour of Hallowe'en
The Dream Factory challenge - anything goes Halloween

Lots of Halloween challenges around this week (of course!).

I hope you will pop over to Instagram and check out the hop; use the hashtag #fallfriendscardhop2024 to see all the gorgeous creations and also if you want to participate we will be able to find you.

I'll be back tomorrow with my card for the Krafty Chicks challenge so I hope you will pop back and check it out. Until then enjoy the rest of your day and thank you so much for stopping by.

Love and hugs,

Card ingredients:
Clearly Besotted Stamps - fright night stamp set - retired
MFT Stamps - Fab-boo-lous friends stamp set - retired 
Taylored Expressions - masking stencils - circles
Gina K Designs - ink pads - tangerine twist and wild wisteria
Limetree Crafts - 250gsm silky smooth white card - currently not available but they have 240gsm in stock here)

Sunday, 1 September 2024

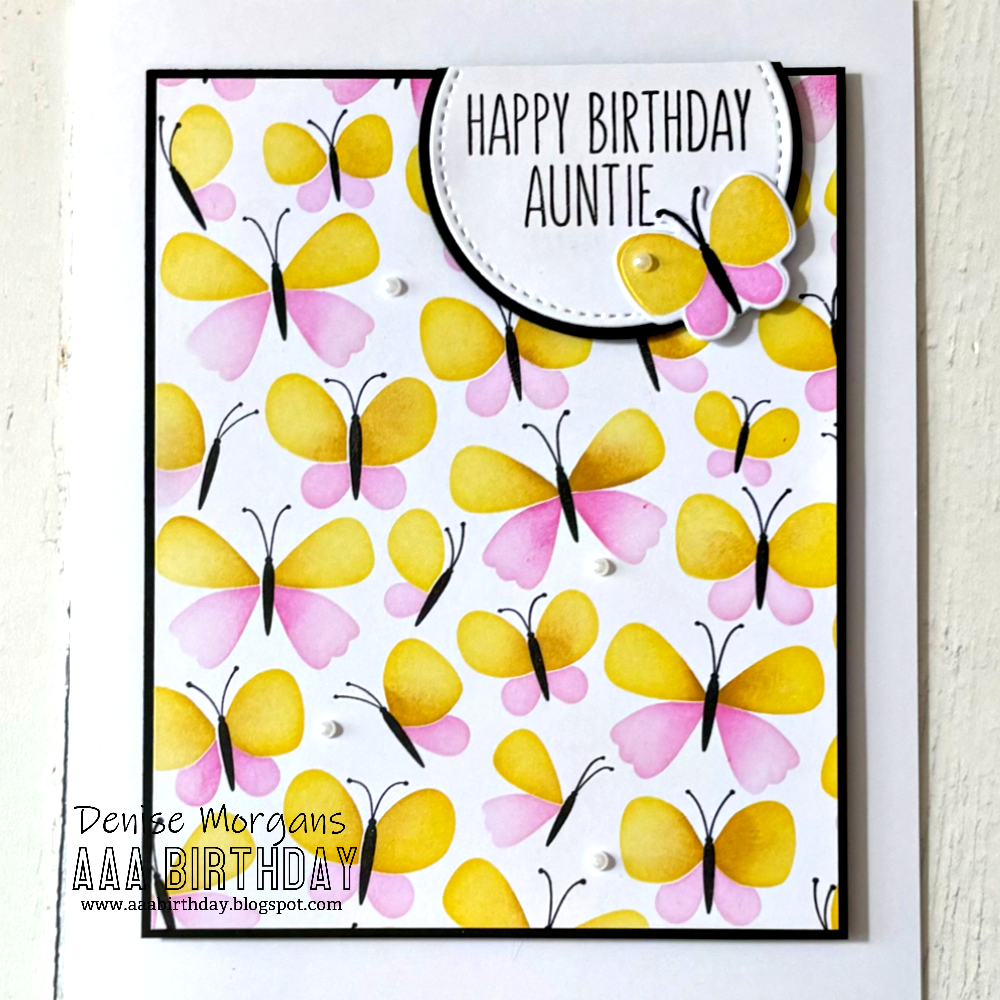
AAA Birthday challenge #65 - background focus

Good morning friends and welcome to September.  I love autumn and I'm hoping it's cool and crisp without too much rain this year (I'm never happy when it comes to the weather am I? lol). Today I'm sharing my card for this month's brand new challenge over at the AAA Birthday challenge. This month Kateryna is the hostess and she has chosen 'background focus' as our theme.  Our guest designer this month is Hanneke so please pop over and leave her some love. 
 
It was my sister's birthday last week so used this opportunity to make my DT card.  Whilst looking through my stash I rediscovered this stamp/stencil combo and I think I have only used it once before so decided to give it some love.  
Here is my card:
A closer look at the background:
Plus I decorated the inside:
I took a white panel 6" x 6" and stamped the butterfly bodies in black ink.  I then took the matching stencils and did the upper wings in yellow ink and the lower wings in pink ink using a lighter and darker shade of both colours for some shading.  Once I finished I trimmed the panel down and it ended up being 4 1/2" by 5 1/2" so I decided to make my card size 5"x 6".  I matted the panel onto a black card mat with double sided tape.  I stamped my sentiment in black ink and cut it out with a stitched circle die and used a slightly larger circle to cut a black mat.  I didn't want to hide too much of the background so cut the top of the circle and added it to the very top of the panel with foam tape.  There is an add-on stamp & die set that has co-ordinating butterflies so I decided to die cut a couple of butterflies and used the same stencils to colour their bodies.  I added one butterfly to the edge of my sentiment circle for some added interest.  I added the panel onto my card base with foam tape.  As a finishing touch I added a few tiny white pearls randomly over the background.  For the inside I cut the same size panels as the front and stamped a sentiment in black ink.  I used a tiny strip of the panel that I had left over when I trimmed it down so added that at the bottom of the panel and added another butterfly over top with liquid glue.  I added this to the card base with double sided tape.  A really bright and happy card and I hope you like it. 

I would like to enter my cards into the following challenges:

Addicted to Stamps & More challenge - die cuts and/or stencils
Allsorts challenge - getting sentimental
Crafty Animals challenge - must include an animal (or insect)
Critter Crazy challenge - ATG with a featured critter
Pearly Sparkles challenge - pink, pearls and/or sparkle (use at least 1)
Try It On Tuesday challenge - make it feminine

The Design Team have created amazing cards as always so please pop over to the blog and check them out and perhaps leave them some love on their personal blogs.   

I hope you will be able to join in with the challenge this month but don't forget it has to be birthday themed.  I can't wait to see your creations in the linky.

Enjoy the rest of your day and thank you so much for stopping by.

Love and hugs, 

card ingredients:
Taylored Expressions - butterflies stamp & stencil combo
Taylored Expressions - butterfly wishes stamp & die set
Honey Bee Stamps - inside: birthday sentiments
Uniko - floral vines stamp (for happy birthday)
Uniko - everyday family stamp (for auntie)
Gina K Designs - Master Layouts 3 (for stitched circle, Master Layouts 5 (for plain circle)
Little Things from Lucy's Cards - pearls - soft snowball mix - store now closed
Hobbycraft - A4 black card
Versafine - onyx black ink