My Lovely Followers

Showing posts with label DCWV. Show all posts

Friday, 21 August 2026

World Goat Day IG Hop 2026

Happy Friday friends; I hope you've had a great week.  I'm back today as we are celebrating World Goat Day with an Instagram Hop organised by my lovely friend Kelly.  We are excited to share our goat themed cards and projects with you and we hope you'll hop along with us, learn fun and fascinating facts and check out all the crafty creations.  

Goats are extremely intelligent and curious and are very often not given credit for being the smart and loving creatures they actually are.  Their inquisitive nature is exemplified in their constant desire to explore and investigate anything unfamiliar which they come across.  
I know it's hard to believe but I didn't have one goat stamp in my (vast) stash but luckily found one by Sugar Pea Designs on eBay.  It has adorable images and some very punny sentiments, which I love. I think my card turned out super cute and I hope you like it too.  
Here is my card:
A closer look at the details:
Plus I decorated the inside:
I began by stamping the images with memento ink onto alcohol marker friendly card and coloured them with Promarkers.  I don't have the dies so I fussy cut them out and added some white highlights.  I cut a piece of patterned paper to fit the front of my card base (4 1/4" x 5 1/2") and adhered it with double sided tape.  I die cut the decorative stitched rectangle and ink blended some blue and green ink to signify sky and grass; I also added some tufts of grass with a promarker.  I added the images with foam squares, except for the one tin can, which was added with liquid glue and stamped the sentiments with black ink.  I added some scrap white card behind the panel before adhering it to the background using double sided tape.  For the inside I die cut another decorative panel from white card and also used the same die to cut a small piece of the patterned paper, which I adhered to the bottom of the panel with liquid glue.  I added another image and tin can in the bottom left with liquid glue and stamped the sentiment in the centre with black ink.  The panel was then adhered to my card base with double sided tape.  

I would like to enter my card into the following challenges:

Crafty Animals challenge - ATG must include an animal
Unicorn challenge - layer it up
We Love Stamping challenge - summer blooms or ATG

We hope you will be inspired by our World Goat Day IG Hop and will pop over and check out all the gorgeous creations along the way.

Thanks for stopping by and take care. 

Lots of love,

card supplies:
Sugar Pea Designs - totes ma goat stamp (store now closed)
Promarkers
DCWV - the natural matstack 8x8 pad (discontinued)
Gina K Designs - ink pads - sea glass and grass green
Gina K Designs - detail craft scissors (for fussy cutting)
Limetree Craft - 280gsm silky smooth white card (not available but other options are here and here)
Limetree Craft - 300gsm smooth white card (for card base)
Versafine Clair - nocturne ink pad
Heffy Doodle - alcohol marker friendly card (store now closed)

I have an Affiliate Link for the Gina K Designs store. If you are considering making a purchase I would appreciate you using my links as it will earn me a small commission at no extra cost to you. 
Thank you x

Thursday, 9 July 2026

Krafty Chicks challenge #828 - Christmas

Good morning lovely friends, I appreciate you stopping by and I hope you're all doing ok. It's time for a new challenge over at Krafty Chicks challenge and this week we are on Week 2; as always the theme is 'Christmas' and I am your hostess. We are slowly adding to the Christmas pile, which really takes the stress off later in the year. We hope you will come over and join in the fun with us.
I recently bought some Penny Black wooden stamps from a friend who was de-stashing her craft room and had to use one of them on today's card (you know how much I love the PB hedgies!).  I was pushed for time when making my card so kept things very clean and simple, no dimension and it is a true SIP card this week. I think it turned super cute and I hope you like it too. 
Here is my card:
A closer look at the cute hedgie:
Plus I decorated the inside:
I began by cutting a white panel 4" x 5 1/4" from alcohol marker friendly card and stamped the image at the bottom.  I coloured the image with Promarkers and added some white gelly roll pen highlights. I stamped the sentiment in the upper left of the panel using black ink.  I added the panel onto a piece of red glitter card cut to 4 1/4" x 5 1/2" and then adhered it to my card base using double sided tape.  No dimension or embellishments but this makes it perfect for mailing!  For the inside I cut a white panel 3 3/4" x 5" and stamped the image in the bottom using black ink.  I stamped the sentiment in the centre and added the panel onto another red glitter card layer.  The panel was then adhered to the card base using double sided tape.  

I would like to enter my card into the following challenges:

613 Avenue Create challenge - ATG optional twist 'any holiday'
Crafty Animals challenge - ATG must include an animal
Creative Friday challenge - new (my stamp is new to me)
Critter Crazy challenge - ATG with a featured critter
Fab 'n' Funky challenge - Christmas in July 
Moving Along With The Times challenge - use a colouring medium (I used Promarkers)
Merry Little Christmas challenge - anything Christmas themed 
Peace on Earth Christmas challenge - anything Christmas themed
Pearly Sparkles challenge - Christmas in July
Penny Black Saturday challenge - ATG optional theme 'on the move'
Simple Clean & Simple challenge - ATG optional theme 'birthday'
Sweet Stampin' challenge - Christmas in July
The Dream Factory challenge - inspired by the Cleaner - CAS cards
Triple B challenge - birds, blooms or butterflies (hope my little robin is ok)
Try It On Tuesday challenge - animals: real or imaginary 

I hope you will be able to join us for our 'Christmas' challenge and I cannot wait to see your creations in our linky. Please leave some love for my fellow chicks - Leanne, Diane and Lori. 

Thank you so much for stopping by; I appreciate your lovely comments.

Love and hugs,
card supplies:
Penny Black - wishes for kisses 1505H wooden stamp
Uniko - rustic Christmas stamp (for sentiments)
DCWV - holiday collection glitter mat stack 
Promarkers
Sakura - black ballsign glaze pen (to darken eyes and nose)
Limetree Craft - 300gsm smooth white card (for card base)
Versafine Clair - nocturne ink pad
Heffy Doodle - alcohol marker friendly card (store now closed)

Saturday, 20 June 2026

Patterned Paper IG Hop - June 26

Hello friends, welcome back to my little blog. I'm here today to share my card for this month's Patterned Paper Party Instagram Hop. Do you love patterned paper? Do you have a huge stash that needs using? Well so do we and it's time to get it used! We will be hopping on the 20th of each month to share our ideas. We will definitely be creating cards, but maybe sometimes tags, ATCs, gift bags/boxes, mini albums and scrapbook pages too. We want our patterned paper to be used.
The theme is always 'anything goes' but each month we will have an optional twist that can be used if you like; this month the twist is 'chevrons' which are so fun, especially for masculine cards. I made a Father's Day card for my FIL and it's 5" x 7" in size.  Surprisingly I didn't use chevron patterned paper but instead die cut some chevrons from patterned paper for my background.  I hope you like it.
Here is my card:
A closer look at the image:
Plus I decorated the inside:
I began by stamping the image onto alcohol marker card, coloured it with Promarkers and fussy cut it out.  I did add some white highlights with a gelly roll pen too.  I found this fun paper pad from DCWV and although it's hard to tell in the photo but the orange/bronze stripe has some foiling detail.  All the papers are from the pad including the brown mat layers and the chevrons were cut from it too.  I cut the main panel 4 1/4" x 6 1/4" and matted it onto the brown layer with double sided tape.  I cut a white panel 3 1/2" x 2 7/8" and again matted it onto a brown layer; I also added some thin cream strips of paper to the top and bottom of the white panel with liquid glue.  I added the image onto the white panel with foam squares.  I stamped the sentiment onto the cream paper with brown ink and die cut the DAD letters from the brown paper and stacked them x3 with liquid glue; the letters were then adhered to a cream piece with liquid glue.  I cut 4 x chevrons for my background and adhered them with liquid glue.  The image panel was added to the centre of the panel with double sided tape and the sentiments were added to the top right and bottom left with double sided tape.  For the inside I cut a white panel 4 3/8" x 6 3/8" and stamped the sentiment in the centre with brown ink.  I cut some of the papers and layered them together with double sided tape and also cut another chevron and placed that across the centre with liquid glue.  the panel was then adhered to the card base with double sided tape (oops I forgot my brown layer but it still looks ok I think). 

I would like to enter my card into the following challenges:

* to be updated *

We hope you will be inspired by our Patterned Paper Party IG Hop and will pop over and check out all the gorgeous creations along the way. If you would like to join us please visit my Instagram page or use the hashtag #patternedpaperpartyhopjune2026 and we will find you.

Thanks for stopping by and take care.

Lots of love

card supplies:
LOTV - vintage boys - mr fixit A5 polymer stamps (available in digi only now)
MFT - stepped up chevon die
MFT - little letters die set
Woodware - one for the boys stamp (for inside sentiment although I did some stamp surgery to remove the happy birthday)
DCWV - the natural stack 8" x 8" pad
Promarkers
Heffy Doodle - alcohol marker friendly card (store now closed)
Limetree Craft - 280gsm silky smooth white card (not available but other options are here and here)
*Gina K Designs - dark chocolate ink pad

*I now have an Affiliate Link for the Gina K Designs store. If you are considering making a purchase I would appreciate you using my link as it will earn me a small commission at no extra cost to you. Thank you x

Saturday, 14 February 2026

CASE IT IG Hop - February 26

Hello again friends. I hope you've had a great start to your Saturday; it's actually been sunny here today but I think it's just a blip and we will be back to rain tomorrow lol!  I'm back to share this month's card for the CASE IT Instagram Hop where we find a project on Instagram that inspires us and we will share that project as well as the project we’ve created. There are so many beautiful creations on Instagram the only difficult part is narrowing down which one to CASE (which means Copy And Share Everything).
This month I was inspired by Stacey (@StaceysCreativeCorner over on IG); her cards are super cute and this one instantly called to me - a cute image, kraft and pretty papers. I don't have any baby cards in my stash so I changed it from Valentine's to new baby.  Here is her card for my inspiration:
Isn't Stacey's card just so adorable? I kept the scalloped layers but I went with white instead of kraft and my layout is vertical instead of horizontal although I think you can still see how I was inspired by Stacey's card! I hope you like it.
Here is my card:
a closer look at the details:
Plus I decorated the inside:
I began by stamping the cute llama onto alcohol marker friendly card, coloured it with Promarkers and used the coordinating die to cut it out.  I die cut the scallop layer and a stitched layer from white card and adhered them together with double sided tape.  I cut three strips of patterned paper (not sure if you can tell but two of them have glittery highlights running through them) and adhered them onto the stitched panel with double sided tape.  I die cut a circle from vellum and adhered the llama on top with foam squares.  I stamped and white heat embossed the sentiment directly onto the vellum but it looked a little lost so I re-stamped it onto white card using sea glass ink and used a sentiments strips die to cut it out.  I then added this over the embossed sentiment with foam squares.  I added foam squares behind the vellum and adhered it onto the background in the bottom right.  I finished off with some mint sequins and also added some glitter accents to the centre so that they would match the papers.  I added some scrap white card behind the panel and then adhered it to my card base with double sided tape.  For the inside I cut the same white layers, cut some small pieces of the papers and added them to the bottom of the panel with liquid glue.  I masked the papers and stamped the llama peeking over the top and stamped a sentiment in the centre with black ink.  I adhered the panel to the card base with double sided tape.  

I would like to enter my card into the following challenges:

* to be updated * 

We hope you will be inspired by our CASE IT Instagram Hop and will pop over and check out all the gorgeous cards along the way. If you would like to join us please visit my Instagram page or use the hashtag #caseithop and we will find you.

Thanks for stopping by and enjoy the rest of your weekend.

Lots of love

card supplies:
Taylored Expressions - llama love stamp & die - retired
Promarkers
MFT - blueprints 27 die set (for scalloped die)
MFT - itty bitty baby stamp (for sentiments)
DCWV - nana's nursery baby boy paper pad - discontinued
Spellbinders - fluted classic circles (for circle die)
*Gina K Designs - ML 14 (for stitched rectangle die)
Gina K Designs - sentiment strips dies
Gina K Designs - sea glass ink pad (for sentiment)
Studio Katia - magic mint sequins
Limetree Craft - 280gsm silky smooth white card (not available but other options are here and here)
Versafine Clair - nocturne ink pad
Stampin' Up! - card stock vellum - retired 
Heffy Doodle - alcohol marker friendly card - store now closed

*I now have an Affiliate Link for the Gina K Designs store. If you are considering making a purchase I would appreciate you using my link as it will earn me a small commission at no extra cost to you. 
Thank you x

Monday, 1 December 2025

AAA Birthday challenge #80 - box card

Good morning lovely friends and welcome to the last month of 2025!  I can't believe it's already December 1st - where did November go?   As it's the first of the month it means we have a brand new challenge over at AAA Birthday. This month's theme is 'box card' which may sound intimidating but there are lots of tutorials out there to follow (there are links over on the challenge blog if you want check them out).  Our guest designer again this month is the talented Sigrid so please pop over to her blog and leave her some love.
To create my box card I used a die set from Studio Light, which I have used once before to make a birthday box card for our cat Willow, which you can see here.  This time around I simply used all the dies in the set to create my card and I think it turned out so pretty and girly.  I hope you like it.   There are a few more photos today as I tried to get as many good views of the project as possible!
Here is my box card:


Plus I added a white panel on the back to write my message:
To create the box you need to die cut two of the pieces and adhere them together to make the box shape so I began by die cutting two of them from black card.  I adhered them together with strong red line tape so I know they would stay secure.  I also cut three of the supports for the inside of the box from black card.  I used a very old but a really pretty paper pad to cut the layers (the stripe paper has glitter running through it and looks beautiful in real life) and cut the back panel from white card and stamped a sentiment in the centre with black ink.   I then added them to the box with liquid glue. As I said I decided to stick with just the dies in the set so cut the butterflies from pink and orange scrap card (to match the papers) and also cut some leaves from paper from the pad.  I also die cut the grass from two different colours of green card from my scraps bin.  I stamped the happy birthday sentiment onto white card and used the decorative label die to cut it out; I also cut the layer from black card.  I adhered them together with liquid glue.  It was now time to decorate the box.  I adhered the grass to the inside supports with liquid glue and then added them into the box with more of the red line tape.  I adhered two of the smaller butterflies directly to the grass and box with liquid glue but the others had a tiny piece of acetate stuck to the backs with double sided tape so that they look like they are flying above the grass.  I did cover the backs with another butterfly to hide the tape.  These three butterflies were then adhered to the supports with red line tape.  I adhered two more of the butterflies to the side flaps with foam squares and the sentiment to the front also with foam squares.  I added two leaves behind the sentiment label (but not sure if I like them now lol!) and finished off with some black pearls in the centres of each of the butterflies.  I also added a butterfly to the white panel on the back.  At the last moment I decided to cut two banners, one from orange and one from pink card for the back flap; I adhered the orange one with liquid glue and the pink one with foam squares.  A really sweet box card and the added bonus is that is folds flat and will fit in an A2 envelope.  

I would like to enter my card into the following challenges:

A Cut Above challenge - ATG with a die cut
Creative Creases challenge - ATG with a fun fold
Cut It Up challenge - fun fold + use a die cut
Girlz Rebel challenge - something beginning with B (butterflies/box card)
Little Red Wagon challenge - pearls & sequins & gems, oh my
Simon Says Stamp Monday challenge - use dies in Diecember
Tic Tac Toe challenge - shaped card, free, foliage

The Design Team have created amazing cards as always so please pop over to the blog and check them out and perhaps leave them some love on their personal blogs. I hope you will be able to join in with the challenge this month but don't forget it has to be birthday themed. I can't wait to see your creations in the linky.

Have a great day.

Love and hugs,

box card supplies:
MFT - sweet 16 stamp (for happy birthday sentiment)
DCWV - Nana's nursery - baby girl 4 1/2" x 6 1/2" paper pad
Limetree Craft - 220gsm black card
Versafine Clair - nocturne ink pad
Gina K Designs - on the inside stamp set (for sentiment on the back)
Gina K Designs - mini pearl mix - black, gold & silver
coloured card from scraps bin
acetate from stash

* I now have an Affiliate Link for the Gina K Designs store. If you are considering making a purchase I would appreciate you using my link as it will earn me a small commission at no extra cost to you. 
Thank you x

Thursday, 6 June 2024

Krafty Chicks challenge #719 - Stamps

Good morning friends; it's Thursday so that means it's time for a new challenge over at Krafty Chicks challenge.  As it's the start of the month we are back to Week 1 which means our theme this week is 'Stamps', so we would like to see a stamp/digi on your project. 
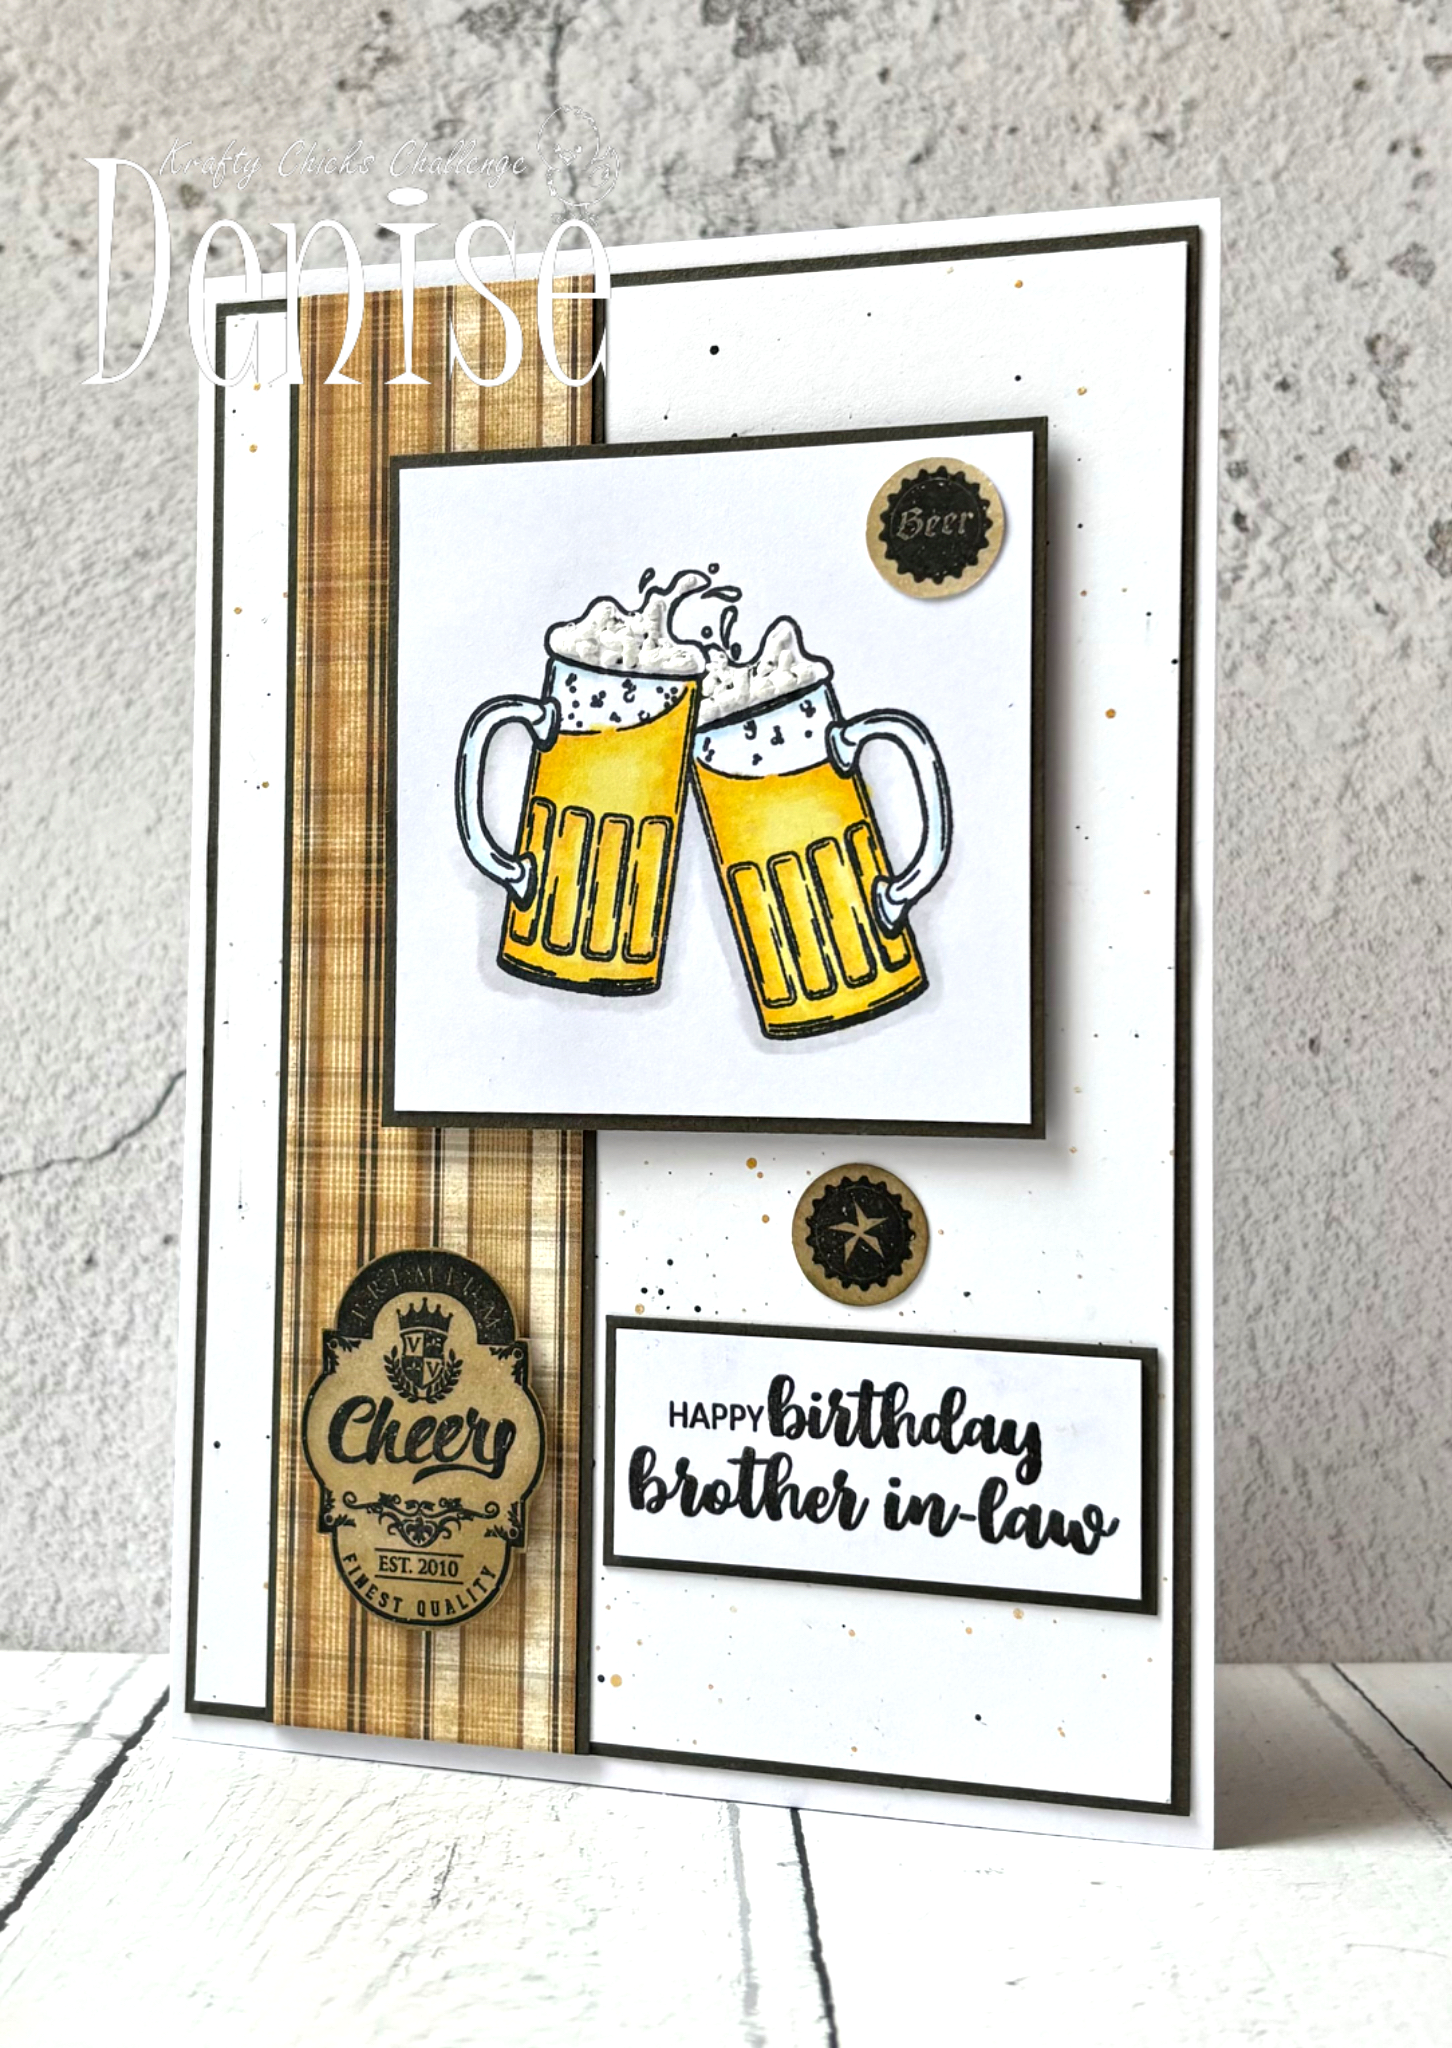
It was my brother-in-law's birthday recently and today I'm sharing the card I made for him.  He took his cards away on holiday with him so didn't fuss too much, although most men prefer this anyway I find.  
Here is my card:
A close up of the image:
I decorated the inside:
I began by stamping the image onto alcohol marker friendly card and coloured it with my Promarkers.  I also added some puffy stuff to make the foam look dimensional.  I cut it into a square and added a brown mat behind.  I had already created the background for a different project but hadn't used it.  It was simply a white panel with some black and gold splatter over it.  I again matted it onto a brown panel and adhered it to my card base with double sided tape.  I wanted to add some interest so took a strip of patterned paper, added a brown mat panel and adhered it to my background along the left side of the card.  I attached the image panel over top with foam squares.  I stamped the sentiment in black ink and cut it into a rectangle before adding a brown mat behind.  The was added to the card with double sided tape.  In the same stamp set as the beer glasses were some label type images and smaller bottle top style stamps.  I stamped them onto white card, inked them with a brown ink pad.  I fussy cut the label and used a small circle punch to cut out the smaller ones.  I added the label with foam squares and the circles with liquid glue.  For the inside I cut a white panel, simply added a strip of the patterned paper to the very bottom and added a strip of brown card above.  I adhered this onto a brown mat panel and stamped the sentiment in the centre with black ink.  I added one of the small punched circles to the bottom right corner.  The whole panel was then adhered to my card base with double sided tape.  The finished card is 5" x 7".  

I would like to enter my card into the following challenges:

Allsorts challenge - lots of layers
Classic Design challenge - ATG optional twist masculine
CRAFT challenge - masculine
Make My Monday challenge - B is for ...... birthday, beer, brother-in-law, brown

I hope you will be able to join us for our 'stamps' challenge and I cannot wait to see your creations in our linky.  Please leave some love for my fellow chicks - Leanne, Diane and Lori and also our guest designer Rachelle, who is with us for another month.  

Thanks for stopping by. 

Love and hugs, 
Card ingredients:
Apple Blossom - time for a beer stamp set - no longer available 
Clearly Besotted - happy birthday all - retired
Clearly Besotted Stamps - mini calligraphy - retired 
Woodware - tiny circle punch
DCWV - the natural stack 8"x8" cardstock pad - no longer available
Gina K Designs - charcoal brown card
Gina K Designs - warm cocoa ink pad
Versafine - onyx black ink pad
Promarkers
Inkylicious - fluffy puffy stuff

Sunday, 4 June 2023

My first pop up box card

Happy Sunday friends.  I hope you sun is shining where you are; it's a glorious day here in South Wales.  Today I'm sharing my first ever pop up box card that I made for my brother-in-law's birthday.  He has a shed/bar in the back garden and I thought it sort of looked like a bar when it was finished lol!  

It was quite difficult to photograph so my post is a bit photo heavy:


close up of the die cuts:


I did add a white panel at the back to write my message but forgot to take a photograph of that (I bet you're glad lol!).  I followed a tutorial by Sam Calcott at Mixed Up Crafts that I saw on YouTube, although I got scissor happy and accidently cut off the flaps at the front but I think for a masculine card it looks less fussy this way.  You can watch her video here.  I die cut lots of drink bottles, glasses etc and added them onto acetate strips so that they would look like they were floating.  I also added some extra stars to fill in the gaps.  The sentiment was stamped on a white panel and added to front of the pop up box.  The papers are from a very old 8"x 8" pad that I found in my stash.  It wasn't that difficult to make but I think it looks really effective.  I hope you like it too.  

I am entering the following challenges:

Seize the birthday challenge - make it pop (my card pops up)
Time Out Challenge - inspiration photo (inspired by the drinks)

I hope you enjoy the rest of your day and thank you so much for stopping by. 

Love and hugs, 


Card ingredients:

Marianne Design - beer by Marleen (for drinks die cuts)
Gina K Designs - grand gentlemen (for the large sentiment)
MFT - blueprints 13 (for the stars) - retired
Apple Blossom - time for a beer (for the smaller round sentiment)
DCWV - the natural stack 8x8 paper pad (discontinued)