My Lovely Followers

Thursday, 25 January 2024

Krafty Chicks challenge - All Occasions

Hello and happy Thursday lovely friends.  I hope you're having a great week.  I'm here today to share my DT card for this week's Krafty Chicks challenge.  We are on week 4 which is always 'All Occasions' i.e. birthday, sympathy, new baby, Valentine's, the world's your oyster lol!
I made this card for a crafty friend who had her birthday recently and was inspired by a technique I saw by Gina K Designs.  Here is my card:
A closer look:
Of course I decorated the inside:
I began by cutting a white panel 3 3 /4" x 5" and used a circle stencil to mask the area I wanted to ink blend.  I used an orange for my sky and a light green for my grass.  I went over my ink blending with a cloud stencil using the same orange ink but with a slightly heavier hand and a grass stencil using a slightly darker green ink.  I did go over the clouds with a pink ink but I don't think I added enough as you can't really see it.  I removed the stencils and stamped the silhouette image in black ink using my Misti tool.  I also stamped my sentiment below the image and a small butterfly to the upper left side.  I added the panel onto a black card mat with double sided tape and this was also added to my card base with double sided tape.  A few black pearls and my card was complete.  For the inside I cut the same size panels and on the white panel I stamped my sentiment in black ink and added a portion of the silhouette stamp in the lower left corner.  I blended some of the orange ink around it for some added interest.  Again I matted the panels with double sided tape and again adhered it to the card base with double sided tape.  A very calm and elegant card which I think would also be suitable as a sympathy card by changing out the sentiment. 

I would like to enter my card into the following challenges:

Addicted to CAS challenge - sky (I stencilled my sky)
Addicted to Stamps & More challenge - die cuts and/or stencils (I used a cloud and grass stencil)
As You Like It challenge - What's your fave: pearls or gems and why (I like both but mostly grab for my pearls as they are great for all types of cards
Inkspirational challenge - use stencils (I used a cloud and grass stencil)
Just Us Girls challenge - ATG stencil week (I used a cloud and grass stencil)
Make My Monday challenge - happy birthday
Triple B challenge - must have either birds, blooms or butterflies (I have silhouette blooms and a butterfly)

I hope you will be able to join us for our 'All Occasions' challenge and I cannot wait to see your creations in our linky.  Please leave some love for my fellow chicks - Leanne, Diane and Lori and also our guest designer for January, Helen.  

Thanks for stopping by. 

Love and hugs, 
card ingredients:
Gina K Designs - Natural Silhouettes stamp
Gina K Designs - Spring Mountain stamp (for butterfly)
Gina K Designs - Birthday Cheer stamp (for inside sentiment)
MFT - mini cloud edges stencil
Taylored Expressions - masking circles stencil
Limetree Crafts - 250gsm smooth white card (for panels and card blank)
Versafine - onyx black ink

Wednesday, 24 January 2024

2024 Crafty Kickoff IG Card Hop - Week 2

Hello again friends; I hope you've had a great start to your week and Storm Isha didn't cause you any problems.  It was really wet and windy here but thankfully no damage or power cuts , although I know some parts of the UK weren't so lucky.  Today we are onto Storm Jocelyn so another wet and windy day here although it is supposed to be short lived.  

Enough of the weather reporting lol!  I am here with my week 2 card for the 2024 Crafty Kickoff IG Card Hop, which has been organised by my lovely friend Kelly.  Each Wednesday we will share a themed card inspired by the new year and this week's theme is 'birthstones'.
and in case you want to participate here is a list of birthstones by month:

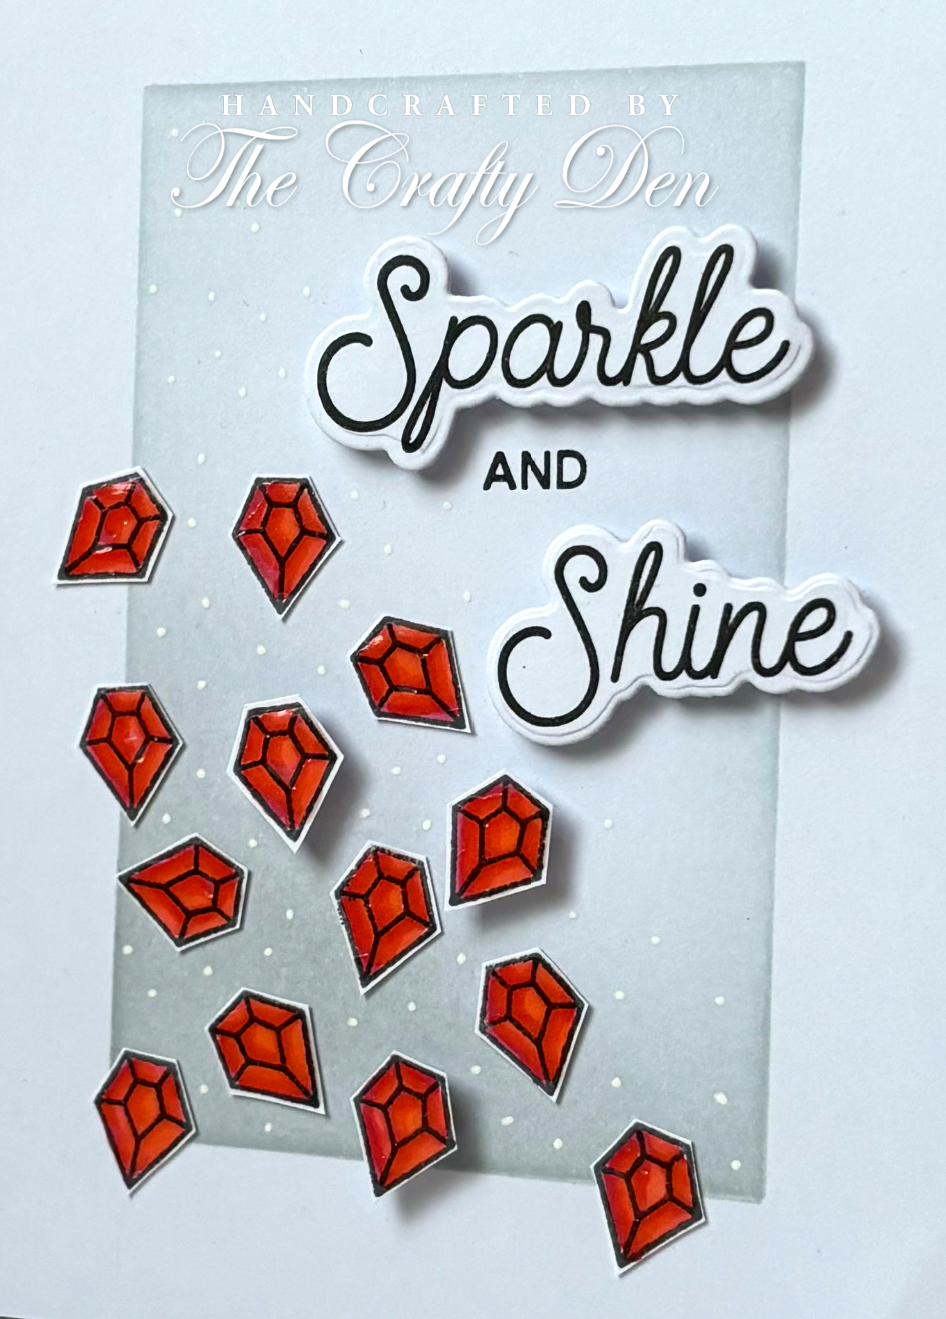
You can take the simple route and just use the colour of your birthstone i.e. my birthday is July, which is ruby, so I could make a card with red as my focal colour, or you can include gemstones or even ruby slippers!  There is no limit to your imagination...... oh I wish I had gone with ruby slippers now but it literally just came to me haha!  Here is my card:
A closer look:
I also decorated the inside:
I began by stamping lots of the tiny gemstones and coloured them with Promarkers.  There is no matching die so I fussy cut them out but they were super simple as it was all straight lines.  I cut a white card panel 3 1/2" x 4 3/4" and used a rectangle masking stencil to lightly ink a border using light grey ink.  I later decided to add some darker grey ink to the lower left corner as this was where my gemstones were going to be (as you would with press'n'seal but I don't have that).  I stamped the sentiments in black ink and used the matching dies to cut them out.  I arranged my gemstones in the left bottom corner of my inked rectangle and once I was happy with placement took a piece of wide masking tape and pressed it onto the gemstones to keep their position.  I added tiny foam squares onto 3 gemstones and liquid glue onto all the others and added them to my card.  The two die cut sentiments were added with foam squares and I also stamped the 'and' word directly onto the card panel.  For some extra interest I took a white gelly roll pen and added some dots around my gemstones and sentiment.  I adhered the white panel onto a grey scrap of card and this was added to my card with foam tape.  I decided to add some crystal glaze to my gemstones to make them shine.  For the inside I stamped a sentiment in black ink and used the same masking stencil but only inked the lower left corner of my white card panel before adding a few more gemstones with liquid glue.  Again I matted the white panel onto some grey card and this was adhered to my card base with double sided tape.  I'm really happy with how my card turned out and I hope you like it too. 

I would like to enter my card into the following challenges:

AAA Cards challenge - ATG CAS - optional love is in the air
Addicted to Stamps and More challenge - die cuts and/or stencils (I have both)
Double D challenge - sparkle and/or shine (I added crystal glaze to my gems)
Inkspirational challenge - use stencils (I used a masking stencil)
Stamping Sensations challenge - mood board (inspired by the colours and gems on the butterfly)
Stencil Fun challenge - ATG stencils - optional birds theme

I would love it if you would pop over to Instagram and see the amazing work by all the other crafters taking part in the hop.  Please use the hashtag #2024CraftyKickoffIGCardHop to find the hop and also so that we can find your creation if you are inspired to take part.  

I'll be back tomorrow with my DT card for this week's Krafty Chicks challenge so please pop by and check it out.  As always I appreciate the comments you leave and thank you so much for stopping by. 

Love and hugs, 

card ingredients:
Create a Smile - 29 Again stamp set (retired)
Taylored Expressions - masking stencils - rectangles
Gina K Designs - ink pads in soft stone and stormy sky
Gina K Designs - Succulent Spray stamp (for inside sentiment)
Honey Bee Stamps - Shine On stamp and die set (for outside sentiments) retired
Limetree Crafts - 250gsm smooth white card (for card base and panels)
Tonic Studios - Nuvo crystal glaze
Promarkers
Grey card from scrap bin

Thursday, 18 January 2024

Krafty Chicks challenge - CAS

Hello friends and happy Thursday.  Well the weeks are certainly flying by aren't they?  I can't believe I'm sharing my week 3 card for the Krafty Chicks challenge already.  Week 3 is always CAS, which I know a lot of people struggle with (me included), but I think it does get easier the more you make them.  
I like the look of clean and simple but honestly don't always know when to stop but I've made quite a few CAS cards in the last few weeks and I'm liking them more.  I decided to make a sympathy card as I'm always usually rushing to make them so here is my card for today:
a closer look:
and I decorated the inside:
I recently watched a video on YouTube that reminded me about partial embossing, which is something I have done before, but completely forgot about so wanted to try again.  I grabbed 2 different embossing folders and embossed them onto white card leaving a gap large enough to fit my sentiment.  I scored each edge of the embossing to define them and make them look more 'finished'.  I stamped the sentiment with versamark and heat emboss with gold detail embossing powder.   I cut a leafy die 3 times from white and once from a matte gold speciality card and adhered them together with liquid glue.  I added the die cut to the embossed panel with liquid glue.  The white panel was then added to the same matte gold card with double sided tape.  I also added it to my card base with double sided tape.  I didn't add any embellishments as I wanted to try and keep it as clean and simple as possible.  For the inside I cut another white panel and stamped my sentiment with black ink.  I added a smaller sprig of the die cut in the bottom right corner.  Again the panel was matted onto the gold card and adhered to the card base with double sided tape.  

I would like to enter my card into the following challenges:

Can You Handle the Pressure challenge - ATG with embossing option - snow people
Craft Rocket challenge - use embossing
Crafty Catz Challenge - ATG optional twist - no designer paper
Double D challenge - sparkle and/or shine (shimmer card and heat embossing)
Just Us Girls challenge - mood board week (inspired by the colours and textures)
Simon Says Stamp Monday challenge - sparkle and shine (shimmer card and heat embossing)

I hope you will be able to join us over at Krafty Chicks and I cannot wait to see all your gorgeous creations.   Check out the blog for all the rules and to see the amazing cards from the very talented design team - LeanneDiane and Lori.  Helen is our guest designer for January so please leave her some love too.  

Thank you so much for stopping by. 

Love and hugs,
card ingredients:
Gina K Designs - Tapestry embossing folder
Gina K Designs - Botanical duo die set
Gina K Designs - Fresh Florals stamp set (for main sentiment)
Gina K Designs - So Many Sentiments stamp set (for inside sentiment)
Tonic Studios - Craft Perfect 6 x 6 card pack - gold hearted
Limetree Crafts - 250gsm smooth white card
Versafine onyx black ink
Versamark
Tonic Studios - Nuvo deluxe glue

Wednesday, 17 January 2024

2024 Crafty Kickoff IG Card Hop - Week 1

Hello again friends and Happy Hump Day.  I'm joining in with a new Instagram Hop organised by my lovely friend Kelly called 2024 Crafty Kickoff and each Wednesday we will share a themed card inspired by the New Year.  This week's theme is 'what's new to you'.   
You can interpret this theme any way you like; whatever inspires you.  I went literal and used a new background stamp that I got recently as the starting point.  Here is my card:  

A closer look:

I decorated the inside:

I also decorated the envelope:

I began by stamping the background stamp twice with navy ink onto white card to make a panel for my card.  I ink blended the same navy ink all over so that the white parts became a lighter blue.  I die cut a circle from the upper centre and added acetate behind so that I could create a shaker window.  I die cut some lighter blue card using the same circle die and one size larger to make a frame for my shaker window.  I added this with liquid glue.  I added foam tape behind my panel and around the window, poured clear sequins onto my card base and removed the foam tape backing and placed it over my sequins to seal them in.  I stamped and coloured a cute bunny image using my Promarkers, added some white highlights with a gel pen and fussy cut him out.  I added him to the bottom right of the shaker window with foam squares.  I used the same light blue card and stamped my sentiment in navy ink and die cut it with a banner die; I also added this to the panel with foam squares.  I added a few more sequins to the front of the card for some extra bling.  

For the inside I cut a white panel and stamped a sentiment in navy ink.  As I had some spare background pieces (as I did a test run before making my card) I added a thin strip at the top and bottom of the panel.  This was added to my card base with double sided tape.   I also decorated the envelope with the extra background pieces.  

I love making shaker cards and don't know why I don't do it more often.  I could have put a few more sequins in my shaker but it shakes and looks ok so no worries.  

I would like to enter my card into the following challenges:

Allsorts challenge - make your own background
CRAFT challenge - new (new BG stamp)
Cardz for Guyz challenge - something new from stash (BG stamp)
Crafty Animals challenge - ATG include an animal
Crafty Catz challenge - ATG optional twist - no design paper
Critter Crazy challenge - ATG with a featured critter
Cut It Up challenge - use something new (BG stamp)
Make My Monday challenge - happy birthday
My Time To Craft challenge - something new in your stash (BG stamp)
Sweet Stampin' challenge - what's new with you? (BG stamp)
We Love Stamping challenge - something new (BG stamp)

I would love it if you would pop over to Instagram and see the amazing work by all the other crafters taking part in the hop.  Please use the hashtag #2024CraftyKickoffIGCardHop to find the hop and also so that we can find your creation if you are inspired to take part.  

I'll be back tomorrow with my DT card for this week's Krafty Chicks challenge so please pop by and check it out.  As always I appreciate the comments you leave and thank you so much for stopping by. 

Love and hugs, 

Card ingredients:
MFT - Sending sweet celebration wishes stamp set
MFT - Old friends stamp set (for HB sentiment)
MFT - Blueprints 27 (for banner die)
Gina K Designs - Birthday cheer (for inside sentiment)
Gina K Designs - In the navy ink pad
Little Things From Lucy's Cards - sprinkles - crystal circles

Monday, 15 January 2024

Another Christmas card

Hello friends and welcome to a brand new week.  It's very cold and frosty here today; I hope you are keeping warm where you are.  I know some parts of the country are having lots of snow this week but I don't think we will be getting any, thank goodness.  

I thought as the weather is so chilly it would be the perfect time to share another Christmas card; this time one that I made for my son.  It was a lot of die-cutting but I think it turned out cute.  Here is my card:
A closer look:

I decorated the inside:
For my son's card I used a new-to-me die set from Spellbinders.  I die cut all the separate elements and adhered them with liquid glue (a little fiddly but not too bad).  I stamped my sentiment directly onto the stocking with black ink.  I took a piece of white card 4 1/2" x 6 1/2" and used an embossing folder for some subtle interest.  I mat the white panel onto a red panel which was cut to 4 3/4" x 6 3/4" with double sided tape; this was then added to my card base with double sided tape.  I'm terrible at arranging things on my cards so you can imagine how long it took for me to decide on a layout!!  I added the stocking with foam tape and tucked the leaves and candy cane behind with liquid glue.  The gingerbread man and gnome were added with foam squares.  I added a few sequins around the stocking for a finishing touch.  For the inside I cut the same size panels in white and red, stamped my sentiment in black ink and added a die cut holly to the bottom left corner.  The panel was adhered with double sided tape.  

I would like to enter my card into the following challenges:

Allsorts challenge - make you own background (EF)
Can You Handle the Pressure challenge - ATG embossing option snow people
Cardz 4 Guyz challenge - use something new in your stash (die set)
Craft Rocket challenge - use embossing
Crafty Catz challenge - ATG optional twist no design paper
Creative Friday challenge - ATG (entry 3 of 3)
Cut It Up challenge - a new year (new die set)
Moving Along With the Times challenge - new craft item (die set)
My Time to Craft challenge - Something new in your stash (die set)

Have a great start to your week and stay warm.  I really appreciate you stopping by.  

Love and hugs, 

card ingredients:
Spellbinders - Stocking full of joy
Stampin' Up! - family party stamp set (retired)
Limetree Crafts - 250gsm smooth white card
red card from stash
Versafine - onyx black ink pad

Thursday, 11 January 2024

Krafty Chicks challenge - 'Christmas'

Hello again friends; I hope you're having a great week so far.  I cannot believe we are at Thursday already or that one week of January is already behind us!

I'm back with my 2nd DT card for the Krafty Chicks challenge and this week is all about Christmas.  As long as your creation is holiday or Christmas themed then you're all set.  I was really chasing my tail and making last minute Christmas cards last year so hopefully these challenges will give me a head start this year.  Here is my card:
A closer look:


I decorated the inside:
I began by die cutting the peace, love & joy cover plate from white card which I then die cut from a stitched rectangle die.  I also die cut a scalloped rectangle die from kraft card and layered them together with liquid glue.  I added the centres of the O's, A and P with liquid glue as I don't think they look finished without the middles!  I added the panel to my card base with foam squares.  I used a pre-printed sentiment which I die cut with a sentiment strip die and remembered that it could be foiled so using my minc machine and the gold foil that came with it foiled the sentiment which I thought looked great with the kraft card.  Finally I added some gold pearls for some extra bling.  On the inside I used the same rectangle dies and cut a white panel and kraft card panel and adhered them with liquid glue.  I stamped the sentiment in kraft ink and also a small image above.  Again added to the card base with liquid glue.  A fairly clean and simple card again but I think it's elegant and beautiful (even if I say so myself).  

I would like to enter my card into the following challenges:

Daisy Chain challenge- no design paper
Incy Wincy Designs challenge - new and/or let's celebrate

I hope you will be able to join us for our Christmas challenge and I cannot wait to see your creations in our linky.  Please leave some love for my fellow chicks - Leanne, Diane and Lori and also our guest designer for January, Helen.  

Thanks for stopping by. 

Love and hugs, 


Card ingredients:
Gina K Designs - Master Layouts 4 (for scallop edge rectangle die)
Gina K Designs - Master Layouts 2 (for stitched rectangle die)
Gina K Designs - winter cheer sentiment strips
Gina K Designs - sentiment strips dies
Limetree Crafts - 250gsm smooth white card (for panels and card base)
kraft card from stash

Wednesday, 10 January 2024

Hubby's Christmas card

I hope you are all doing ok and having a great week so far.  It's flipping freezing here today and has been all week; plus it's been really windy, which is not a good combination.  Luckily I didn't have to go anywhere today so could stay inside and craft lol!  

I've got quite a few Christmas cards that I haven't shared with you yet so I thought today I would start with the card I made for my husband.  I was inspired by a card I saw from Mindy Eggen, although mine is not as good as hers.  Here is my card:
A closer look at my scene:
I decorated the inside:
plus I stamped the envelope:
I loved Mindy's card as soon as I saw it so followed along with her video using the same ink colours etc.  I began by stamping the row of houses in versamark and embossing with clear embossing powder.  I then ink blended the background using 3 different ink colours.  I stamped the trees in a mid grey ink behind the houses.  I'm not sure why but my embossing didn't resist the colour as well as Mindy's but I did use a clear gloss powder so not sure if that has something to do with it.  I splattered some water droplets onto the background and also added white gauche to replicate snow.  I took a white panel and cut it with a stitched hill die and then stamped my sentiment in black ink and adhered this over the bottom of my houses to create a snow bank.  The panel was then adhered to a black mat panel and this was added to my card base with foam tape.  No fussy embellishments as I loved it as it was.  The finished card size is 5" x 7".  For the inside I stamped my sentiment in black ink onto a white card panel and stamped a row of the trees at the bottom in the same mid grey ink.  This was then adhered to a black panel and added to my card with double sided tape.  I also stamped the trees again onto my envelope.  

I would like to enter my card into the following challenges:

Daisy Chain challenge - no design paper
Get Creative challenge - snow much fun
Inspiration Station challenge - inspiration photo (I was inspired by the scene and colours)
Inspired By challenge - inspired by snowman (I was inspired by the colours)

I really appreciate you stopping by today.  I will be back tomorrow with my DT card for the Krafty Chicks challenge.  Have a great evening. 

Love and hugs, 

card ingredients:
Gina K Designs - Winter whimsy stamp
Gina K Designs - ink pads - turquoise sea, tranquil teal, plum punch, stormy sky
LOTV - Christmas greetings A5 stamp set (for inside sentiment)
LOTV - Snow globes A5 stamp set (for Merry Christmas sentiment)
Stampin' Up - family party stamp set (bought from another crafter)
Lawn Fawn - stitched hillside borders die
Versamark ink pad
Limetree Crafts - 250gsm smooth white card