My Lovely Followers

Showing posts with label Crafts UK. Show all posts

Friday, 9 May 2025

Mother's Day card

Hello lovely friends; I hope your week has been great and the weekend is nearly here *yay*.   Today I am sharing one of the Mother's Day cards I made back in March; when I saw that it was Mother's Day in the USA this weekend I realised that I hadn't shared my cards for this year.  Today I'm going to share the card I made for my mother and then in another post I will share the card I made for my MIL.  

I made a larger 6" x 8" card this time and even though it's quite a large space to fill I had a layout in mind when I made it.  I used a new (back in March) decorative die and some gorgeous flowers from Gina K Designs.  I hope you like it. 
Here is my card:
A closer look at the flowers:
Plus I decorated the inside:
I began by creating my background panel using a clear background stamp.  I cut my white panel 5 3/4" x 7 3/4" but the stamp is only 4 x 6 so I turned it sideways and stamped it twice using a light brown ink so that it would fill my panel.  I used gold mirri card as my mat layer and adhered them together with double sided tape.  I cut two of the decorative panels from ML 19 and again added a gold mirror mat layer behind it with double sided tape.  I placed them on the panel at a jaunty angle, overlapping slightly.  For my focal point I used two flower images and coloured them with the layering stencils and die cut them out with the coordinating dies.  I added a few white hightlights with a gelly roll pen.  I cut a few extra white flowers so that I could add some dimension with using foam squares.  The flowers were adhered together with liquid glue and then added to the decorative panels with liquid glue.  For the sentiments I used a mix of stamp sets, stamped them in black ink and cut them out with the coordinating dies.  I also die cut extra white pieces of these and layered them together with liquid glue.  They were added to the card panel with liquid glue.  The panel was added to my card base with double sided tape.  For a finishing touch I added some gold pearl embellishments.  For the inside I used some leftover offcuts of the stamped background and placed them at the top and bottom of the panel, adding a thin strip of the gold mirri card to make it look more finished.  I adhered this onto a gold mirri mat layer with double sided tape.  The inside sentiment was made up of two separate stamps which I stamped in black ink.  I added the panel to the card base with double sided tape.  I was really happy with this card and it looked so much better in real life.  

I would like to enter my card into the following challenges:

Beautiful Blossoms challenge - Anything floral goes with optional mood board
Classic Design challenge - ATG optional twist feminine
Crafter's Cafe challenge - ATG optional theme feminine
Crafty Catz challenge - ATG option May flowers
Inkspirational challenge - seasonal - spring/Mother's Day
The Four Seasons challenge - think spring optional mood board
The Dream Factory challenge - flowers and/or Mother's Day
Triple B challenge - birds, blooms or butterflies optional mood board

I hope you enjoy the rest of your day and that you have a fun weekend. 

Thanks for stopping by.

Love and hugs, 

card supplies:
Gina K Designs - ML 19 die set
Gina K Designs - a bit of spring mini stamp (inside sentiment)
Gina K Designs - Sending flowers clear stamp (inside sentiment)
Versafine - onyx black ink pad
gold mirri card from stash

Wednesday, 5 June 2024

Mini Card Challenge IG Hop - Week 4

Hello friends and happy Wednesday.  I trust your week has been good so far.  I'm back to share my card for the final week of the Mini Card challenge IG Hop, which has been organised by my lovely friend Kelly. It's a chance to keep us occupied and our creativity flowing before the Summer 2024 Hop begins. 
This week we are challenging ourselves to use up old, forgotten and hoarded supplies (I'm sure we all have lots of these hiding in our cupboards) or use up some of those backgrounds you've created and put in a drawer.  You can choose to use 1, 2 or all 3 of the parameters.  I decided to use all 3 on my card and as we are using old, forgotten supplies, I thought I would go 'old-school' and make a layered, 6" x 6" card like I used to in the olden days! 
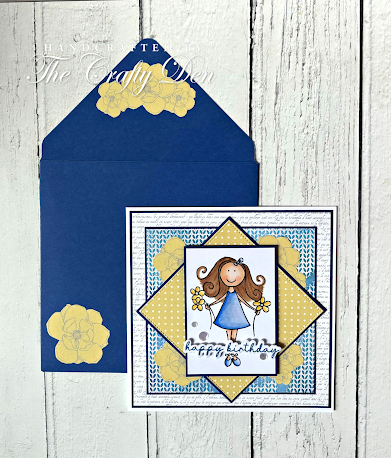
Here is my card:
A close up of the image:
I decorated the inside:
I also made my own envelope and decorated it:
I began by stamping my very old wooden block stamp from Elzybells (maybe 2008/09) onto alcohol marker friendly card and coloured it with my Promarkers.  I dug out a very old 6" x 6" paper pad (again from 2012) and matted the pieces onto navy card.  I used another embossed background which went a bit awry and distressed looking but most of it is covered by the patterned paper!  I fussy cut some of the yellow flowers from a sheet that I had already used as I thought they would be pretty decorations.  I made my own 6" x 6" card blank and added my layers with double sided tape.  I used a die to cut the yellow dotted paper so that it would have a decorative stitched edge.  I placed this in a diagonal position for some extra interest and this also meant I could tuck my flowers into the corners.  I added my coloured image in the centre and adhered it with foam squares.  I fussed about with various sentiments but then remembered I had just received a new set from Simon Says Stamp which had a matching die-set so I thought it would be perfect as it wouldn't hide too much of my image.  I stamped it in navy ink, die cut it out and added to my card with thin foam strips.  I did get a little ink on my image panel so added a couple of clear sequins to hide my boo-boo!  As a finishing touch I added some clear glaze into the centre of the flowers.  For the inside I cut a white panel and adhered it to a navy panel with double sided tape.  I added a strip of the yellow paper on the bottom and a thin strip of blue card.  I also tucked another yellow flower under the border with liquid glue.  I stamped my sentiment in black ink in the centre of the panel.  I adhered the whole panel to my card base with double sided tape.  I don't have any 6" x 6" envelopes any more so used my 1-2-3 punch board to make my own from navy card.  I decorated the front and the back flap with more of the fussy cut flowers.  It's very different to my more minimal style these days but I think it turned out really pretty. 

I would like to enter my card into the following challenges:

Allsorts challenge - lots of layers
Alphabet challenge - embossing wet or dry (my blue panel is heat embossed)
As You Like It challenge - embossing wet/dry (I love the look of heat embossing but I'm not very good at it.  My blue panel is embossed and again it looks a little distressed but I'll keep practising).  
Double D challenge - pick 3; old, new, borrowed, blue (old stamp, new birthday stamp, blue colour)
Everybody Art challenge - 3 patterned papers (script, dots and flowers cut from one sheet)
Make My Monday challenge - B is for...... birthday, blooms & blue
Pearly Sparkles challenge - one for the girls
Triple B challenge - include at least one bird, bloom or butterfly
Try It On Tuesday challenge - emboss it (my blue panel is embossed)
Unicorn challenge - embossing (my blue panel is embossed)
We Love Stamping challenge - fabulous florals/anything goes

If you would like to follow the hop over on Instagram please use the hashtag #minicardchallenges to find us or alternatively visit my profile and you will find the list of participants on my post.  We would love it if you would give the mixed up challenges a try and again use the hashtag and we will find your projects.  I'm sad that this particular hop is coming to an end but it won't be long before the Summer hop begins.  

I'll be back tomorrow with my card for the Krafty Chicks challenge but until then enjoy the rest of your day and thank you for stopping by. 

Love and hugs,

Card ingredients:
Elzybells Stamps - 16.002F (not sure of the name) - sadly closed many years ago
Promarkers
Teresa Collins - everyday moments 6" x 6" paper pad
Gina K Designs - close knit background stamp 
Gina K Designs - master layouts 3 (for square dies)
Gina K Designs - blue denim ink pad
Crafts UK Limited - 12" x 12" 250gsm white card
Heffy Doodle - alcohol marker friendly card - so sad to hear they are closing soon
Heffy Doodle - adhesive foam strips
Tonic Studios - Nuvo crystal glaze

Wednesday, 17 April 2024

Spring Into Card Making IG Hop - Week 6

Hello friends; I hope you're having a great day.  I'm back to share this week's card for the Spring Into Card Making IG Hop, which has been organised by my lovely friend Kelly.  Each week we will be sharing a themed card focusing on the joys of spring.  If our hop inspires you please use the hashtag #2024springintocardmakinghop to join in the fun.  
This week's inspiration prompt is 'spring into action' so we want to see something interactive on your cards this week; even if it's just an action wobbler.  If interactive cards are not your things we would love to see your spring themed cards.  I originally made a card with an action wobbler but I didn't love it so decided to make another; the second card is a tent style card with a swinging action.  I hope you like it.
Here is my card:

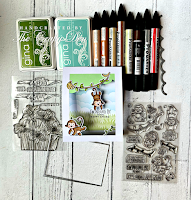
A closer look at the cute images:

There is no inside as such so I decorated the back:
It's not a very good photo but I wanted to show you the side view:

The basic size of the card is a regular US A2 (4 1/4" x 5 1/2") so I made my card base from white card and then cut a smaller piece 4 1/4" x 2" to create the 'W' for the inside using my score board to score at every 1/2" (I hope that makes sense).  Before sticking everything together I cut a rectangle from the front of the card so that I could make my scene.  I also created a background piece using cloud and grass stencils and adhered it to the inside of the card with double sided tape.  I stamped 2 monkeys, some branches and some bananas and coloured them with Promarkers; I then used the matching dies to cut them out.  I know you can buy the swinging mechanisms but to be honest I very rarely make these types of cards so had a go at making my own.  I cut a thin strip of acetate and punched a small hole in the top.  I die cut 6 smaller circles from white card and adhered them together with liquid glue.  By placing the smaller circles inside the acetate circle will enable my monkey to swing.  To keep it all together I punched 2 larger white circles and enclosed it all together.  I did have to trim my acetate a little to enable it to swing freely and also so that it wouldn't show behind the monkey.  I cut some green card using a scalloped die and added this to the top of the rectangle on the inside so that it would hide my mechanism.  I'm sorry if my instructions are not clear; I didn't think to take step by step photos as I wasn't sure it would even work lol!  I'm sure if you check Pinterest you will find some instructions there.  I added my branches, monkeys and bananas and then stamped my sentiment (which was made up of 2 different stamp sets).  As there is no traditional inside of the card I decorated the back with another stencilled panel and also added another monkey.  I haven't added a sentiment yet but will do that when I know who I am sending the card to.  I adhered the panel with double sided tape.  I then finished the card by adding the 'W' to each side of the card (using extra strong tape) to make it stand up (although it is a little bowed as I didn't take into account the extra bulk of the swing mechanism).  I didn't feel the need to add any embellishments as there was so much going on.  I really hope you like it.  I did take a short video and if you want to see it swing please pop over to my Instagram. 

I would like to enter my card into the following challenges:

As You Like It challenge - cute or floral (I love cute animal images and they suit all ages)
Creative Creases challenge - ATG with a fun fold
CRAFT challenge - inspired by a movie (jungle book)
Crafty Animals challenge - ATG must include an animal
Crafty Catz challenge - ATG option any cute critter
Creative Moments challenge - cute and cuddly
Critter Crazy challenge - ATG with a featured critter
Fab 'n' Funky challenge - add a sentiment
I love Promarkers challenge - ATG option shapes
Incy Wincy Designs challenge - inspired by a song/book or movie (jungle book)
Inkspirational challenge - word prompt FOLD
Simply Create Too challenge - more than one fold
Simon Says Stamp Monday challenge - make your own background
Stencil Fun challenge - Anything stencil goes option spring/flowers
The Cutie Pie challenge - simply cuties
Tic Tac Toe challenge - stencil/die cut/critter
Tic Tac Toe Challenge #245

I would love it if you would pop over to Instagram and see the amazing work by all the other crafters taking part in the hop.  Please use the hashtag #2024springintocardmakinghop to find us and also so that we can find your creation if you are inspired to take part.  

I'll be back again with you tomorrow with my card for the Krafty Chicks challenge so please pop by and check it out.  As always I appreciate the comments you leave and thank you so much for stopping by. 

Love and hugs, 


card ingredients:
Heffy Doodle - Chimply the best stamp & die set
Gina K Designs - Easter blessing stamp set (for part of sentiment)
Gina K Designs - ink pads - sea glass and grass green
MFT - mini cloud edges stencil
Spellbinders - standard circles large dies (for larger circles in my mechanism)
Clearly Besotted Stamps - scalloped edges die collection
Promarkers
Versafine - onyx black ink pad
green card from stash

Wednesday, 14 February 2024

2024 Crafty Kickoff IG card hop - Week 5

Hello crafty friends and Happy Valentine's Day.  Whether you celebrate or not I trust you'll have a great day.  I'm sharing my card for this week's 2024 Crafty Kickoff IG card hop, which has been organised by my lovely friend Kelly.  Each week we will share a themed card to inspire you and this week we have a great theme of 'Valentine's your way'. 
Valentine's Day means different things to different people; if you're not in a relationship it can seem that it's not a day for you but you must show yourself love and celebrate YOU.  Obviously if you're in a new relationship Valentine's is a big deal to show how much you love each other but when you've been married as long as I have it's just another day but we do give each other cards lol!.  Here is the card I made for my hubby:
a closer look at the sweet image:
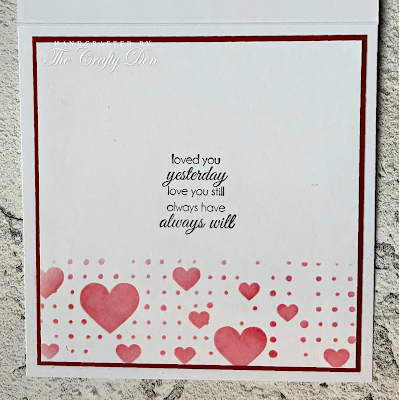
plus I decorated the inside:
I was inspired by a card I recently saw by Gina K Designs, although I wanted mine a little bigger.  I cut my card base to be 5 1/4" square and cut a red mat just a touch smaller and this was adhered with double sided tape.  I didn't have a decorate die in the correct size so took an A2 die and just partial die cut it and then extended it to make it approximately 5" square.  I used a heart stencil and some red ink to decorate this panel.  This was then added to my red mat with double sided tape.  I die cut a heart from white card and another in the size bigger from red card but I felt the red heart was too big so ended up trimming it down with scissors so that the border was smaller (it's a bit wonky but it's not too bad).  I used a sunshine stencil and light grey ink to decorate the white heart.  I stamped the cute hedgie image and coloured it with Promarkers before fussy cutting it out.  I added some white highlights to the image with a gel pen.  I added the hedgies with foam tape to the centre of my heart and stamped the sentiment, curving it slightly to match the circle in the stencil, with black ink.  The heart was added with liquid glue.  I stamped the sentiment in black ink below the heart and die cut the husband word 4 times from black card and stacked them for stability and dimension.  This was added with liquid glue below the stamped sentiment.  I added a few sequins and my card was finished.  I wish now that I'd left the bottom layer plain white as I feel it's a little busy but hubby isn't really a 'card person' so he won't mind!  For the inside I cut a white panel and a red mat and adhered them together with double sided tape.  I used the heart stencil at the bottom of the white panel and stamped a sentiment in black ink.  My finished card measures 5 1/4" wide by 6 3/4" tall including the heart.  

I would like to enter my card into the following challenges:

Aud Sentiments challenge - use dies and/or love + sentiment
Crafty Animals challenge - ATG must include an animal
Crafty Catz challenge - ATG option Valentine or with love
Creative Inspirations challenge - for someone you love/special friend
Critter Crazy challenge - ATG with a featured critter
Cut It Up challenge - have a heart
Double D challenge - heartfelt
Little Red Wagon challenge - show us some love
Stamping Sensations challenge - animals, birds and creatures
Sweet Stampin' challenge - Valentine's or Galentine's day
The Male Room challenge - Valentine/use a heart
Try It On Tuesday challenge - hearts and/or flowers

Wow there are still a lot of heart/love challenges around!  Again I did check the rules but if I've overlooked anything and broken any please delete me. 

I would love it if you would pop over to Instagram and see the amazing work by all the other crafters taking part in the hop.  Please use the hashtag #2024craftykickoffcards to find the hop and also so that we can find your creation if you are inspired to take part.  

I'll be back again with you tomorrow with a couple of cards so please pop by and check them out.  As always I appreciate the comments you leave and thank you so much for stopping by. 

Love and hugs, 

card ingredients:
Penny Black Stamps - piece of my heart stamp set
Clearly Besotted Stamps - happy days stamp set - retired
Go Create - XXL frames - heart #1
Heffy Doodle - husband die (it's retiring so on sale)
Gina K Designs - sunshine stencil
Gina K Designs - Master Layouts 4 (for scalloped die which I extended)
Gina K Designs - ink pads - red hot and soft stone
Textures by Lou Collins - heart fragments stencil
Promarkers
CC Designs - elegant Valentine (for inside sentiment) - retired
red card from stash