My Lovely Followers

Thursday, 26 December 2024

Krafty Chicks challenge #748 - All Occasions

Good morning lovely friends. I hope you all had a wonderful Christmas Day and were spoiled by Santa; maybe you were even lucky enough to have some crafty goodies.  We had a lovely time with all the family; had a gorgeous dinner cooked by my wonderful mother, and had a fun time with my sister and her family.  We raised a glass to my dad (it was the fifth Christmas without him) and reminisced about the good times.  I know not everyone is lucky enough to spend this time of year with family (or anyone for that matter) so I am sending my love and thoughts to you.  

It's time for a new challenge over at Krafty Chicks challenge and this week we are on Week 4.  The theme as always is 'all occasions' and Lori is our hostess. We don't mind what you make this week, it can be birthday, new home, baby, sympathy whatever creations you like. We hope you will come over and join in the fun with us.
It was my niece's birthday just before Christmas so I used this opportunity to make a card for her.  It was such a gloomy day when I made it that I wanted to make a bright and colourful card.  The photo's are a bit rubbish again but you get the gist.  I hope you like it.
Here is my card:
A closer look at the butterflies:
Plus I decorated the inside:
I had some spare butterflies so decorated the envelope too:
As it was a card for a family member I went for a 5" x 7" card base.  I cut my largest white panel to 4 1/2" x 6 1/2" and adhered it to a slightly larger black mat with double sided tape.  I cut the next white panel to 4" x 6" and ink blended pink, orange and yellow inks before using a swiss dots embossing folder for some texture.  I again adhered this to a slightly larger black mat with double sided tape.  I added the larger panel to my card base with double sided tape and the smaller colourful panel was added with foam tape.  I stamped 3 butterflies onto matching coloured card using black ink and also stamped 3 butterflies onto white card with black ink and used the matching die to cut them out.  Initially I wasn't sure if I was going to use the white butterflies on the front on my card but they looked a little lost against the white background so I used the coloured ones.  They were added to the card base with foam squares.  I stamped the happy birthday sentiment onto white card and die cut it out with a circle die and stamped the niece word onto white card and die cut it out with a rounded banner die.  I added both the sentiments with double sided tape.  As a finishing touch I added a sequin to each of the butterfly bodies and a few onto the background.  For the inside I stamped a sentiment with black ink onto the centre of my panel (again cut to 4 1/2" x 6 1/2") and used a tiny strip of offcut from the front panel as a landing area for one of my white butterflies.  These were added with liquid glue.  The panel was matted onto a slightly larger black panel and added to card base with double sided tape.  As I had two butterflies left over I decided to add them to my envelope for some extra interest and to tie them all together.  A bright and colourful card on a dreary day.  

I would like to enter my card into the following challenges:

Allsorts challenge - use your dies
CRAFT challenge - new/ATG (the butterfly stamps are new to me)
Fab 'n' Funky challenge - anything but square
Simon Says Stamp Wednesday challenge - use dies for Diecember 
Triple B challenge - use birds, blooms and/or butterflies

I hope you will be able to join us for our 'all occasions' challenge and I cannot wait to see your creations in our linky. Please leave some love for my fellow chicks - Leanne, Diane and Lori.

Thank you so much for stopping by; I appreciate your lovely comments.

Love and hugs,

card ingredients:
Prickly Pear - butterfly 1 & die (and matching die) - no longer available
MFT - blueprints 13 (for circle and rounded banner die) - retired
Stampin' Up! - family party clear stamp - retired
Gina K Designs - ink pads - bubblegum pink, tangerine twist, wild dandelion
Limetree Crafts - 250gsm silky smooth white card - currently oos but this is available as an alternative
Hobbycraft - A4 black card
Versafine - onyx black ink pad

Thursday, 19 December 2024

Krafty Chicks challenge #747 - CAS

Good morning lovely friends. I hope you're all doing ok and having a great week so far. It's time for a new challenge over at Krafty Chicks challenge. This week we are on Week 3 and as always the theme is 'CAS (clean and simple)' and Diane is our hostess. We want you to see all your clean and simple creations this week and even though I've made another Christmas card you are free to make whatever you like.  We hope you will come over and join in the fun with us.
Don't be fooled into thinking clean and simple is easy; this card was attempt 3!!  The trouble with stamping in darker colours is that it is very noticeable when you smudge the ink or get a finger print somewhere you don't want to.  The first attempt I managed to smudge the ink in a spot that couldn't be easily disguised and the second attempt I managed to mess up stamping my sentiment (even with the Misti) so I was having a bad day.  I eventually managed to get a good panel without any mess up's but I was starting to get frazzled lol!  Thankfully I really like the finished card; I hope you do too. 
Here is my card:
A closer look at the snowflakes:
Plus I decorated the inside:
I began by cutting my white panel 4" x 5 1/4" and choose my colours of dark blue and grey.  I used two different stamp sets and stamped the largest snowflake in the bottom left and top right corners in grey ink and added the smaller snowflakes either side of it using the blue ink.  I stamped the sentiment in the centre with black ink.  I debated adding any embellishments but liked it as it was so left it.  I have run out of foam tape (shock horror) so used some scrap white card to add some dimension to my panel before adding it to the case base with double sided tape.   For the inside I stamped the 3 snowflakes along the bottom of the panel and added a sentiment in the centre with black ink.  The panel was adhered with double sided tape.  A true SIP card this time and almost one layer.  

I would like to enter my card into the following challenges:

As You Like It challenge - anything Christmassy 
Aud Sentiments challenge - non traditional colours and/or winter + sentiment
Classic Design challenge - ATG optional theme happy holidays
Crafters Cafe challenge - ATG optional monochrome
Crafty Gals Corner challenge - ATG optional make it merry
Fab 'n' Funky challenge - anything but square
Little Red Wagon challenge - merry Christmas 
Peace On Earth Christmas challenge - Anything Christmas themed
Sweet Stampin' challenge - Christmas creations


I hope you will be able to join us for our 'CAS' challenge and I cannot wait to see your creations in our linky. Please leave some love for my fellow chicks - Leanne, Diane and Lori.

Thank you so much for stopping by; I appreciate your lovely comments.

Love and hugs,

card ingredients:
Simon Says Stamp/Gina K Designs - sparkling season stamptember set from 2022
Gina K Designs - blizzard clear stamp
Gina K Designs - ink pads - soft stone and blue denim
Limetree Crafts - 250gsm silky smooth white card - currently not available
Versafine - onyx black ink pad

Wednesday, 18 December 2024

Cards For All Seasons IG Hop - Week 3

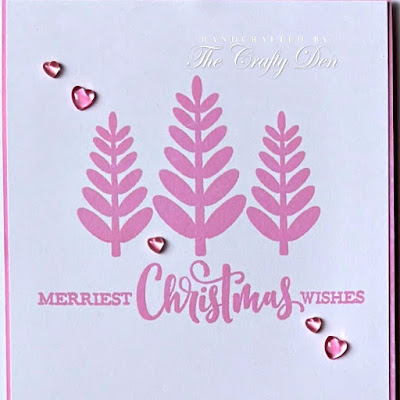
Hello friends; I hope you're having a great week so far. I'm back today to share my card for this week's Cards for All Seasons IG hop organised by my lovely friend Kelly. Week 3 is hosted by Simeen and she has chosen 'pink Christmas/winter'. A really fun theme and maybe out of the box for some but I can't wait to see what sparks your imagination.
My house is still in chaos but we are getting to the end now, although the kitchen fitter may need to come on Saturday and possibly Monday to ensure that he will finish in time for Christmas - fingers crossed everyone please!  With that in mind I went CAS so that I could make a quick card.  I was inspired by a card I saw from Stephanie at Clearly Besotted Stamps (hers was gold and very elegant) and I'm really happy with the final result.  I hope you like it too.  
Here is my card:
A closer look at the trees:
Plus I decorated the inside:
I began by cutting a white panel 4" x 5 1/4" and used the Misti to stamp my trees and the sentiment in pink ink.  I originally was going to not add a matt panel but decided I wanted a bit more pink in the background.  Unfortunately all my pink card stock were completely the wrong colour so I swiped the ink pad directly onto a second panel so that the colours would match.   That meant that I had to cut down my tree panel ever so slightly so that you could see the pink layer.  I adhered them together with double sided tape.  The panel was then added to my card base with foam tape.  I found some super cute heart crystal embellishments that were the perfect pink so added a few around the focal image.  For the inside I stamped the trees in the lower left corner and a sentiment in the centre in the same pink ink.  I created another matt layer and adhered them with double sided tape.  Again they were added to the card base with double sided tape.  A really CAS and girly card but it could easily be mass produced in a rainbow of colours and still look good.  

I would like to enter my card into the following challenges:

* to be updated * 

I hope you will pop over to Instagram and check out the hop; please use the hashtag #cardsforallseasonshop2024 to see all the gorgeous creations and also if you want to participate we will be able to find you. 

I'll be back in the morning with my card for the Krafty Chicks challenge so I hope you will pop back and check it out. Until then thank you so much for stopping by. 

Love and hugs,

card ingredients:
Clearly Besotted - deck the halls clear stamp - currently on sale!
Clearly Besotted - simply said Christmas (for inside sentiment) - retired
Gina K Designs - bubblegum pink ink pad
Limetree Crafts - 250gsm silky smooth white card - currently oos but this is available as an alternative 
Little Things From Lucy's Cards - crystal collection think pink - store now sadly closed

Saturday, 14 December 2024

Krafty Chicks challenge #746 - Christmas

* EDIT - sorry my post is so late - the kitchen fitter moved everything on Thursday morning so I couldn't get to my computer until today *

Good morning lovely friends. I hope you're all doing ok and having a great week so far. It's time for a new challenge over at Krafty Chicks challenge. This week we are on Week 2 and as always the theme is 'Christmas' and I am your hostess. We want you to see all your festive creations this week and even if you are done with your Christmas cards this year, you can always make a start on next year or even share some gift bags or tags you've made.  We hope you will come over and join in the fun with us.

In all honesty I was going to skip this week as I literally cannot get to my craft desk at the moment due to all the kitchen appliances being delivered.  My room has a fridge/freezer, tumble dryer, washing machine, oven and microwave in the middle of the room so I didn't think I could get anything done.  Who knew you could create on top of a washing machine box lol!  I did find the image already stamped, coloured and die cut so that was a big help but I got there, even if it's not 100% perfect.  I hope you like it.
Here is my card:
A close up of the cute reindeer:
Plus I decorated the inside:
As I mentioned the reindeer was left over from last year, she even had foam squares already on the back!  I cut a white panel 4" x 5 1/4" and stamped the peace, love, joy words in black ink.  I then decided to cut a red panel using a scalloped die so that meant I had to cut my white panel much smaller (3 1/2" x 4 3/4").  I coloured the words using Promarkers.  I added the white panel onto the red panel with foam tape and the reindeer was also added with foam squares.  The red panel was added to my card base with double sided tape.  As a finishing touch I added some red sequins.  For the inside I cut a white panel, stamped the reindeer in kraft ink in the left bottom corner and a sentiment in the upper centre with black ink.  I matted this with a red panel using double sided tape and it was added to the card base again with double sided tape.  A super cute card and it took very little time to make.  I wasn't sure if there was too much red but I think it makes the reindeer stand out.  

I would like to enter my card into the following challenges:

52 Christmas Card Throwdown challenge - pick a previous colour challenge (I chose April 24)
ABC Christmas Challenge - Z for zoo animals (quite a few zoos have reindeer)
As You Like It challenge - anything Christmassy 
Critter Crazy challenge - ATG with a featured critter
Cut It Up challenge - more than one die cut (I die cut my reindeer and scalloped panel)
Fab 'n' Funky challenge - Christmas animals
I Love Promarkers challenge - ATG or use the sketch (I went for ATG)
Moving Along With The Times challenge - Christmas characters 
Merry Little Christmas challenge - Anything Christmas goes
Sparkles Christmas challenge - Christmas song or carol (Rudolph the red nosed reindeer)
Simon Says Stamp Monday challenge - use dies in diecember 
Stamping Sensations challenge - ATG option winter (full list of supplies at bottom of post)
Sweet Stampin' challenge - Christmas creations 
The Cutie Pie challenge - cute Christmas 
Word Power challenge - #12 (use sentiment as the focus)

I hope you will be able to join us for our 'Christmas' challenge and I cannot wait to see your creations in our linky. Please leave some love for my fellow chicks - Leanne, Diane and Lori.

Thank you so much for stopping by; I appreciate your lovely comments.

Love and hugs,

card ingredients:
MFT - reindeer love stamp & die set - currently oos
MFT - blueprints 27 (for scalloped die) - currently oos
MFT - itty bitty holiday (for inside sentiment) - retired 
Promarkers
Gina K Designs - kraft ink pad
Limetree Crafts - 250gsm silky smooth white card - currently not available
Versafine - onyx black ink pad

Wednesday, 11 December 2024

Cards for All Seasons IG Hop - Week 2

Hello friends; I hope you're having a great week so far. I'm back today to share my card for this week's Cards for All Seasons IG hop organised by my lovely friend Kelly. Week 2 is hosted by Melissa and she has chosen 'create tags'. A really fun and useful theme and I can't wait to see what sparks your imagination.
I really enjoyed this week's challenge as I don't tend to make many tags.  Also it took my mind away from all the chaos and mess in my house currently lol!.  I used lots of different brands of dies and stamps and went all out and made a shaker tag.  My photos are not the best again this week but with everything everywhere I couldn't find a bright spot to take them.  I hope you like it.
Here is my tag:
Plus I decorated the back of the tag:
A closer look at the front:
And a closer look at the back:
I began by die cutting two tags from white card and 1 tag from red card and die cut the word merry from one of the white tags.  I die cut some holly and leaves from various colours of green card, some berries from red card and a bow from red card.  I arranged the foliage at the top of the tag and adhered them with liquid glue.  I added the bow with tiny foam squares and placed a red pearl in the centre.  I stamped a sentiment in black ink and die cut it with a sentiment strip die.  I adhered some acetate behind the merry word with liquid glue and then added thin shaker foam strips.  I sprinkled some clear sequins and then stuck this to the red tag.  I added the sentiment at the bottom of the tag with foam tape.  For the back of the tag I add two more sprigs to the bottom with liquid glue and added 3 red pearls in the centre.  I stamped a to and from word in black ink and a small sentiment above the foliage.  I then adhered the tags together with liquid glue.  I found some pretty shimmer ribbon and threaded that through my tag and also found a tiny gold bell and attached that to some red and white bakers twine.  I tied the ribbon in a knot so it could be hung from a tree or a present.  Not really a tag that could be mass produced quickly but if you took away the shaker element I think it would be fun to make multiples of.  

I would like to enter my tag into the following challenges:

AAA Colourful challenge - mood board #10
ABC Christmas challenge - Y is for your favourite colours (red, green & gold)
Allsorts challenge - it's beginning to look a lot like Christmas 
A Place to Start challenge - ATG optional twist happy holidays (any holiday)
Christmas Crafts All Year 'round challenge - bows, gifts or decorations
Christmas Kickstart challenge - if it's Christmassy, link it up
Classic Design challenge - ATG optional twist bells and baubles
Colourful Options challenge - red, green & gold (my bell is gold)
Crafty Gals Corner challenge - ATG optional twist make it merry
Inspired By challenge - inspired by gifting (I was inspired by the colours and I made a gift tag)
Jingle Belles challenge - last minute Christmas makes
Little Red Wagon challenge - action (my tag is a shaker)
Merry Little Christmas challenge - anything Christmas goes
My Time To Craft challenge - anything but a card
Peace on Earth Christmas challenge - anything Christmas themed optional inspiration board
Simon Says Stamp Monday challenge - use dies in diecember
The Four Seasons challenge - anything goes winter optional inspiration board
Word Power challenge - challenge #12 (make the sentiment the focus)

I hope you will pop over to Instagram and check out the hop; please use the hashtag #cardsforallseasonshop2024 to see all the gorgeous creations and also if you want to participate we will be able to find you.

I'll be back in the morning with my card for the Krafty Chicks challenge so I hope you will pop back and check it out. Until then thank you so much for stopping by.

Love and hugs,

 
tag ingredients:
Creative Dies Plus - wonky stitches nesting tags - not available
MFT - stacked merry die - oos
MFT - winter wreath die (for bow) - retired
MFT - itty bitty holiday clear stamp - retired 
Spellbinders - stocking full of joy die set (for holly & berries) - retired 
Spellbinder - seasonal cupcake toppers die set (for leafy sprigs) - retired
Gina K Designs - sentiment strips dies
Gina K Designs - sketched wreath builder (for to & from)
Gina K Designs - Christmas Cheer clear stamp (for small sentiment on back)
Limetree Crafts - 250gsm silky smooth white card - currently not available 
red card from stash
ribbon and bell from stash
clear sequins from Little Things from Lucy's Cards - store now closed

Thursday, 5 December 2024

Krafty Chicks challenge #745 - Stamps

Good morning lovely friends. I hope you're all doing ok and having a great week so far. It's time for a new challenge over at Krafty Chicks challenge. This week we are back to Week 1 and as always the theme is 'Stamps' and Leanne is our hostess. We want you to use your clear, wooden or even digital stamps this week.  We hope you will come over and join in the fun with us.
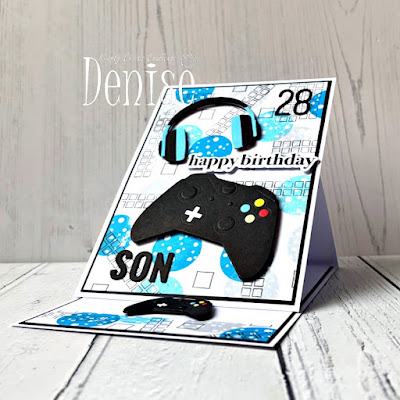
It was my son's birthday last week (I can't believe my baby is now 28 lol!) so this challenge was just perfect timing.  I know the card is very similar to the one I made my niece but I stepped it up a little as it was for my little boy.  I hope you like it.
Here is my card:
Here is a full view of the front:
A closer look at the dies:
Plus I decorated the inside:
I decided to make a 5" x 7" easel card.  I cut one piece of white card 5" x 7" and scored it in half and one piece white card 5" x 8" and scored it at 1".  I then glued them together to make my card base.  I also cut an extra 5" x 7" piece to attach to the front of the half panel to create the easel part of the card.  I hope you understand my ramblings.  I then cut a white panel 4 3/4" x 6 3/4" and using some geometric background stamps randomly stamped them all over (I did first and second generation stamping so that I would have a light and dark version of the blue colour ink).  I cut a black mat slightly larger than the panel and adhered them together with double sided tape.  I die cut the headphones and games controller, mostly using card from my scraps bin, and added them together with liquid glue.  They were added to the card with foam squares.  I die cut the word SON from black card 4 times and adhered them together with liquid glue.  I also die cut the number 28 4 times and again used liquid glue to stack them together.  They were both added to the panel with liquid glue.  I stamped the sentiment in black ink and used the matching die to cut it out.  I added it to the panel with foam squares.  As the background was quite busy I didn't feel the need to add any further embellishments.  For the inside I cut another white panel 4 3/4" x 6 3/4" and masked the bottom so that I could stamp a border to match the outside panel.  I also die cut the smaller games controller and added that above the border with foam squares (this also acts as the stopper that holds the easel card open).  I stamped the sentiment in the upper centre in black ink.  I cut another black mat and adhered them together with double sided tape.  The panel was then added to my card base with double sided tape.  I love the funky stamped background and it would look cool in lots of colours I think.  Thankfully my son loved his card.  

I would like to enter my card into the following challenges:

Creative Creases challenge - ATG with a fun fold
Seize the Birthday challenge - ATG birthday optional topping: masculine
Sweet Stampin' challenge - it's our birthday

I hope you will be able to join us for our 'Stamps' challenge and I cannot wait to see your creations in our linky.  Please leave some love for my fellow chicks - LeanneDiane and Lori.  

Thank you so much for stopping by; I appreciate your lovely comments. 

Love and hugs, 

card ingredients:
MFT - little letters die set - retired
Honey Bee Stamps - inside: birthday sentiments
Gina K Designs - ink pads - slate, soft stone, blue raspberry
Versafine - onyx black ink pad
Limetree Crafts - 250gsm silky smooth white card - currently not available
Hobbycraft - A4 black card